Don't like the adverts?  Click here to remove them

Hedgehog - LC100 build thread

Sorted the "step n tow" bracket to go on the tow ball. Might chamfer off the external corners with 45 degree cuts but the bracket works nicely and takes my weight. Not bad for £12 and a bit of elbow grease.
 

Attachments

  • IMG_1094 low res.jpg
    IMG_1094 low res.jpg
    248.9 KB · Views: 462
  • IMG_1093 low res.jpg
    IMG_1093 low res.jpg
    311.5 KB · Views: 466
  • IMG_1092 low res.jpg
    IMG_1092 low res.jpg
    290.2 KB · Views: 452
Nice work there,

but mind your shins! :lol:

Yes that does worry me a little but at least when the tailgate is down it sticks out just right. Not sure whether to free issue shin-pads or wellies to the SWIMBO when she is cooking :icon-biggrin:
 
Looks good, I would recommend having it powder coated a colour or sprayed a colour as the glare on a hot summers day is going to be unbearable and you only going to have to sit on it once having left it in the sun for 5min to know you will not do that again as it will get bloody hot.


Finished profiling my shiny :icon-biggrin: stainless steel kitchen surface for the tail gate. Been thinking about Warren's concerns too. So shiny things reflect heat energy better than painted/dark things. Also for glare to be a problem then the sun would have to be in the car so to speak and reflecting out. If the stainless gets any hotter than black leather seats in a sunny car window, which we sit on regularly, then I will put something over it to sit on (actually use the camp chairs :icon-biggrin:). For overhead sun the 80% tinted rear window will take the intensity off too. I'll suck it and see in practice whether we have a problem when we go to south of France in a couple of months time.

You'll notice that I don't plan to bolt the sheet to the car surface - I'm going to experiment with using silicone sealant to hold it in place. I want to be able to stop food getting caught in screw heads if I can. Id the silicone doesn't work I'll default to some sheet metal countersunk screws

Anyway thanks Warren - fore warned is fore-armed as they say - I'll post pictures of the burns on the back of the legs later :lol:
 

Attachments

  • IMG_1096 low res.jpg
    IMG_1096 low res.jpg
    253.2 KB · Views: 443
Yes that does worry me a little but at least when the tailgate is down it sticks out just right. Not sure whether to free issue shin-pads or wellies to the SWIMBO when she is cooking :icon-biggrin:

Actually - probably best to free issue more wine........will help numb the pain
 
When i made my tail gate cover out of aluminium i had a shock with the reflection.its totaly blinding dont even chance going to france with it. I did one trip to the beach and covered in rubber.
Stu
 
Don't like the adverts?  Click here to remove them
When i made my tail gate cover out of aluminium i had a shock with the reflection.its totaly blinding dont even chance going to france with it. I did one trip to the beach and covered in rubber.
Stu


Thanks Stu - we've used a natural stainless camp table for years (integrated with Hannibal rack) without problems. Can always improvise like you if it does become a problem. Will take photos of us wearing welder's masks :cool::cool:
 
Try Tech7? (cannot for the life of me remember how to spell it and I've used plenty!!) to stick it, its pretty impressive stuff. Only thing I would advise is lightly sanding the reverse surface and cleaning to remove any residues before trying to stick.

http://www.contec7.co.uk/faqs.htm

there is a link!

Thanks Yogi - looks like good stuff
 
Tec 7 is wonderful stuff, I use it on anything that needs to be stuck or sealed, dearer than ordinary silicon but so so much better.
 
The finished positions for the step and work surface. The step location is spot on for use as a step but we'll have to see if we bang our legs in everyday use when cooking. Our trip to the south of france will determine if there is any fettling required. Choices include sliding it further back in the hitch when not in use, removing the hitch all together or just putting a bit of shin protection on the corners - or of course do nothing.

The work surface location needs to be accurate so that it doesn't impinge on the rubber door sealing strip. The sprung plastic flap will need a felt pad to stop it rattling when in the closed position (I'm a bit OCD when it comes to rattles)
 

Attachments

  • IMG_1119 low res.jpg
    IMG_1119 low res.jpg
    311.8 KB · Views: 424
  • IMG_1121 low res.jpg
    IMG_1121 low res.jpg
    260.2 KB · Views: 420
With the kitchen work surface now sorted I'm moving on to the start of improving the lighting around the camp. First up is to illuminate the kitchen area. I'm going to use these low power capacitive switched (finger touch the metal pad) LED lamps as down-lighters mounted to the upper tailgate surround - quite a few LC owners have done this and it illuminates the work area well. I'm going to wire them into the upper tailgate open microswitch (switched ground) and the 12V to the rear dome light feed. This will mean that he LEDs cannot be inadvertently be left on and that they can be on only when the tailgate is open. This will mean I need to run the juice across the headlining and down the umbilical into the upper tailgate and the LED ground will need to be spliced into the microswitch NO terminal. Removing the upper tailgate trim is straightforward (lever the studs and unscrew the handle and surround on the internal latch assy) and gives access to the microswitch wiring. The tricky part is putting the 12V feed across the headlining.......I think I'll use an electrician's steel tape to push/pull the wire through without pulling the headlining out
 

Attachments

  • IMG_1124 low res.jpg
    IMG_1124 low res.jpg
    244.6 KB · Views: 409
  • IMG_1123 low res.jpg
    IMG_1123 low res.jpg
    177.3 KB · Views: 401
Nice lights, I think they are the same as the ones Chris has in the back of his 80. I am very keen to follow suit and wanted to ask where you sourced them from? I can find them for £25 each!!! but that is the cheapest i can find at the moment.
 
They are a great light, had the on my truck for a few years now.
 
I got a cabin light unit with an 48 LED panel instead of the normal light bulb and fitted it in the upper tailgate connected to the tailgate switch so only switched live when tailgate is open, and can be controlled by the three way switch, lights up the rear lovely.


Tailgate light.jpg
 
I'm planning a much shorter and easier trip through Mexico and Central America in an 04 Land Cruiser with way more miles. I just received an ARB roof rack. Does anyone know of a storage box that can lock to the rack in contrast to using cables? Also, I was going to buy a VersaHaul hitch rack for hauling a dirt bike. I'm thinking better suspension is in order. Any suggestions? Thanks in advance.
 
Nice lights, I think they are the same as the ones Chris has in the back of his 80. I am very keen to follow suit and wanted to ask where you sourced them from? I can find them for £25 each!!! but that is the cheapest i can find at the moment.

I got them from MUD UK along with a bunch of other bits. They were a few pounds more from memory.
 
I'm planning a much shorter and easier trip through Mexico and Central America in an 04 Land Cruiser with way more miles. I just received an ARB roof rack. Does anyone know of a storage box that can lock to the rack in contrast to using cables? Also, I was going to buy a VersaHaul hitch rack for hauling a dirt bike. I'm thinking better suspension is in order. Any suggestions? Thanks in advance.

Take a look at EFS springs
 
I got a cabin light unit with an 48 LED panel instead of the normal light bulb and fitted it in the upper tailgate connected to the tailgate switch so only switched live when tailgate is open, and can be controlled by the three way switch, lights up the rear lovely.


View attachment 13890

Chas - I have planned two units at either side of the tailgate so that you don't create a full shadow if you block one with your head....also throws less strong shadows. Nice idea though to use a standard dome light with LED bulb
 
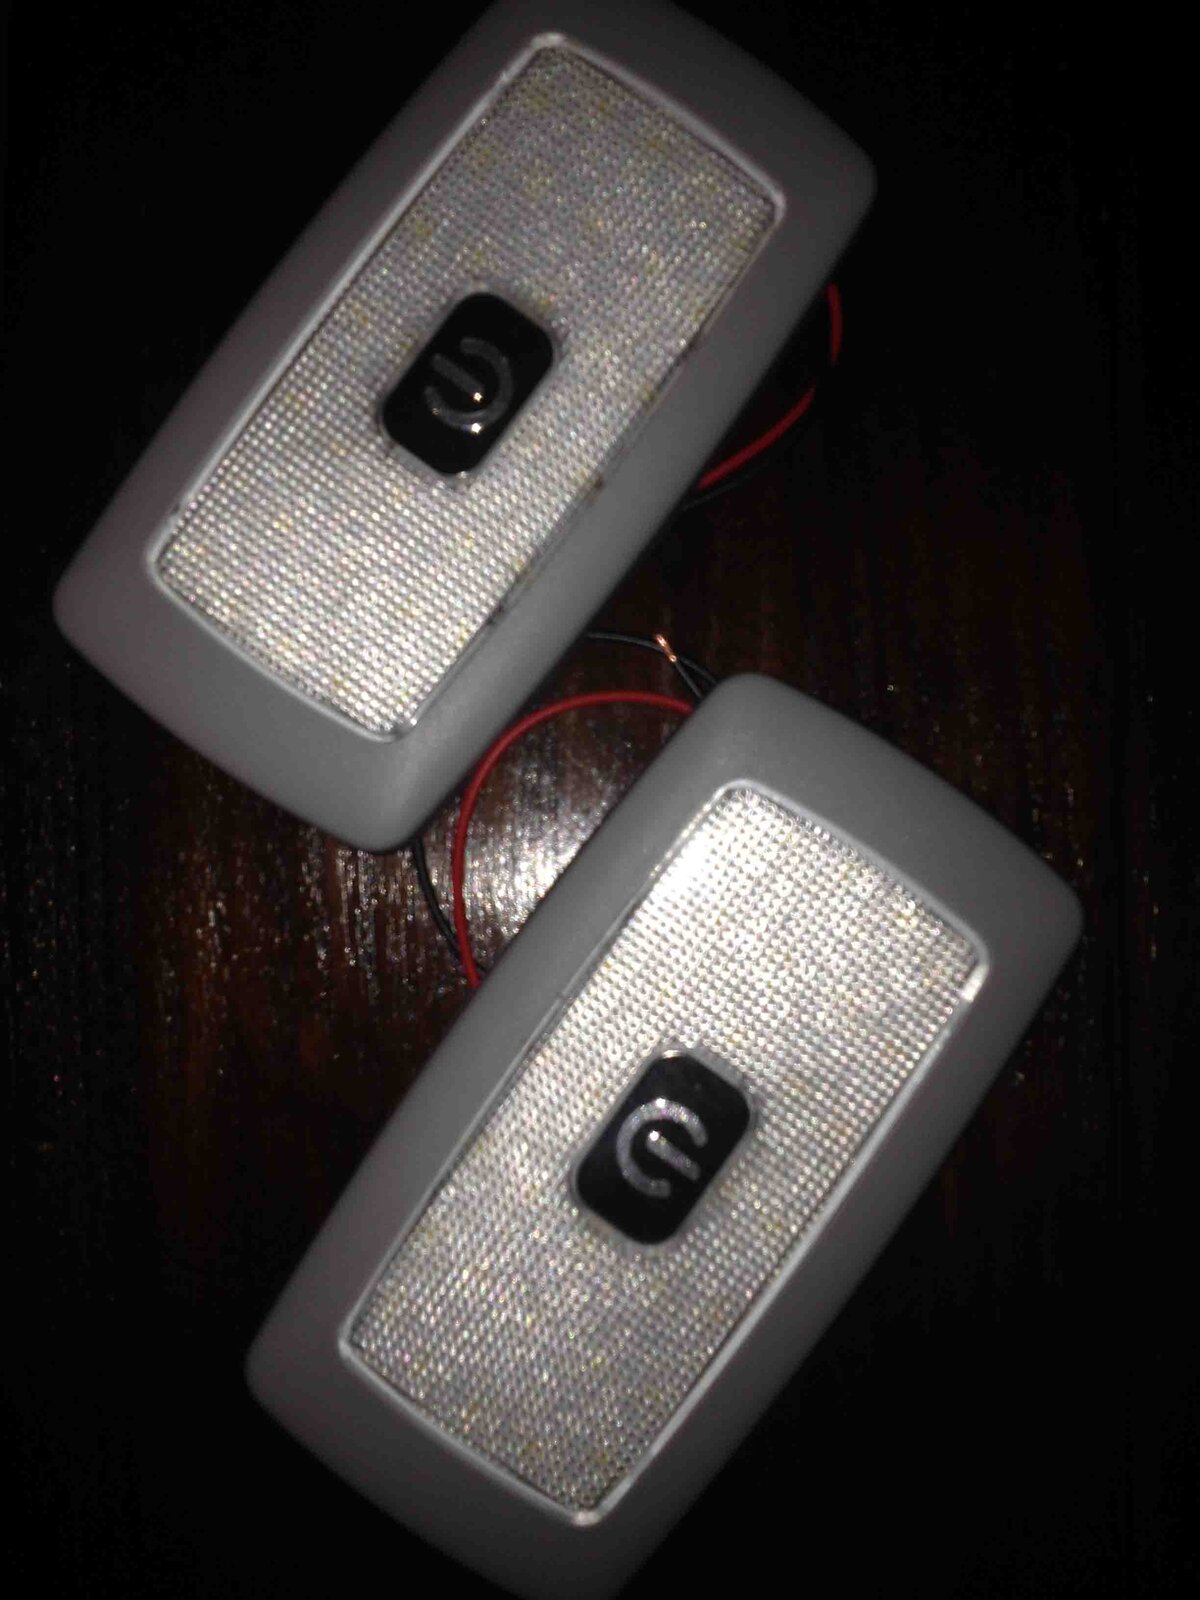
Holes drilled and lights stuck in place with "No More Nails" double sided FOAM backed tape. No onto the wiring loom. I've been having a think about this and I plan to run a +12v/0v pair to the Dome light, even though at this stage I do not plan to take the earth from there having a spare wire up to that point could be useful if later the lights don't work as desired off the switched 0v on the tailgate switch. So a pair (I'm using a lightweight 0.5mm plastic sheathed main cable) is to be run from the dome light, over the roof lining, down the umbilical and into the upper tailgate and to one of the lamps. From there I will run individual cores and spiral tape them to the existing harness across to the other light, and from there extend only the 0v wire to the door closed switch on the tailgate to provide the switched ground. Each LED is 1.8W (3.6W total) so with the extra 3.6W/50% added to the traditional bulb load of 8W there is a risk of stressing the circuit (the electronics ramp up the volts to the light). To counteract that I will either see if a 5W bulb or a LED replacement for the 8W OE bulb can be fitted - this should keep the load close to the original 8W design.
 

Attachments

  • IMG_1128 low res.jpg
    IMG_1128 low res.jpg
    799.5 KB · Views: 374
Last edited:
Back
Top