Don't like the adverts?  Click here to remove them

LJ70 Build Thread!

Thats the lane Paul. :thumbup:

I remember the guys showing me it on the OS map and saying that its not marked on this map, but that theyve checked it on the definitive map and that its legal to drive.

Was a great lane, just wish I'd had mine with the 37"s and air lockers! :icon-twisted:
 
Managed to get some more done today! :dance:

First I put some tarps down.

P1010706_zps55d5d553.jpg


P1010707_zps2fbca008.jpg


Out with the dinitrol.

P1010708_zpsaf9004f6.jpg


Masked the panels.

P1010709_zps37682cd4.jpg


P1010710_zps841bbc74.jpg


Didnt want any dinitrol on my brakes or balls, so used a bag to cover them.

P1010711_zps46d9aad0.jpg


First job was to spray any rust with rust killer.

Then 4 cans later.

P1010712_zps02cfa29b.jpg


And this was the result.

P1010713_zpsdc355745.jpg


Decided to dinitrol the rusty Ironman springs and shocks. Really not impressed with Ironman suspension. :thumbdown:

I guess its the cheapest suspension for a reason. :icon-rolleyes:

Anyway will be changing it ASAP, so figured I might as well coat it and cover the rust up. :icon-cool:

P1010714_zpse0978006.jpg


P1010715_zps16b058dc.jpg


P1010716_zps2cf60c11.jpg


P1010717_zps7ace98ab.jpg


P1010718_zpsa4cbd5b4.jpg


P1010719_zpsd15ec7f9.jpg


P1010720_zps5b7ca7bf.jpg


P1010721_zps968de752.jpg


P1010723_zps3d4002fe.jpg


Just hope customs like it and dont decide my truck is still too dirty. :pray:

Interior next.

P1010724_zpsa19ac689.jpg


Needed to fit the side door/rear quarter panel cards.

P1010725_zps5caade5a.jpg


So needed to remove the drawer system.

P1010726_zps1893b4f5.jpg


The truck was upside down for a good 30mins with 60-70KG of gear in the drawers, so no surprises the mounts took a hammering. :doh:

P1010727_zpsb64506d7.jpg


P1010728_zpsc6eb9d6a.jpg


When I pulled one of the sunroof drain hoses off the side vents it snapped the bit the hose pushes onto off the vent. :doh:

Luckily I got another one from Johny off the donor KZJ70. :icon-cool:

P1010729_zps0e43a5c3.jpg


This is the snapped one.

P1010730_zpsfaa74295.jpg


All fitted.

P1010731_zps28d609e2.jpg


P1010732_zps9a15d358.jpg


P1010733_zpsf516b7c9.jpg


One thing I've not mentioned before is I did something a few weeks before I rolled the truck, which in hindsight was a stupid idea. :oops:

Not wanting my truck to rot, I sprayed a load of used engine oil inside the rear arches and poured a litre or two inside the sills and rear quarters. :shifty:

All was well until the truck ended up, upside down. No clues for guessing what happened. :lol:

Bloody oil went everywhere! :doh:

Anyway back to re-building the interior.........................

Door cards were oil stained.

P1010734_zpsc252e940.jpg


P1010735_zps0a9b21bc.jpg


I plan on changing the cards for aluminium but havnt got time right now, so I cleaned the old ones with a rag soaked in petrol.

P1010737_zpsa50150f3.jpg


P1010738_zps66a56f32.jpg


Lots of oil to clean off.

P1010739_zpsd801b8c9.jpg


Other side.

P1010740_zpsb5acb845.jpg


P1010741_zps56752c81.jpg


Next job was to clean and straighten the drawer system frame.

P1010742_zps51c2357e.jpg


P1010743_zps53a2eb36.jpg


Straightened, bolted back together and bolted back in the truck.

P1010744_zps38a43c6f.jpg


As it was dry I got the tarp down and packed up ready for Lincomb tomorrow. :icon-cool:

Not sure if it will rain or not, but cant have people sat round the roaring campfire in the rain! :eusa-naughty:

P1010745_zps748a9624.jpg


Loving the shiny black underside.

P1010746_zps67b9dee9.jpg


Drawers back in.

P1010748_zpsc967ed04.jpg


Broke 2 of the catches recently. :doh:

Will be changing them for something a bit stronger soon.

P1010749_zps3dd3ccd4.jpg


Re-fitted the ply on top of the drawers. Its got quite dirty what with the oil and muddy strops and boots etc being thrown in the back. This is why I dont have carpet, would be filthy in no time.

P1010751_zpsd94944d6.jpg


P1010752_zps56ae4be4.jpg


Knowing that the custom/quarantine inspectors probably wouldnt like it, I bought some industrial rubber floor matting to cover the ply.

This should be a lot better as I can simply wipe it clean when it gets muddy. Its worth remembering that my truck is first and foremost a toy, so mud is inevitable! :icon-twisted:

P1010753_zpse745d717.jpg


P1010754_zpsff25ba92.jpg


I'm hoping the aluminium angle that will be screwed down front and back will be enough to clamp it in place.

P1010755_zpsa80a4aa1.jpg


P1010757_zps3d72e2d5.jpg


Still need trimming to size, but was starting to get dark by this point.

P1010758_zps643b7305.jpg


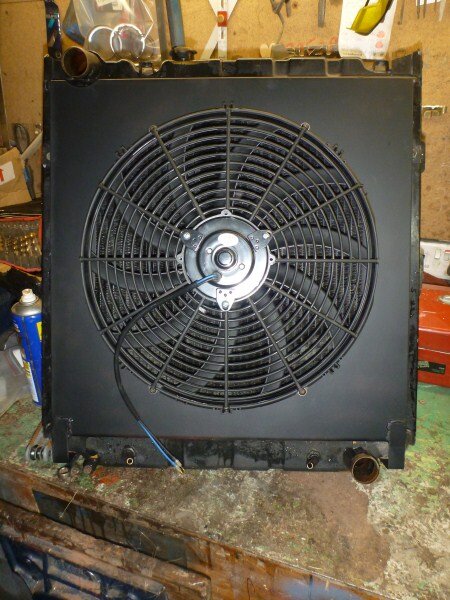
New 16" electric fan turned up today. :dance:

These have apparently been tested and will run under water. :icon-twisted:

P1010759_zpsf95e8c1a.jpg


P1010760_zpsb8703827.jpg


Positioned it on the new rad cowl.

P1010761_zpsc2b1f0f2.jpg


Marked around it and then drew another line 12mm further in.

P1010763_zpsc8b6e1bd.jpg


After finding which box the jigsaw had been packed into (bottom one, bloody would be wouldnt it, so had to move 6 other boxes to get to it. :lol:) I got the drill out.

P1010764_zps6ad847c1.jpg


Hole cut out.

P1010765_zps9bd5ffa9.jpg


P1010766_zps428f2b82.jpg


Marked where the mounting holes needed drilling.

P1010767_zpsfe90f1ba.jpg


Found some bolts.

P1010768_zps9d6f2133.jpg


Holes drilled and fan bolted in place.

P1010769_zps1cae16c3.jpg


P1010770_zpsd4a8cefb.jpg


P1010771_zps7f5b294e.jpg


P1010772_zps3c97fba0.jpg


P1010773_zpsc32778cc.jpg


P1010774_zpsc74a2176.jpg


P1010775_zps5b306922.jpg


P1010776_zps1f123723.jpg


Unbolted everything and then gave all the welds a quick smooth over with a flap wheel disc.

P1010777_zpsdce828a7.jpg


Coat of primer.

P1010778_zpsa761cd28.jpg


So quite a successful day so far. :icon-biggrin:

Still lots to do before shes ready for export though. :think:

Just come in for dinner and beer, going to go back out now and give the rad cowl a spray of top coat. :icon-cool:
 
Hey Ben,

That is a puller fan isn't it? I can't work out in my head at the moment if it is or not...

Also will it cool everything enough in 45* heat at 25mph? ie if you were out on a trail somewhere working it hard, will it be enough with the shroud?
 
It will pull or push, you just connect the wires the opposite way round on the motor to switch direction. :icon-wink:

Dont know, guess we will find out. :lol:

Luckily I run an aftermarket temp gauge, so its unlikely I will cook the engine as its not like I'm relying on the grossly inaccurate standard gauge to tell me how hot the engine is. :icon-biggrin:

I'm of the opinion that having the cowl will make the fan/rad cooling more efficient as the air is being pulled straight through the rad, as opposed to no shroud and some air being pulled from the hot engine bay through the fan. :think:

If it doesn't work I will do something else. :thumbup:
 
Our FJ73 had a bit of a shroud on the back, but not to the same extent.

I got fed up of our temp gauge after 3 senders, 2 thermostats and still not getting it to match the 3F's temp gauge in the work Troopy!
 
Last edited:
Good call on that Fan, these engines work there best when they are cooled! I'm guessing you will remove the viscous fan as there wont be enough space?

Also where did you get it from? Best of luck on your move to Australia as well, I hope you keep this thread posted, it's pretty much the heart of this forum!
 
Don't like the adverts?  Click here to remove them
Hi Ben,

The fan shroud,,,, won't it also restrict the natural flow of air?

Gra.
 
Good call on that Fan, these engines work there best when they are cooled! I'm guessing you will remove the viscous fan as there wont be enough space?

Also where did you get it from? Best of luck on your move to Australia as well, I hope you keep this thread posted, it's pretty much the heart of this forum!

Thanks Beau. :icon-smile:

I removed the viscous fan a while ago because it didnt line up with any of the cowl's id got. Also the engine is angled very slightly back, which meant the viscous fan looked tilted to the radiator. :think:

I looked into getting a decent fan from a reputable manufacturer and was keen to stay away from cheaper ebay ones.

But when I looked into it I was looking at £142 + delivery. :shock:

As opposed to just over £30 for an unbranded one, and reading the description it didnt seem bad. So decided to get the cheaper one and see how it goes. :think:

This is the one I got:-

http://www.ebay.co.uk/itm/380509651566?ssPageName=STRK:MEWNX:IT&_trksid=p3984.m1439.l2649

Thanks for the kind words regarding this thread. :icon-biggrin:

Will most certainly be keeping it going. :dance:

+Should also be lots trip reports. :icon-cool:

Hi Ben,

The fan shroud,,,, won't it also restrict the natural flow of air?

Gra.

Not sure to be honest Gra. :?

Guess we will find out. :icon-wink:
 
Also, forgot to ask, have you wired up the fan so it works at certain temperatures, working with some sort of thermostat?
 
Hi Ben,

Wiring up the fan suggest like this.

I guess you will connect it through a thermo-switch, with a manual over-ride?
With two lights, a green and a red, some where where they can't be missed.
Requires a 2 way relay.

1/ Voltage from switched side of ignition.
To the thermo-switch holds open a 2 way relay, (fail-safe). And to the fan for power.
So if the thermo-switch fails to work, ie, fails to send a signal to the relay, then the relay will remain de-energised, causing the fan to run.
A voltage from the thermo-switch to the relay, will open the rely, and prevent the fan from running.

By using the relay, you can also have both the red and green indicator lights.

Manual over-ride.
2/ A fused direct feed from the battery to a manual switch on the dash, powering the fan, as and when you feel required.

Gra.
 
When the Volvo boys switch to an e-fan, they tend to rob a T piece out of a SAAB and then fit into outflow rad hose (from memory)

The T piece has a common thread for a temp switch (M10 or so) and it's then just a case of getting hold of the parts catalogue and working out what temp range works, then finding a temp switch to suit.

I've got a feeling it's left on a live circuit so that it cools the block down a bit more after running in hot weather when turned off, much like a modern car does.

Disclaimer:
This is all from memory, and the details are hazy!
 
Saturday morning I did a bit more. :icon-cool:

Rad cowl painted matt black.

P1010779_zpsccaf097a.jpg


Mounted the fan.

P1010780_zps7d769318.jpg


P1010783_zps51957758.jpg


P1010784_zpsb812d507.jpg


The rad has got an oil cooler built into the bottom so it can be used on auto's.

P1010785_zpsc9add568.jpg


Dont want it getting full of mud, so put a hose on to blank them off. I would have fitted jubilee clips on the hose but they've already been packed.

P1010786_zps06661f27.jpg


P1010787_zpsf34c22d6.jpg


Out to the truck.

P1010789_zpseb22ad8f.jpg


Hadnt fitted the rad before so was relieved that it fitted.

P1010791_zps645ef779.jpg


P1010792_zps6cbc8a83.jpg


P1010793_zps83fe2c76.jpg


Wired the fan up and luckily got the wires the right way round first time. Tested it was pulling and not pushing by holding a piece of paper in front of the rad and watched it get sucked to the front of rad. :icon-cool:

P1010794_zpsc1f8c995.jpg


Cable tied the wires along the fan. Need to come up with some way of connecting the wires. I dont want to solder and heat shrink the join encase I need to take the fan/rad off again. Need some sort of waterproof connector. :think:

P1010795_zps947694b1.jpg


Got all the rad hoses connected.

P1010797_zps6b769759.jpg


P1010798_zpsdc3deae3.jpg


Stuck 5 litres of anti freeze in.

P1010799_zpsbf27ed41.jpg


Keep finding Lincomb sand. :icon-mad

P1010800_zps1e3a060d.jpg


P1010802_zps855524bd.jpg


P1010801_zpse1a1ce15.jpg


Been offered some work this week with very good pay. :icon-biggrin:
So doubt I will get much done on the truck over the next week, so despite the hangover decided to do some tonight.

P1010820_zpsb672c480.jpg


Wanted to straighten the bent recovery point.

P1010821_zps7ba5581d.jpg


I hoped I could straighten it in the vice with a 3ft crowbar.

P1010822_zps5c889355.jpg


P1010823_zps5ef8fc9c.jpg


Couldnt do it. :thumbdown:

So decided to hammer it with a sledge hammer.

P1010824_zps418e5744.jpg


Still couldnt do it. :doh:

P1010825_zps52dc8d14.jpg


Going to get some 15-20mm thick angle and make some new stronger ones. :icon-twisted:

Winch tray and steering guard re-fitting next.

P1010826_zps44740416.jpg


P1010827_zps51438eb8.jpg


P1010828_zps13f8e599.jpg


Bumper next.

P1010830_zps9e7c6425.jpg


P1010831_zps7f4b71fc.jpg
 

Attachments

  • P1010779_zpsccaf097a.jpg
    P1010779_zpsccaf097a.jpg
    69.6 KB · Views: 46
why not go for this style of recovery point?
it's a 15mm thick piece mounted through the face of the winch plate (8mm) and welded front and back

170920121965.jpg

170920121966.jpg
 
Good idea, I hadn't thought of that. :clap:

Thanks. :thumbup:
 
Ben thats the same rad and looks to be the same fan as I have fitted. I didnt bother fitting a light to show if it was on because its a crazy powerful fan, you know when its on you can hear it! Mine will hold a piece of newspaper on the front grille when its running. It never stays on for longer than about 2mins even in the hottest weather (not that we get much).
 
That sounds good Dave. :thumbup:

I'm hoping the spotlights, intercooler and new rad cowl wont restrict airflow too much. :pray:

Going to be a few months till we know. :icon-cool:
 
The redundant oil cooler circuit,,,,,

Or possibly use it for Auxiliary hot water for a shower ?
coolant.jpg

Gra.
 
Hi Ben. I want you to ask about the tyres 37´´ that you have, because are heavy, do you have often ring pinion failure. I have a LJ72 with a 35x14,5R15 Νιττο MUD GRABBER and i have ring pinion failure; I broke three 4 sets.
 
The redundant oil cooler circuit,,,,,

Or possibly use it for Auxiliary hot water for a shower ?
View attachment 5292

Gra.

How would it work as a shower Gra? :think:

Hi Ben. I want you to ask about the tyres 37´´ that you have, because are heavy, do you have often ring pinion failure. I have a LJ72 with a 35x14,5R15 Νιττο MUD GRABBER and i have ring pinion failure; I broke three 4 sets.

Hi George,

Well I've found cracks in some of the ring gears and that was before fitting the 37"s.

The last failure which was the front was down to the front air locker being fitted incorrectly. :doh:

The pinion should have been ground slightly to prevent it catching on the ARB centre, this wasnt done and over the next few thousand miles the pinion ground quite a lot of metal off the ARB centre. The sludgy swarf filled diff oil was what I suspect caused the damage. :think:

The back one I ground and so far it seems fine.

I will grind the front when I get the air locker re-fitted. :icon-cool:

If I have any more breakages I will replace everything for stronger after market parts.

Some of the trailgear bits look good.

http://www.trail-gear.com/

Id like to turn the truck into a challenge truck one day and start doing competitions. :icon-twisted:
 
YYY
Back
Top