- Joined
- Oct 13, 2010
- Messages
- 6,058
- Country Flag

Frankenzuke back from the paint shop & MSA fridge slide install.
So Monday morning we went and picked Frankenzuke up from the paint shop.


It wont fit on the trailer with the 37" Treps on so had to have the 34"s on.

First job was to re-fit the roof rack.

The next job was fitting the snorkel that Safari kindly donated.


Flares next.

The widest we could get.


Got the 37" Treps down ready to go back on.


Front next.

The high tensile sprung wire that we've got for flares would help make them curvier.


Had to add some metal behind the back ones to fill in the gap.

The front ones were left long until I've finished designing and building the front bar.


Parked up next to my bosses old comp truck, which looks tiny in comparison, but is actually quite high compared to a standard one.

Today I did a bit more on the flares.


Started to look at the front bar that I need to design and build and we discovered that the outside of a Jimny's chassi rails is almost identical to the inside width of a Vitara's, meaning we could modify a Vitara one to fit.


The Hi-Lux Trail Gear bits I imported from the US for LJ and then discovered they wouldnt fit were sold to my boss and have now been fitted on the front of Frankenzuke.

I still love the duel cab 70's! We had another one in this week.


OK..................
Back to LJ!
I needed to bolt everything in place including the new MSA drop down fridge slide, But any bolts/nuts sticking through would interfere with my waffle board storage.

The solution.................
Bolts exactly the right length so as not to protrude through the ply, and some nuts to hammer into the underside of the ply.

I wanted some more Toyota bolt on tie down points like this as I could only find 2.

But the wreckers yard only had 1 from a 70 series, they had a few 80 series ones but I didnt like the look of them so I asked to look at the Patrol ones and left with 4 of those instead.

Not too bad once removed from the plastic surrounds.

The first job was to bolt the handle onto the fridge slide.


In position.


I wasnt impressed with the quality of the product as the paint was chipped, missing and scratched in places.


One of the lines of mounting holes fell above the 2" x 2" so I would be able to use some big wood screws along that line.

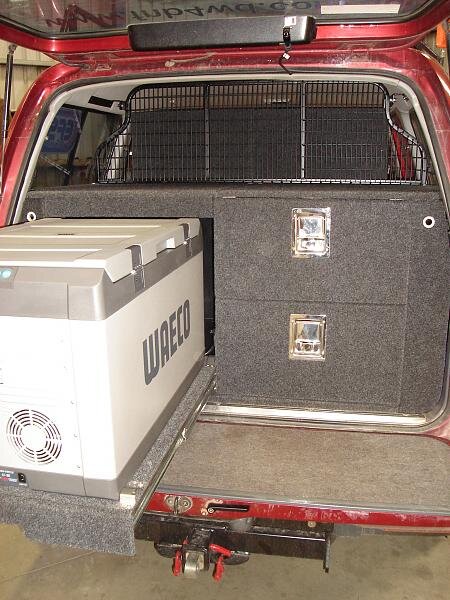
Got the fridge in place to check I'd allowed enough room.


Happy with the position I slid it forwards a bit so I could get a screw in one of the very back mounting holes to hold it down while I drilled through all the other mounting holes, through the ply below.


I also needed to drill down for the tie down points.

Positioned them where I thought best.


With all the holes drilled I could unscrew the angle alluminium trims.

I could then remove the rubber mat.

Followed by the ply.

Holes drilled to correct sizes and I was ready to hammer in the nuts.


One done.

And the other.

Screwed the ply back down.

2 sizes of bolts. Smaller M6 stainless ones for the fridge slide and bigger zinc coated M8 ones for the tie down points. (They didnt have any stainless M8's left)

Could fit the fridge slide next.

Wood screws down one edge.

Stainless bolts everywhere else.

Tie down points next.


I got some straps from work which are normally used with the fridge slides we make and sell.

The idea was to use them to help secure the water cans.


Decided I dont like that idea as its too awkward and fiddly to do with them in place in the back of the truck. So I'm now thinking I should go back to the original idea of making one out of aluminum and then come up with a more sophisticated latch mechanism.
Anyway back to the fridge slide.
Now what the instructions said next is wrong as it would make the next step very difficult! But I followed them as I didn't realize at the time.

Un-screwed the feet on my fridge.

Positioned them on the fridge slide.

Lifted the fridge back into place on top of the feet and used the longer bolts in the kit to screw through the fridge slide, feet and back into the fridge.


The next step would prove to be a hell of a lot easier had the fridge not been bolted in place.
Bolting the side bits on that the handle locks into.

As the fridge was in position on the slide it wasnt possible to hold the brackets in place and do the bolts up. So I had to guess where they needed to be, drop the fridge down, do the bolts up, lift the fridge back up and check, no still not right, drop the fridge back down and adjust them and so on.
The thing that I've spotted which has pissed me off the most is the fact theres 2 bolts sticking out which scrape there way down the side of the transit bag every time you lower/lift the fridge. Its only a matter of time till these wear through and ruin the bag.
I will have to get some countersunk headed bolts and remove the existing bolts, drill the metal with a countersink bit and then fit the new bolts, but frankly I shouldnt have to for the cost of the dam thing!


It said in the instructions that it will work best with some weight in the fridge.


Next I needed to bolt on the tie down points at the front of the fridge.


Rear straps on.

The instructions advice you to keep the fridge slide locker when driving and they give you keys on a little key strap.

I've tucked the keys in front fo the fridge where they will probably rattle and annoy the hell out of me.

The instructions are very vagueabout how to run the wires for the fridge power. They mention cable tieing it to the runners of the fridge slide, and had they added a few strateigly placed holes then this would have been fine, but they havent.
I found its impossible to run the wires neatly, and so they have enough slack for when it slides out and drops down.


OK so as you can probably tell I'm not overly impressed with the MSA fridge slide!
-The paint finish is poor!
-The instructions are crap.
-Certain aspects of the design are terrible, particularly the bolts that destroy transit bags. The operation of it how it drops down and picks up isnt as smooth and easy as I'd hoped for.
-The power cable issue clearly wasnt thought through at the design/development stage.
But what has pissed me off the most was I thought I was buying a quality Australian made product, keeping Australians in work, supporting my economy, buying from Michelle Sacks Australia (MSA) so what do I find when I open the box................
Made in China!


OK Rant over!
After my last spare wheel bag got destroyed on my last trip, the company kindly replaced it for me free of charge.
(Note to self dont put 10 liters of used engine oil in this one! )
)


Tha standard temp gauge stopped working when I was out the other day and I thought maybe the connector had come off the sender on the engine.
Out with the factory service manual to find where abouts on the engine it is.

Found it and discovered that the single wire going to the connector on the sensor had snapped off.


Fortunatly I still had the wiring loom from under the bonnet of the 4-Runner which I got the engine from.

And I soon found the correct connector for the temp sender.

I cut it off the loom allowng myself plenty of wire to connect it to my loom. I then twisted the wires together to make a solid connection, and then soldered them together.


Soldered and ready for me to slide the heat shrink along and heat.

I ran the engine for a while and the standard gauge started to move as it should, so all fixed.
Next job.....................
For a long time the fire extinguisher has been rattling around in the passenger foot well, so I decided to do something about that.


I fitted the Engel power socket to the back of the water can holder for now.

And connected it up under the bonnet and then checked the fridge was working OK.

So LJ is virtually ready for this weekends 3 day Hight Country trip, just need to sort the camping gear out.
So Monday morning we went and picked Frankenzuke up from the paint shop.


It wont fit on the trailer with the 37" Treps on so had to have the 34"s on.

First job was to re-fit the roof rack.

The next job was fitting the snorkel that Safari kindly donated.


Flares next.

The widest we could get.


Got the 37" Treps down ready to go back on.


Front next.

The high tensile sprung wire that we've got for flares would help make them curvier.


Had to add some metal behind the back ones to fill in the gap.

The front ones were left long until I've finished designing and building the front bar.


Parked up next to my bosses old comp truck, which looks tiny in comparison, but is actually quite high compared to a standard one.

Today I did a bit more on the flares.


Started to look at the front bar that I need to design and build and we discovered that the outside of a Jimny's chassi rails is almost identical to the inside width of a Vitara's, meaning we could modify a Vitara one to fit.


The Hi-Lux Trail Gear bits I imported from the US for LJ and then discovered they wouldnt fit were sold to my boss and have now been fitted on the front of Frankenzuke.

I still love the duel cab 70's! We had another one in this week.


OK..................
Back to LJ!
I needed to bolt everything in place including the new MSA drop down fridge slide, But any bolts/nuts sticking through would interfere with my waffle board storage.

The solution.................
Bolts exactly the right length so as not to protrude through the ply, and some nuts to hammer into the underside of the ply.

I wanted some more Toyota bolt on tie down points like this as I could only find 2.

But the wreckers yard only had 1 from a 70 series, they had a few 80 series ones but I didnt like the look of them so I asked to look at the Patrol ones and left with 4 of those instead.

Not too bad once removed from the plastic surrounds.

The first job was to bolt the handle onto the fridge slide.


In position.


I wasnt impressed with the quality of the product as the paint was chipped, missing and scratched in places.


One of the lines of mounting holes fell above the 2" x 2" so I would be able to use some big wood screws along that line.

Got the fridge in place to check I'd allowed enough room.


Happy with the position I slid it forwards a bit so I could get a screw in one of the very back mounting holes to hold it down while I drilled through all the other mounting holes, through the ply below.


I also needed to drill down for the tie down points.

Positioned them where I thought best.


With all the holes drilled I could unscrew the angle alluminium trims.

I could then remove the rubber mat.

Followed by the ply.

Holes drilled to correct sizes and I was ready to hammer in the nuts.


One done.

And the other.

Screwed the ply back down.

2 sizes of bolts. Smaller M6 stainless ones for the fridge slide and bigger zinc coated M8 ones for the tie down points. (They didnt have any stainless M8's left)

Could fit the fridge slide next.

Wood screws down one edge.

Stainless bolts everywhere else.

Tie down points next.


I got some straps from work which are normally used with the fridge slides we make and sell.

The idea was to use them to help secure the water cans.


Decided I dont like that idea as its too awkward and fiddly to do with them in place in the back of the truck. So I'm now thinking I should go back to the original idea of making one out of aluminum and then come up with a more sophisticated latch mechanism.
Anyway back to the fridge slide.
Now what the instructions said next is wrong as it would make the next step very difficult! But I followed them as I didn't realize at the time.

Un-screwed the feet on my fridge.

Positioned them on the fridge slide.

Lifted the fridge back into place on top of the feet and used the longer bolts in the kit to screw through the fridge slide, feet and back into the fridge.


The next step would prove to be a hell of a lot easier had the fridge not been bolted in place.
Bolting the side bits on that the handle locks into.

As the fridge was in position on the slide it wasnt possible to hold the brackets in place and do the bolts up. So I had to guess where they needed to be, drop the fridge down, do the bolts up, lift the fridge back up and check, no still not right, drop the fridge back down and adjust them and so on.
The thing that I've spotted which has pissed me off the most is the fact theres 2 bolts sticking out which scrape there way down the side of the transit bag every time you lower/lift the fridge. Its only a matter of time till these wear through and ruin the bag.
I will have to get some countersunk headed bolts and remove the existing bolts, drill the metal with a countersink bit and then fit the new bolts, but frankly I shouldnt have to for the cost of the dam thing!


It said in the instructions that it will work best with some weight in the fridge.


Next I needed to bolt on the tie down points at the front of the fridge.


Rear straps on.

The instructions advice you to keep the fridge slide locker when driving and they give you keys on a little key strap.

I've tucked the keys in front fo the fridge where they will probably rattle and annoy the hell out of me.

The instructions are very vagueabout how to run the wires for the fridge power. They mention cable tieing it to the runners of the fridge slide, and had they added a few strateigly placed holes then this would have been fine, but they havent.
I found its impossible to run the wires neatly, and so they have enough slack for when it slides out and drops down.


OK so as you can probably tell I'm not overly impressed with the MSA fridge slide!
-The paint finish is poor!
-The instructions are crap.
-Certain aspects of the design are terrible, particularly the bolts that destroy transit bags. The operation of it how it drops down and picks up isnt as smooth and easy as I'd hoped for.
-The power cable issue clearly wasnt thought through at the design/development stage.
But what has pissed me off the most was I thought I was buying a quality Australian made product, keeping Australians in work, supporting my economy, buying from Michelle Sacks Australia (MSA) so what do I find when I open the box................
Made in China!


OK Rant over!
After my last spare wheel bag got destroyed on my last trip, the company kindly replaced it for me free of charge.
(Note to self dont put 10 liters of used engine oil in this one!
)

Tha standard temp gauge stopped working when I was out the other day and I thought maybe the connector had come off the sender on the engine.
Out with the factory service manual to find where abouts on the engine it is.

Found it and discovered that the single wire going to the connector on the sensor had snapped off.


Fortunatly I still had the wiring loom from under the bonnet of the 4-Runner which I got the engine from.

And I soon found the correct connector for the temp sender.

I cut it off the loom allowng myself plenty of wire to connect it to my loom. I then twisted the wires together to make a solid connection, and then soldered them together.


Soldered and ready for me to slide the heat shrink along and heat.

I ran the engine for a while and the standard gauge started to move as it should, so all fixed.
Next job.....................
For a long time the fire extinguisher has been rattling around in the passenger foot well, so I decided to do something about that.


I fitted the Engel power socket to the back of the water can holder for now.

And connected it up under the bonnet and then checked the fridge was working OK.

So LJ is virtually ready for this weekends 3 day Hight Country trip, just need to sort the camping gear out.
Last edited: