- Joined
- Mar 1, 2010
- Messages
- 2,003
- Country Flag

I bought my 100-Series 4.2 litre 24-valve Automatic with 121,000 miles last April and within a couple of weeks it was dripping diesel on the yard. I replaced the fuel tank with a brand new Toyota one at eye-watering expense and made a new tank cradle out of fibreglass because the old one had disintegrated and no new ones were not going to be available until September 2014.
I posted a description of that job at the time.
When replacing the tank I could see that the long and tortuous filler & breather pipes were looking bad and was planning to replace them when the weather got warmer this year.
Fate had other ideas.
I had noticed a small damp patch under the truck when filling it up and knew that the pipes were leaking but it wasn't bad enough to worry about so stuck to 'the plan'.
On 6th Feb I took it down to Somerset in order to attend the "Bristol Classic Bike Show" at Shepton Mallet. I usually take a bike but with snow and ice around the Scottish Central Belt and the Borders plus increasing old age decided to take 'the truck'.
Filling up at The Michael Wood Services on the M5 I was rather embarrassed to see diesel dripping furiously onto the forecourt as I filled the tank - the leak had got a lot worse .
.
So after an 867 mile round trip at 23.8mpg shock
shock") I ordered a new filler pipe from Simon Holton along with a few fittings and set to work last Friday (20th Feb).
I ordered a new filler pipe from Simon Holton along with a few fittings and set to work last Friday (20th Feb).
Naturally the two 8mm bolts with Toyota's collapsing 12mm heads were attached to a body cross-member positioned right above a chassis cross-member, meaning that it wasn't possible to get a socket on them or get any straight access at all, a bit of genius design.

The filler pipe and its attached breather pipe were both damp and obviously no longer fit for purpose.

The rubber hoses at the tank had been replaced last summer and were in good condition.

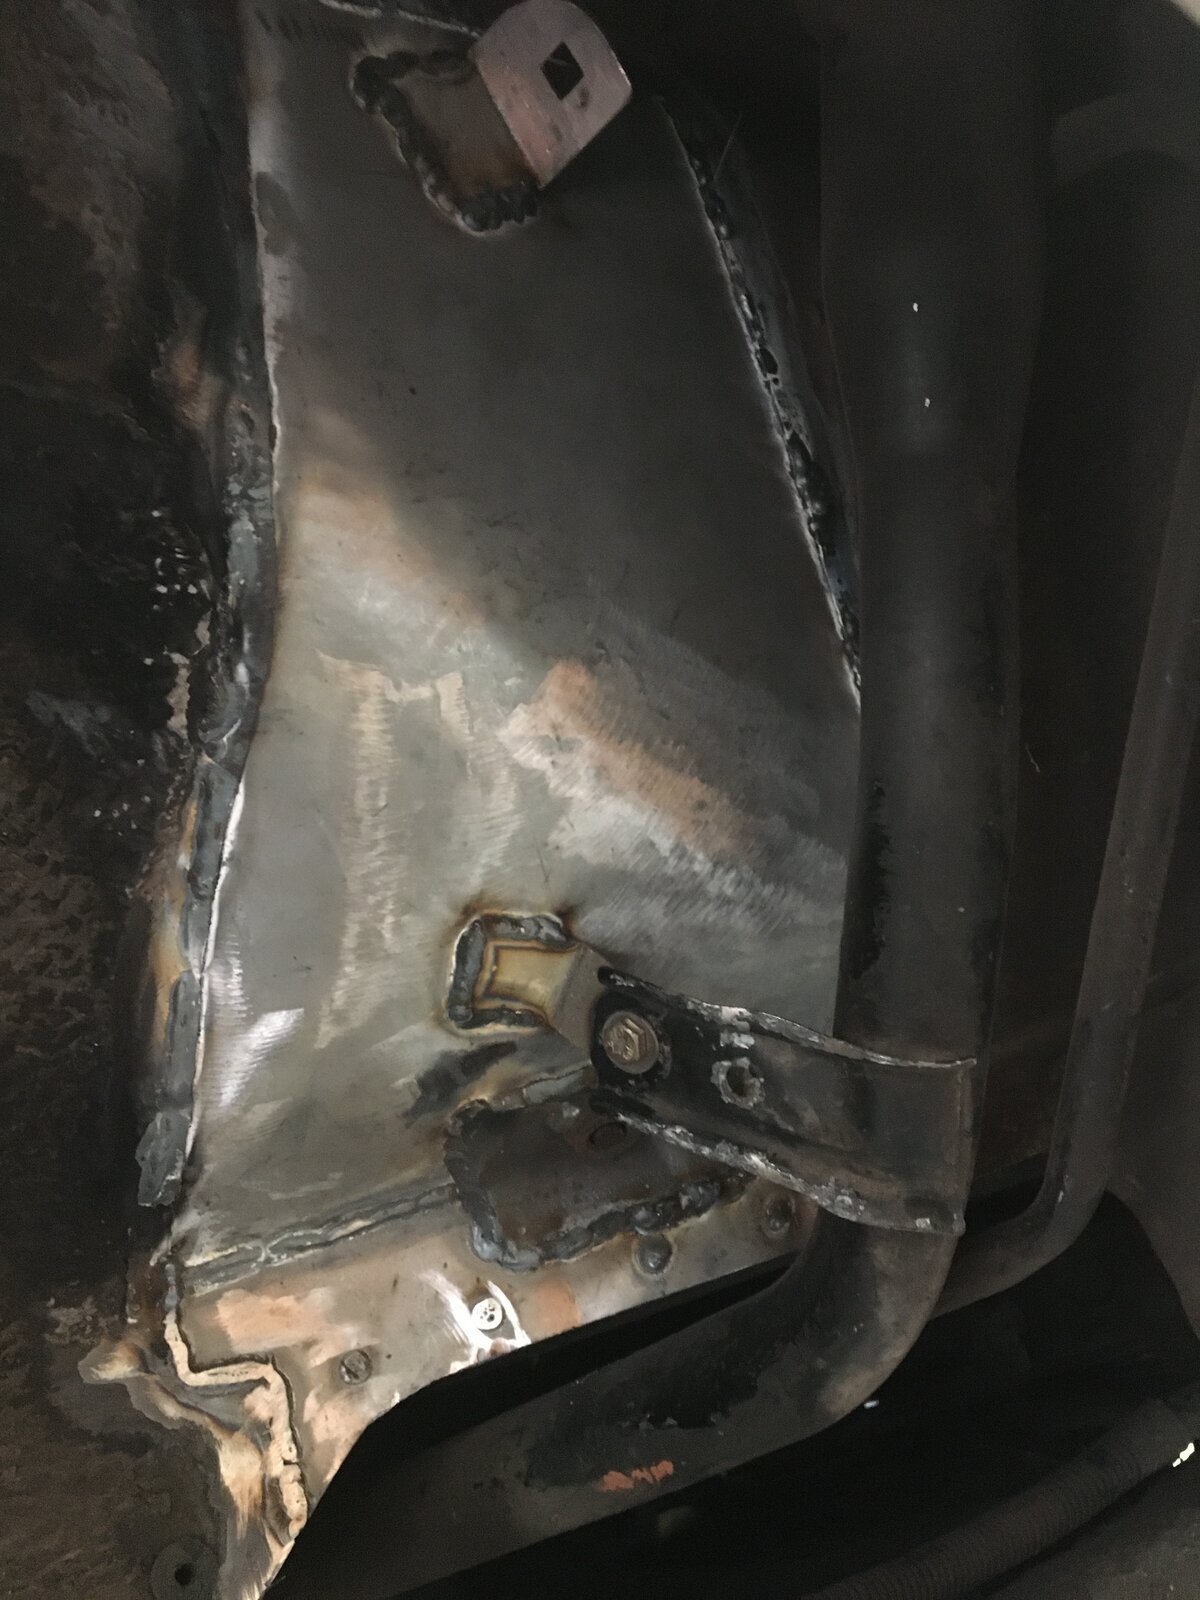
In order to get to the filler-end of the pipes one has to remove the mud shield behind the rear wheel.
Its called a 'mud shield' because it shields the mud and prevents it from being washed out of the wheel arch (cynical ?? moi ??).
There was a lot of wet mud trapped behind the shield resulting in some serious rust.


The bracket up at the filler-end was very thin and the bolt and captive nut were naturally seized solid. I spent a long time with a hot air gun, a wire brush and a can of spray oil before I got it free. I have given the assembly a couple of coats of black spray paint but that's just to show willing - its not going to stop the rot (I'll wait until its warm and dry in the Summer). The bolt has been replaced with a stainless 8mm with a good dollop of 'Optimol TA' anti-sieze paste.
The real challenge was the bracket above the chassis cross-member. fortunately the diesel spill had reached it and it looked as though the bolts may come free if I could only get a suitable tool in there. To cut a long story short I ended-up with a six-point 12mm socket on an 18" power bar as that was the only combination that would work.
I sprayed the bolts with oil and gently tried loosening them and lo - they both turned .
.
I undid them half a turn (very tight), sprayed oil in behind and tightened them up. Undid them one turn and re-sprayed the shanks and did them up. This was going far too well and by the time I had got them about three full turns out both the heads snapped off .
.
This gave me a real problem. I wanted to get the broken remains loose and screw them back into the cross-member where they would drop inside - leaving clean threads for new bolts. I carefully centre-punched them (at an angle of course) then tried drilling. I put a hole in one but it was nowhere straight and the second one was just impossible. about four hours later I called it a night and slept on it.
On day-2 I had another go then gave up, put a point on a piece of round steel bar and with a 2.5lb hammer broke the captive nuts free. They will be rattling about in the body cross-member for the remaining life of the car (whose life expectation was rapidly diminishing ).
).
I then had to remove some thin steel overlay from around one of the holes to give a clear view. Then with a collection of nuts, washers and a bolt plus two spanners and a mole grip I was able to install a pair of 8mm stainless rivnuts into the chassis.

Access was difficult and its not the neatest job I've done but its solid and will work.

Whilst getting the two bolts out and repairing the damage was difficult it was nothing compared with the job of getting the old pipework out. There was a point when I thought I was going to have to saw it up and remove it piecemeal, then cut the new one up and join it with rubber tubes.
It seems obvious, but Toyota must install the diesel tank and all the fitting to the underside of the body before dropping the body onto the chassis. I thought I was going to have to cut the body mountings free and lift it as there isn't enough room between the body cross-member and the chassis cross-member to wriggle the pipes out. If you have a 2" body lift you will have no problem .
.
Then I had a thought, the body mounts are rubber and should give a bit so I stuck a large steel wrecking bar between the two cross-members and gave it all I had. This gave me just enough clearance to pull the pipes back into the void where the spare wheel hangs.
I had to cut the bracket in the wheel arch to free the pipes completely.

But eventually the old pipework was out.

The first thing I noticed was just how light it was, this thing has rotted away over its 13 year life and feels like it made of papier mache. It is porous for most of its length but there are no real holes in it, just pin-pricks all over.
Thankfully, the new one is more substantial but its still made of thin steel. Why not make them out of suitable plastic
 .
.

As all the books say "Assembly is the reverse procedure" and having everything clean with new stainless bolts makes it a bit of a doddle.


I bought a new rubber boot and locking ring for the filler cap surround.


Unfortunately I don't have a picture of it fitted. Its a slightly different shape to the original and doesn't lie in the fitting as neatly as the old one - but its a minor point.
Then all that has to be done is to re-attach the mud shield, rear bumper and mud flap.


And its 'Job Done'.
It took me nearly two full days to do this - most of the time spent trying to remove rusted bolts. At one point I thought of drilling a couple of holes through the body cross-member and hanging the pipes on cable ties. However, I couldn't live with such a bodge so persevered, thankfully, as its an OK job now.
Hopefully this will forewarn anyone contemplating doing this job - its a bit tricky in places.
Bob.
I posted a description of that job at the time.
When replacing the tank I could see that the long and tortuous filler & breather pipes were looking bad and was planning to replace them when the weather got warmer this year.
Fate had other ideas.
I had noticed a small damp patch under the truck when filling it up and knew that the pipes were leaking but it wasn't bad enough to worry about so stuck to 'the plan'.
On 6th Feb I took it down to Somerset in order to attend the "Bristol Classic Bike Show" at Shepton Mallet. I usually take a bike but with snow and ice around the Scottish Central Belt and the Borders plus increasing old age decided to take 'the truck'.
Filling up at The Michael Wood Services on the M5 I was rather embarrassed to see diesel dripping furiously onto the forecourt as I filled the tank - the leak had got a lot worse
So after an 867 mile round trip at 23.8mpg
shockNaturally the two 8mm bolts with Toyota's collapsing 12mm heads were attached to a body cross-member positioned right above a chassis cross-member, meaning that it wasn't possible to get a socket on them or get any straight access at all, a bit of genius design.
The filler pipe and its attached breather pipe were both damp and obviously no longer fit for purpose.
The rubber hoses at the tank had been replaced last summer and were in good condition.
In order to get to the filler-end of the pipes one has to remove the mud shield behind the rear wheel.
Its called a 'mud shield' because it shields the mud and prevents it from being washed out of the wheel arch
(cynical ?? moi ??).There was a lot of wet mud trapped behind the shield resulting in some serious rust.
The bracket up at the filler-end was very thin and the bolt and captive nut were naturally seized solid. I spent a long time with a hot air gun, a wire brush and a can of spray oil before I got it free. I have given the assembly a couple of coats of black spray paint but that's just to show willing - its not going to stop the rot (I'll wait until its warm and dry in the Summer). The bolt has been replaced with a stainless 8mm with a good dollop of 'Optimol TA' anti-sieze paste.
The real challenge was the bracket above the chassis cross-member. fortunately the diesel spill had reached it and it looked as though the bolts may come free if I could only get a suitable tool in there. To cut a long story short I ended-up with a six-point 12mm socket on an 18" power bar as that was the only combination that would work.
I sprayed the bolts with oil and gently tried loosening them and lo - they both turned
I undid them half a turn (very tight), sprayed oil in behind and tightened them up. Undid them one turn and re-sprayed the shanks and did them up. This was going far too well and by the time I had got them about three full turns out both the heads snapped off
This gave me a real problem. I wanted to get the broken remains loose and screw them back into the cross-member where they would drop inside - leaving clean threads for new bolts. I carefully centre-punched them (at an angle of course) then tried drilling. I put a hole in one but it was nowhere straight and the second one was just impossible. about four hours later I called it a night and slept on it.
On day-2 I had another go then gave up, put a point on a piece of round steel bar and with a 2.5lb hammer broke the captive nuts free. They will be rattling about in the body cross-member for the remaining life of the car (whose life expectation was rapidly diminishing
I then had to remove some thin steel overlay from around one of the holes to give a clear view. Then with a collection of nuts, washers and a bolt plus two spanners and a mole grip I was able to install a pair of 8mm stainless rivnuts into the chassis.
Access was difficult and its not the neatest job I've done but its solid and will work
Whilst getting the two bolts out and repairing the damage was difficult it was nothing compared with the job of getting the old pipework out. There was a point when I thought I was going to have to saw it up and remove it piecemeal, then cut the new one up and join it with rubber tubes.
It seems obvious, but Toyota must install the diesel tank and all the fitting to the underside of the body before dropping the body onto the chassis. I thought I was going to have to cut the body mountings free and lift it as there isn't enough room between the body cross-member and the chassis cross-member to wriggle the pipes out. If you have a 2" body lift you will have no problem
Then I had a thought, the body mounts are rubber and should give a bit so I stuck a large steel wrecking bar between the two cross-members and gave it all I had. This gave me just enough clearance to pull the pipes back into the void where the spare wheel hangs.
I had to cut the bracket in the wheel arch to free the pipes completely.
But eventually the old pipework was out.
The first thing I noticed was just how light it was, this thing has rotted away over its 13 year life and feels like it made of papier mache. It is porous for most of its length but there are no real holes in it, just pin-pricks all over.
Thankfully, the new one is more substantial but its still made of thin steel. Why not make them out of suitable plastic
As all the books say "Assembly is the reverse procedure" and having everything clean with new stainless bolts makes it a bit of a doddle.
I bought a new rubber boot and locking ring for the filler cap surround.
Unfortunately I don't have a picture of it fitted. Its a slightly different shape to the original and doesn't lie in the fitting as neatly as the old one - but its a minor point.
Then all that has to be done is to re-attach the mud shield, rear bumper and mud flap.
And its 'Job Done'
It took me nearly two full days to do this - most of the time spent trying to remove rusted bolts. At one point I thought of drilling a couple of holes through the body cross-member and hanging the pipes on cable ties. However, I couldn't live with such a bodge so persevered, thankfully, as its an OK job now.
Hopefully this will forewarn anyone contemplating doing this job - its a bit tricky in places
Bob.