Don't like the adverts?  Click here to remove them

LJ70 Build Thread!

Thanks guys. :thumbup: :thumbup:

Glad you enjoyed the trip report! :dance:

It took well over a day to do! :shock: :sleeping-sleep:

Rob that yellow 40 you've built is a thing of beauty sir! :drool: :clap:

Not envious at all! :eusa-liar:
 
I had my first day back at work on Friday and made a start on an exciting new project I'm working on. :dance:

You may remember we got a badly accident damaged Suzuki Jimny in a while ago and I was given the task of stripping it for parts. After removing the body I found that the chassis, engine, axles etc. were all in really really good condition and I told my boss I thought it was a shame to strip it any further and we could make a cool, super light buggy out of it. :icon-cool:

Then I came up with a really good idea.............................

Lets sell the reasonably valuable low mileage engine and auto box in the Jimny and fit a Vitara engine and box. Not only will we gain an extra 300cc, going from a 1.3L to a 1.6L engine, but we have lots of Vitara engines in stock and there not as valuable.

Fast forward a few months and we sold the engine and box to a guy who wanted to replace the blown engine in his Mrs's Jimny and convert it to Auto at the same time. This meant that we now had a rolling chassis that had already put us well in profit and had given us some cash to throw at the project! :dance:

So my plan......................

-Fit a mid mounted 1.6L Vitara engine and auto box.

-Fit a center mounted tricked up Warn 8274 winch and run it out the back, through a snatch block, then through a tube and out the front of the truck in a Vector Foers style, meaning we can winch forwards or backwards with one winch.
(http://www.4wdonline.com/Foers/Winch.html)

-Full roll cage/tube body.

-ARB lockers front and rear.

-Custom front suspension and raised rear.

-Bob tailed chassis front and rear.

-Low center of gravity and as light as possible.

:icon-twisted:

I've got a few more ideas but thats the rough plan.

I've taken some inspiration from the following builds and we've sourced a bonnet so we can have a tapered cut one on ours:

Jimny2_zps72a65ff5.jpg

Jimny4_zpsabe7f42f.jpg

Jimny6_zps3139a564.jpg

Jimny3_zpsed99a5e5.jpg

Not Jimny but this is kind of the look I'm thinking.

1_15_02_09_10_29_48_4_zps005c4996.jpe

OK......................

This is the basis for the project and with these wheels with ridiculous off set fitted, the wheel base is almost as wide as it is long!

PA100001_zpsd06294eb.jpg

PA100002_zpsc8ce11ad.jpg

PA100004_zpsc8edaa94.jpg

Initially I thought I could rotate the pitman arm on the bottom of the steering box 180 degrees, this would mean I could move it back along the chassis towards the rear of the car 300+mm. This would have meant that the chassis and body could be 200mm+ back from the tyres meaning it would have had an awesome 90 degree+ approach angle! :icon-twisted:

But as I thought about it more I realised that doing this would mean you would steer left to go right! :doh:

Obviously the ultimate choice would be hydro steer! :icon-twisted:

But as I'm doing this build on quite a small budget this isnt really an option.

So looking at it I can take at least 100mm off the front to the cross member, although I will probably take that cross member out anyway and replace it with something a bit stronger. :think:

PA100005_zps127331af.jpg

PA100006_zps57cd8b7f.jpg

The body mounts, some of which are badly bent will all get cut off.

PA100007_zps65082dac.jpg

The back end will be much easier to bob tail.

PA100008_zps4bca7ad4.jpg

PA100009_zpsb9257410.jpg

I removed the anti roll bar, another part which will go on the shelf with all the other used Jimny parts to be sold.

PA100010_zps98782309.jpg

I found a suitable Vitara engine and auto box.

PA100011_zpsac25c259.jpg

PA100013_zps80ea3853.jpg

I got it nice and clean with the jet wash and de-greaser.

PA100014_zpsdc59a655.jpg

I could then try it in the chassis.

PA100015_zps40e49642.jpg

PA100017_zpscef0f8e7.jpg

PA100018_zps3da8ddbe.jpg

I cut the chassis cross member out of the way and I will have to make and weld a new one in to support the auto box once we've decided upon the exact position of the engine.

PA100019_zps02d1810c.jpg

I will also possibly have to remove the next cross member to allow clearance for the rear prop shaft. I'm also thinking for the winch to work I will need to remove the fuel tank and probably make my own custom TIG welded one.

PA100020_zpsce10460e.jpg

PA100021_zpsddfef156.jpg

The idea is to have the engine mid mounted, so behind the front axle.

PA100022_zps7fe03332.jpg

PA100023_zpsabe575cc.jpg

I'm hoping to spend some days on the build this week! :icon-cool:

More soon, as always thoughts and suggestions welcome. :icon-wink:
 
Last edited:
That jimmy will be a neat thing to work on, will keep a close eye on the build.

Started the 12HT on Saturday, I was surprised how quick it revs & red lines.

IMG_2181.jpg

IMG_2194.jpg

IMG_2189.jpg
 
Hi Ben posts all look brilliant and jealous of ur trip mate looked a good larf!! Well done mate good on u!

Where you get ur air lockers from and any clues on what size pinion I'll need?

You ou got a link of where u got urs from?

what u recommend front or rear locker??

Thanks Ben keep it all up aswell
 
Looks awesome Rob. :clap:

I love the 12HT its one of Toyota's best ever engines! :icon-biggrin:

Hi Ben posts all look brilliant and jealous of ur trip mate looked a good larf!! Well done mate good on u!

Where you get ur air lockers from and any clues on what size pinion I'll need?

You ou got a link of where u got urs from?

what u recommend front or rear locker??

Thanks Ben keep it all up aswell

Thanks Craig, was a great trip. :thumbup:

I got my ARB air lockers from Devon 4x4 and was very pleased with the price and service from them. :icon-biggrin:

However I've not been overly impressed with my air lockers as they have proven to be bloody unreliable! :thumbdown:

My rear is leaking quite badly inside the diff now meaning when I use it the compressor just keeps running all the time its engaged. :doh:

Thats despite getting it rebuilt a year or so ago by a diff expert who worked at ARB HQ for 10 years fitting lockers and I used all new Koyo bearings and genuine ARB seals. :icon-evil:

If I had the choice again I would get an E locker from some one like Harrop.

http://www.harrop.com.au/store/driveline/harrop_elocker/toyota/land_cruiser_70_series

Theres a few other companies doing E lockers, such as:

http://www.eaton.com/Eaton/Products...veAftermarket/Differentials/PCT_221472#tabs-1

I'd fit a rear one first and if/when funds permit get a front one! :icon-ugeek:

They are awesome things! Instant traction at the flick of a switch! :icon-twisted:
 
Don't like the adverts?  Click here to remove them
Hi Ben, run with Harrop/Eaton e-lockers, I used them in my build and have already bought a couple for my next build of the RJ70.


IMG_0914.JPG

IMG_0915.JPG

You also end up with a nice ice box as well.

IMG_0913.JPG
 
They are definitely what will go in my next build Rob. :icon-cool:

Just working on a thread update now! :icon-wink:
 
I got a little bit more done on the project Jimny.

First I removed the springs and dropped it down onto its bump stops to check if the front diff will clear the engine sump.

PA140007_zpsa347bf39.jpg

PA140008_zps6c2a21ec.jpg

PA140009_zpsd1f72a65.jpg

It cleared fine.

PA140010_zps0e3e8804.jpg

The next job was to cut all the old engine mounts off and the plasma cutter was the best job for this.

PA150011_zps507864ae.jpg

PA150012_zps588e597a.jpg

PA150013_zps1836eb4a.jpg

I removed the fuel tank to avoid a fire.

PA150014_zpsc5667224.jpg

PA150015_zps60f9985a.jpg

PA150016_zps8c521cba.jpg

PA150017_zps24aa977b.jpg

PA150018_zps2b5cff3d.jpg

I also cut the bent front body mounts off.

PA150019_zps101d57c4.jpg

PA150020_zpsf4332361.jpg

PA150021_zps1868d584.jpg

I cleaned the paint off the chassis where I intended to mount the engine, quite a way back from the original engine mounts and well behind the front diff.

PA150023_zpsabb0736c.jpg

And then tried the engine back in.

PA150024_zpsb33977a9.jpg

PA150025_zps611b665a.jpg

PA150026_zps0a162197.jpg

PA150027_zps47cc984f.jpg

The next job was to fab up some engine mounts so I could bolt the engine in place.

PA150028_zpscc413899.jpg

PA150029_zps037473c5.jpg

PA150030_zpse0959809.jpg

I decided to reinforce the chassis where the engine mounts as the chassis isnt that thick.

PA160031_zpsc96d4ad0.jpg

I cut a cardboard template.

PA160032_zps4209c89d.jpg

PA160034_zps9aa2e92a.jpg

Then cut 2 out of some 3mm steel.

PA160035_zps64016a11.jpg

Tacked them in place.

PA160036_zpsa089d458.jpg

PA160037_zps4909182c.jpg

PA160038_zps5959dccb.jpg

Cut some 6mm plate and tacked the engine mounts in place.

PA160039_zps53c3c314.jpg

PA160040_zps6c106bb9.jpg

PA160041_zpsf1e64bc5.jpg

PA160042_zpsf2597990.jpg

PA160044_zps40b71865.jpg

PA160045_zpsdb9e8dda.jpg

PA160047_zps63258697.jpg

PA160049_zps3da49539.jpg

PA160051_zps2082efa1.jpg

I've probably spent as much time working on this project as I have looking, measuring and discussing it with my boss.

We really wanted to use as many Jimny parts on this build as possible, but one major issue was the rear prop shaft. As were using a Vitara transfercase which has the output in the center of the box, with the Jimny axle with off set diff it meant the prop shaft would be at a nasty angle.

PA160053_zps1dcf4fdc.jpg

PA160054_zps10e02d8b.jpg

So we've decided to use a Vitara rear axle, which has the diff in the center. This will mean we will have a much stronger rear axle and a straight prop shaft. I'm going to mount it using 4 links.

On the front we need to obviously match the rear diff ratio, so we will use a Sierra (SJ) front axle with a Vitara ring and pinion fitted and I'm hoping to 4 link it as well if theres enough room for the links beneath the engine.

If I can 4 link the front it will mean I can get rid of the panhard rod and move the axle forwards 100/150mm meaning the front tyres will be well in front of the front of the chassis for an awesome approach angle. :icon-smile:

Were planning on fitting the longest off the shelf springs we can get, so probably OME +3" Jeep springs. I will weld new spring perches onto the chassis and weld them nice and high so that we keep the truck and center of gravity nice and low and have only a smallish amount of up travel but a shit load of down travel. :icon-twisted:

Thats as far as I got on it as customers jobs keep getting in the way. :doh:

PA160055_zpsa53aa6a4.jpg

I've been doing a bit of work on LJ.

When I connected the engine oil pressure gauge after the engine conversion I connected it wrong and burnt out the gauge. :oops: :doh:

PA120024_zps8d2fb030.jpg

PA120027_zpsc6d238e3.jpg

So when I went back to the UK I picked up another set of clocks off Karl.

When I came to fit it I found its actually different to mine and must be out of an import as its in kilometers and hasnt got miles on it.

Obviously not a problem though down here as thats what all the road speeds are measured in.

PA120029_zpsb2ee9162.jpg

PA120031_zps2c243e9f.jpg

But as it had different electrical connections on the back, it wouldnt plug into my loom. :doh:

PA120036_zpsc2610e78.jpg

So I stripped both sets down and used the kilometers fascia and oil pressure gauge off the new clocks and fitted them into my old ones.

PA120032_zps1e732bfe.jpg

Fitted.

PA120039_zps47d58ae4.jpg

PA120040_zps187e7943.jpg

While away on the trip I thought of a few changes I wanted to make to LJ.

One was to move the fridge and fridge slide closer to the side of the car.

It could be moved over 95mm.

PA190059_zps3dc2fec8.jpg

I also decided that as I rarely need the waffle boards and even when I do 2 are normally enough, that I will remove 2 from LJ and just carry 2. That would mean I could drop the fridge down by 75mm which would obviously lower the COG and also make it easier to see into the fridge.

Also with the removed ply and waffles LJ would be 25kg lighter. Not much but it all adds up.

PA190061_zpsbcdf7e4e.jpg

PA190062_zps56a88537.jpg

PA190063_zpse47e4ff7.jpg

PA190064_zps9128d560.jpg

PA190065_zps1e826021.jpg

PA190066_zps85610e45.jpg

Checking for clearance.

PA190067_zpse068cbd8.jpg

PA190068_zpsb4ae3918.jpg

PA190069_zpsd06bf418.jpg

PA190070_zpse1418912.jpg

PA190071_zps1aa08d89.jpg

PA190072_zps1ceaab66.jpg

The other idea I had while I was away was to build a storage shelf above the fridge running the entire width and depth of the rear of the cab. This will be out of light weight tube with mesh welded on and will be ideal for all the sleeping bags, pillows, roll mat, tent, chairs and bags of clothes.

Had I had this for the trip then I wouldnt have needed the blue space cases on the roof.

PA190074_zps0c882382.jpg

It will fit reasonably tightly to the sides of the car so wont need an up stand on those sides, but it will need one on the front to stop stuff from shooting out the front. It will be mounted used the 4 seat belt mounting points.

PA190077_zps2ad195f2.jpg

And finally the rear panhard rod.......................

Because the rear panhard rod is too short after the suspension lift, the rear tyres stick out 30mm further from the chassis on the drivers side than the passenger side.

Before the trip we noticed that because of this the rear axle is constantly being pulled side ways and this had badly damaged the near new rear bushes in the rear trailing arms. :doh:

PA190079_zps98ecaebe.jpg

The panhard rod is also not at a particularly good angle and this must be limiting articulation.

PA190078_zps4e132039.jpg

Now the common fix for this is to fit a longer, adjustable panhard rod. But there isnt one available anywhere for LJ70's. :doh:

A longer panhard rod will centralise the axle but........................

It wont fix the angle.

So my idea is to make a bolt on drop bracket that will drop the chassis mount down for the rear panhard rod. This will centralise the axle and more importantly put the angle of the panhard rod back to how it was when it left the factory.

PA190080_zps4ac5fe93.jpg
 
Hi Ben could you have a look at this item number and then let me no what u think mate cheers
also will it fit my 92 lj70 thanks

281334853290 eBay
 
OK update time guys..................................

I've been designing and making a bolt on bracket to drop the rear panhard rod down to compensate for the suspension lift.

I cut and drilled some 6mm steel.

PA200001_zpse3d86b75.jpg

And welded it together.

PA200002_zps4ae6d6c4.jpg

PA200003_zps6703ea22.jpg

PA200004_zpsff084fd1.jpg

PA200019_zpsae30a032.jpg

That bracket will bolt on the passenger side chassis rail and will have a length of tube welded to it that will run down to the panhard drop bracket.

PA200021_zpsfa98101b.jpg

PA200022_zpsad7fbc7c.jpg

PA200011_zps79bf4999.jpg

PA200012_zps44f7f7a2.jpg

PA200028_zpsceb5a85a.jpg

PA200029_zps6052b72d.jpg

PA200031_zpsda8e1e9c.jpg

PA200032_zps0c3d5bcf.jpg

PA200033_zps35f4d30a.jpg

PA200034_zpsbec2cae8.jpg

PA200035_zpse4957959.jpg

PA200036_zpse822426f.jpg

PA200037_zps74067a2a.jpg

PA200038_zps8e9b3333.jpg

PA200039_zps224e4757.jpg

PA200040_zps0d75dae0.jpg

PA200041_zpsf430d8b0.jpg

PA200042_zps0cce6216.jpg

PA200044_zps71761931.jpg

PA200045_zps66388737.jpg

PA200046_zpsdab41b43.jpg

PA200048_zps993b5162.jpg

PA200049_zps0be2c471.jpg

This is how the tube will go roughly.

PA200051_zps8e115d3d.jpg

PA200054_zpsc86f5c1f.jpg

PA200055_zps8d8e08ae.jpg

PA200061_zpsdb46fecb.jpg

I cut and welded some more 6mm steel.

PA210062_zps9e6f082e.jpg

PA210064_zpsbc0b505a.jpg

PA210065_zps95d3d924.jpg

PA210066_zpsc4e11ab5.jpg

PA210067_zps3b11bd56.jpg

PA210068_zpsac4c3690.jpg

PA210069_zpsb356be9d.jpg

PA210070_zps51b165f2.jpg

PA260125_zps5daadef3.jpg

On the trip the swing away wheel carrier cracked the welds. :doh:

PA240109_zpsd40b01f2.jpg

So I re-welded it.

PA240110_zps87654a86.jpg

PA240111_zpsce94eaf2.jpg

Cut some 2mm steel to reinforce it.

PA240112_zps457779e3.jpg

PA240113_zps93a2638a.jpg

PA240114_zpse60385cf.jpg

PA260127_zps23df097b.jpg

PA260128_zps6008b70d.jpg

PA260129_zps089e6e72.jpg

PA260130_zps1ecc25c4.jpg

My boss very kindly gave me an old woodworking bench from work. I almost declined it as its another big thing to pay to store when I go to the mines but its a great bench and will be very useful especially in the huge workshop that I will have under the house I'm going to build.

PA200014_zps5ad0c3ba.jpg

The vice on it was knackered.

PA200015_zps38dfdf59.jpg

But I happened to have a decent Record one that I saved from a skip about 5 years ago that I have been saving to one day mount on a bench.

PA200017_zpsb1701be8.jpg

PA200018_zpsb0c12718.jpg

It doesnt look very well used, but needed a good clean and oil as it was pretty rusty.

So I stripped it all down.

PA210076_zps8eb403f3.jpg

PA210077_zpsc6c81510.jpg

PA210078_zps1f05d44b.jpg

I took the bits to work to clean them.

PA220079_zpsb106e385.jpg

PA220080_zps3376f640.jpg

PA220081_zpsb1ea5ee8.jpg

I then used the wire wheel on the grinder to clean all the rust off.

PA220082_zps9d89074f.jpg

PA220083_zps8554bc8d.jpg

LJ has been making me money rather than taking it for a change!

I've been doing some carpentry work for a friend.

PA270131_zps77a4645f.jpg

PA270132_zpsc40f2d19.jpg

PA270133_zpsfcf3461a.jpg

PA290137_zps8a007cc2.jpg

The new bench has come in very useful.

PA290138_zps19aad84b.jpg

PA290139_zpsa4c6b643.jpg

Painted all the timber.

PA290140_zps84c24e6b.jpg

PB010170_zps495e6c0d.jpg

LJ was a little too small really for all my tools and the materials but we managed.

PB010171_zps7821c5b9.jpg

PB010172_zps7c7bc9ae.jpg

The job was to replace a load of hand rail and spindles that were rotten.

PB010173_zps34473eb3.jpg

PB010174_zpscc5007ea.jpg

PB010175_zps5577d617.jpg

PB010176_zps49b1a8f6.jpg

PB010177_zps82bf7bb8.jpg

Piranha work next....................................

My boss wanted me to shave some more Suzuki diff housings. I made an alluminium template that I could use as a guide to plasma cut around.

PA200006_zps609a4774.jpg

PA200007_zps1e87240d.jpg

PA200008_zpsf6b06e61.jpg

PA200009_zps51cd17c5.jpg

I TIG welded some 6mm steel on and added some tube braces.

PA230086_zps4ca370b8.jpg

PA230089_zps97279724.jpg

PA230091_zps0ef9d858.jpg

I've put some inspirational pics up on the wall of my office for the Jimny project I'm designing and building.

PA200010_zps171c80c9.jpg

I made a start changing the front Jimny axle for a Sierra (SJ) one.

The CV's and half shafts on Sierra's are quite a bit bigger and stronger than Jimny ones and we have chromoly ones in stock so will fit those.

We can also match the diff ratio for the Vitara rear diff easier, as the USA got Vitaras and Sierras but sadly not the Jimny. So theres a few companies over there making parts such as ring and pinions etc. for Sierras and Vitaras but obviously not Jimnys.

Also we will have a pair of Jimny axles we can sell for good money which will give me more money to spend on cool stuff for the project! :icon-biggrin:

PA240093_zpsb38accc7.jpg

This is the Sierra axle I will be fitting but we will probably have to remove the high steer kit from it as we may not it get it passed by scrutineering with that fitted.

PA240094_zps6a2d4316.jpg

PA240095_zpse4d1ed96.jpg

PA240096_zpse19915b0.jpg

PA240097_zps8f48742b.jpg

Removed the wheels from the Jimny axle.

PA240098_zps92cec3a7.jpg

And bolted them on to the Sierra one.

PA240099_zps5b71267c.jpg

And rolled the Sierra one in place.

PA240101_zps685643f8.jpg

PA240102_zpsaa194238.jpg

I want all the wheels to project forward of the front and back of the car so that it will have the best approach and departure angle possible!

PA240103_zps73b587a3.jpg

PA240104_zps9546adaa.jpg

I got a load of different arms from our Suzuki parts warehouse to have a play with.

PA240105_zpsf37949bc.jpg

Theres even a set of custom made Jimny radius and trailing arms that were originally on Frankenzuke when it came in as a wreck.

PA240106_zps07fde58c.jpg

PA240107_zpsd936bb5b.jpg

PA240108_zps612188ca.jpg

I bolted on the Jimny radius arms and as I was thinking at this point of 4 linking the front i used just the end mount on the radius arm and was considering cutting the other mount off.

PA240115_zps8449651e.jpg

PA240116_zps1c3715da.jpg

PA240117_zps7cea9673.jpg

PA240118_zpscad2317e.jpg

I cut another chassis cross member out as I was thinking of turning the pitman arm on the steering box to allow me to have the front axle so far in front of the steering box.

PA240122_zpsf56e6e96.jpg

I wanted to turn the pitman arm from this position.

PA240119_zps7c838e4d.jpg

To this position.

PA240120_zps1f03fd66.jpg

But that would mean the truck would go right when you steered left and vice versa. :doh:

Thats as far as I got with it but the plan is now to take the high steer off and fit the standard steering linkage but with one of the tierod ends turned around the the other way to make the angle of the steering link a bit better.

I'm also not going to 4 link the front as there really isnt room with the engine, so the front will be 3 link and the rear will be 4 link.

Another project I've started is a LWB Maruti Sierra. Suzuki Japan sold all the old tooling to Maruti when they stopped making Sierras and the Indian car maker produced and sold Sierras for a while.

This particular truck was rescued from a scrap yard and although it is in pretty rough condition having spent its entire life on a farm, it is a reasonably rare model and so we've decided to save it rather than stripping it for parts.

PA290141_zpsa895a620.jpg

PA290142_zpsef8dfbb1.jpg

PA290143_zpse2ee9f8c.jpg

So my plan is to turn it into another shooting/farm truck like the last one I built which sold almost instantly and for good money. So a weeks worth of my time and a load of old parts we've already got sitting around and we will have a great truck!

So my plan is to remove the roof and doors.

Build a roll cage for it and fit some of my tube doors.

Jack it up and stick some big tyres on it.

Knock the dents out and give it a quick respray.

Replace the knackered 1 litre engine and gearbox with a 1.3 one.

I removed all of this.

PA300145_zps1ffafbc7.jpg

PA300144_zpsc288078e.jpg

I could then push it outside and jet wash it.

PA300146_zpsa29f2d30.jpg

PA300147_zps070c6c5d.jpg

It was very dirty underneath and looked like it had been parked in a few feet of slurry for a long time!

PA300148_zps13ff21c4.jpg

PA310149_zps7963673e.jpg

PA310150_zps2ebffa7f.jpg

The only clues that its not a Suzuki.

PA310151_zps3f2e0f31.jpg

PA310152_zps66b71bbf.jpg

PA310153_zps71721af5.jpg

Fitting the 1.3 engine in place of the 1 litre would require engine mount modifications so I decided it would be easier with the body off.

Also to give it a lift on a budget I'm going to fit a body lift and make my own spacers out of box section steel.

PA310154_zpsa08b1282.jpg

PA310155_zpsbfb2d4c9.jpg

PA310157_zpsafd425da.jpg

PA310158_zpsf3d672e3.jpg

PA310159_zps15406157.jpg

I then got the chassis back outside to give it another degrease and jet wash.

PA310160_zps0339e87f.jpg

PA310161_zps846023ae.jpg

PA310162_zpsc113564d.jpg

Once clean I pushed it back in and parked it next to the other project Suzuki I'm working on.

PA310163_zps8d9931a1.jpg

PA310164_zps8d39e44a.jpg

PA310165_zps42241ae6.jpg

I then Pushed the body back outside and gave that a good clean.

PA310166_zps45249d79.jpg

The engine bay came up really clean compared to how it was.

PA310167_zps9856490f.jpg

PA310168_zpsf83f0659.jpg

PA310169_zps04c66f2c.jpg
 
Last edited:
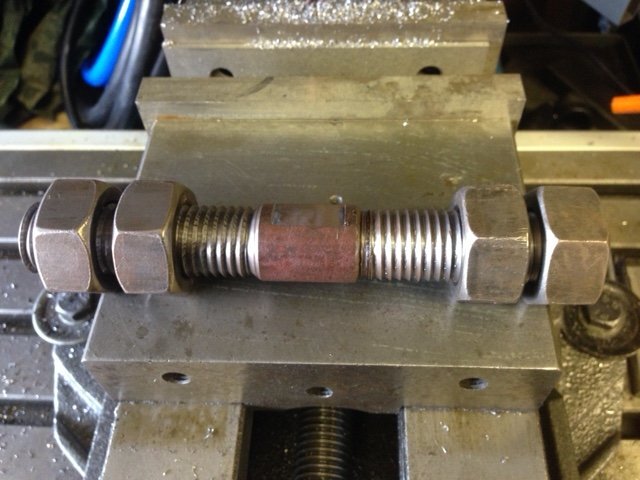
Coincidence that you are doing a panhard rod mod Ben. Been doing the same myself today in readiness for the new suspension coming from FNB. Went a different way to you. Your skills in fabbing stuff give you different options. I just kinda went with the simple chop and change version. Having had adjustable PH rods before, I found that I needed so little extra length (like half an inch) that I didn't really want to pay all that cash for so little change. And, the adj rods I had before were RH thread only so you had to keep undoing one end to adjust them. I shall cut out a section of the PH rod. If I just add this in, it will be too long to start with.

I decided I'd make a bottle screw version. Started with this LH/RH section to go in the rod. The outer nuts will be welded onto the rod and be locked with the inner nut unless I think of something different.. I'll post the conclusion on my own build thread. But half a world apart and doing the same thing. Ha. Small world.

IMG_0892.JPG
 
The Jimny build that's becoming less Jimny day by day:lol:

What will this one be called Ben? Grat to see it coming together.

LJ's getting better by the minute too :thumbup:
 
Coincidence that you are doing a panhard rod mod Ben. Been doing the same myself today in readiness for the new suspension coming from FNB. Went a different way to you. Your skills in fabbing stuff give you different options. I just kinda went with the simple chop and change version. Having had adjustable PH rods before, I found that I needed so little extra length (like half an inch) that I didn't really want to pay all that cash for so little change. And, the adj rods I had before were RH thread only so you had to keep undoing one end to adjust them. I shall cut out a section of the PH rod. If I just add this in, it will be too long to start with.

I decided I'd make a bottle screw version. Started with this LH/RH section to go in the rod. The outer nuts will be welded onto the rod and be locked with the inner nut unless I think of something different.. I'll post the conclusion on my own build thread. But half a world apart and doing the same thing. Ha. Small world.

View attachment 16117

Thats cool Chris! :thumbup:

Should work well. :icon-biggrin:

I'm hoping that by returning my panhard rod to nearer the angle it left the factory with, as opposed to just lengthening it I might get better articulation. I did also wonder if it might improve the ride as obviously it should restore the geometry of the suspension back to standard. :think:

The Jimny build that's becoming less Jimny day by day. :lol:

What will this one be called Ben? Great to see it coming together.

LJ's getting better by the minute too :thumbup:

Yeah thats what worries me, I want it to still be a Jimny primarily. :oops:

But atleast its still all Suzuki! :icon-cool:

Not sure of a name yet. :think:

The Jimny will probably take a while to build as its not a priority job. :thumbdown:

Should get the Maruti project done quite quickly though. Then theres the air boat to build which will involve lots of alluminium welding and were still working on the world record attempt project and were hoping to give that a really good test run over the next week! So lots of fun projects/toys to build. :dance:

LJ is going really good! :clap:

Because I did so much prep work before the desert trip I havent really got to do any work on her now. I'm going to build some rear spring adaptors hopefully next month and I might look at getting some new rear shocks.

Then I want to build the rear cargo shelf and thats pretty much it for a while. :icon-biggrin:

I will also need a new windscreen at some point as a bird hit it on the way back from the desert and cracked it. :doh:
 
I will also need a new windscreen at some point as a bird hit it on the way back from the desert and cracked it. :doh:
What were you doing to her that made her crack your screen Ben?
 
:lol:

TBH I knew I'd do a windscreen on the trip as thats what has happened every time I've been to the Outback!

But I thought it would be other vehicles kicking stones up when passing on dirt roads. :think:

I've got windscreen cover on my insurance so I'm going to see how much the excess is to have them replace it. The guy my boss uses will do it for $120. :icon-smile:
 
Thanks Pat! :thumbup:

Don't seem to have much time to get on here anymore. :thumbdown:

I'm putting all my energy and concentration into my TIG welding at the moment. I've never wanted something so badly before or been more determined as I am about getting my welding qualification and getting to the mines! :think:

I've only got 2 more weeks at TAFE then they close for almost 3 months for the Christmas/summer break! :crazy:

So next week I'm going to buy the Miler TIG welder I want, the 200DX. :dance:

That way I can practice like hell and hopefully sit the test in the new year. :pray:

This is the machine:

http://www.millerwelds.com/products/tig/product.php?model=M00118

Its a shame I'm not visiting the US this year as buying one over there and bringing it back in my suitcase would save me thousands! :doh:

Oh well..................

I see it as an investment in my future, I will put the receipt in with my tax return and once I've mastered alluminium and stainless welding I should be able to make some cash on the side welding things for people. :icon-cool:

Anyway................................

Time for some pics! :dance:

I've been doing some work on project Maruti this week (well the 3 days I was at work after we had 2 days off at the start of the week for a public holiday.)

I pulled the old knackered 1 litre engine out.

PB050002_zps101f8ee2.jpg

And found a suitable 1.3 litre engine out of the Suzuki parts warehouse.

PB050003_zps892fbcbb.jpg

PB050004_zpsab2d8ca3.jpg

PB050005_zps17b772d8.jpg

After deciding the exact spot it needed to sit I could look at modifying the existing engine mounts to suit the new engine.

PB050006_zpsbfc3b9d4.jpg

PB050007_zpsfceb1afe.jpg

PB050008_zpsc8c35282.jpg

PB050009_zps2351bc46.jpg

On the passenger side I could just use a 6mm thick piece of steel.

PB050011_zps7667aa8e.jpg

PB050012_zps868f17d4.jpg

But the drivers side was slightly more complicated.

PB050014_zpsd495bdec.jpg

Had I have left it like this then over time it would have cracked the welds like it did on one of the trucks on a recent 4wd trip I was on.

PB050015_zpsbd3f931b.jpg

PB050016_zpsb912900b.jpg

The correct way to do it is to triangulate it back to the chassis, thats how I did it on LJ 4-5 years ago and I've never had an issue with welds cracking on engine mounts! :icon-biggrin:

PB050018_zpsde27c935.jpg

PB050019_zps64a95fbd.jpg

PB050021_zps1d9d7473.jpg

I cut some 75mm x 50mm box section into 60mm pieces and drilled a hole through the center of each. These would be my budget bodylift spacers.

PB050010_zps24025e4b.jpg

Painted them and bolted them to the body.

PB050022_zpsd8953cb4.jpg

PB050023_zpsff40a3ab.jpg

PB050024_zps108487b0.jpg

I could then lift the body up off the trailer, push the trailer out one way and the chassis in from the other.

PB050025_zps502c4069.jpg

Due to the thick rubber body mounts that I used on top of the steel box section spacers the car ended up with a 4" lift and all for virtually no cost!

PB050026_zpsc2bda4d6.jpg

PB050027_zps3ce4141b.jpg

PB050028_zps9c3cea5c.jpg

PB050029_zpscf95ece5.jpg

The old bonnet was totally shot so I found a suitable second hand one, this one is off a Sierra that would have had a 1.3 litre engine, as it has a raised center section that the 1 litre ones never had. Not that it needs it now the body is sitting 4 inches higher!

PB060030_zps68a0ad23.jpg

PB060031_zps55bb4603.jpg

Wheels and tyres next!

I found some second hand 31" muddies!

PB060032_zps24caa12d.jpg

Much better than the tiny old 27" road tyres.

PB060033_zps17187844.jpg

Its good practice when lifting a 4wd to go out with the wheels/tyres to make the car more stable. Wheels with more negative off set is the best way to go, but as this is an off road only vehicle I can use wheel spacers (which arnt road legal anywhere in Australia).

This is the first new part I've fitted to the vehicle.

PB060034_zpsd9fbcf87.jpg

A quick wire brush of the brake drum to get the worst of the rust off, a quick spray of black enamel and on the spacers went.

PB060035_zps9f96c261.jpg

PB060036_zps86d6b101.jpg

And on with the new tyres!

PB060037_zps14eac878.jpg

Much better!

Starting to look a bit tougher and cooler now!

PB070043_zpse33dc630.jpg

PB070044_zps2733b576.jpg

PB070045_zps57dfc383.jpg

A few things needing to be done to compensate for the monster bodylift.

One being the steering.

I cut and drilled some 15mm thick steel and found some suitable bolts.

PB060038_zps8954f17d.jpg

PB060039_zps401ffc62.jpg

And bolted it in place.

PB060040_zps045aad19.jpg

PB060041_zpsa1952d8d.jpg

I found a carburetor and engine wiring loom.

PB070046_zps2aca580c.jpg

I mounted it and got everything all hooked up. I also made some rad brackets and got a 1.3 litre rad bolted in.

PB070047_zps6ab39092.jpg

PB070048_zps4f7a8224.jpg

We got it running today but were going to try a different carburetor next week as it wasnt running too great.

Plan for next week is to spend a day pulling the worst of the dents out, sanding the body down and respraying it.

Then another day building the roll cage and mounting tube doors. :icon-cool:

Still havent decided whether to build a winch bumper for the front or not.

The idea with this project is to do it cheaply using second hand parts weve already got so not sure I can stretch to the time and cost of a winch and winch bumper. :think:

I'm hoping to do some work on LJ tomorrow ready for a 4wd trip next month. :icon-cool:
 
Back
Top