Don't like the adverts?  Click here to remove them

LJ70 Build Thread!

Birder said:
Ben, are you sure you have not mixed up your images

This one looks like a Land Rover to me

P1000281-1.jpg

:lol:

sae70 said:
Looks like alot of fun to had there Ben :D

Those battery clamps on that 4-Runner look very familiar :think: If the top clamp, hook bolt, plastic tray & inner wing battery shelf are the same as fitted on the Collie then I know a few Prado owners would / may be interested in them :D


its not been fun at all mate. ive lots count of the times ive been burnt, or banged my head getting out from under the truck, and its so time consuming. ive decided i hate doing body work. :thumbdown:

but i know it will all be worth it once my trucks built. i got more done yesterday but havnt got time to re-size all the pics, upload them to photobucket, and then copy all the links over. will try and update the thread tonight. :thumbup:

drove the 4-runner again yesterday and it really does pull well! will be interesting to see how it feels with my intercooler and when i get a 3" stainless exhaust. :twisted:
 
Ben, that's a 1st class job you're doing there :thumbup: Well done - your truck will be mint by the time you're done :cool:
 
thanks Andrew, its getting there slowly. :thumbup:

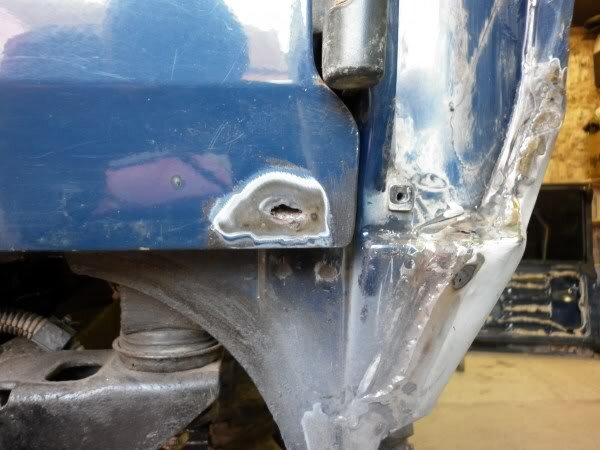
so yesterday i finished the welding underneath, and then cut the piece of rot out of the inner arch.

P1000309-1.jpg


and welded the patch on.

P1000310-1.jpg


whilst scraping the melted paint off around the weld i found another small area of rot, so i poked it and bashed it till i was back to sound metal, so i patched that aswell.

P1000311-1.jpg


i then finished welding the panel around the rear light.

P1000312-1.jpg


P1000313-1.jpg


next i started some re-assembling. :dance:

so i refitted the rubber strips onto the fuel tank hangers.

P1000314-1.jpg


i used mitre mate to stick the rubber squares back on to the fuel tank.

P1000315-1.jpg


so fuel tank, guard, and hangers all ready to go back on.

P1000317-1.jpg


fitted.

P1000321-1.jpg


P1000324-1.jpg


next i took the 2 exhaust heat shields and a front guard and steam pressure washed them clean.

P1000325-1.jpg


i refitted one of the heat shields.

P1000326-1.jpg


next i turned my attention to refitting the rear suspension. aswell as the bottom shock bushes being slightly worn due to not having a washer fitted above them, i noticed the same was true on the top, the metal surrounding the top shock mount has worn into the bush.
i dont know why i didnt fit washers when i fitted the lift kit. :doh:

P1000327-1.jpg


i needed some washers with quite a big centre hole to fit over the shock mount, but couldnt find any suitable, so i made some using a hole saw in the drill.

P1000328-1.jpg


P1000329-1.jpg


new home made washer in place.

P1000330-1.jpg


shock fitted correctly.

P1000334-1.jpg


P1000335-1.jpg


P1000333-1.jpg


i fitted the panhard rod, and reconnected the 2 fuel lines, brake line, handbrake cable, prop shaft, and axle breather, and then put the wheels back on.

P1000340-1.jpg


P1000342-1.jpg


P1000345-1.jpg


that was the end of sunday. next job was going to be fitting the new back door.

P1000350-1.jpg


so today i finished work, and started on my truck. i removed the back door, and laid the new one inside ready to strip it down.

P1000351-1.jpg


first job was to remove one of the hinges as it had been cut clean off.

P1000352-1.jpg


P1000353-1.jpg


i noticed some rust behind the hinges on the body, so i sanded this down before rust killing it.

P1000354-1.jpg


i removed one of the hinges from my bent door to replace the cut one.

P1000355-1.jpg


the catch was badly bent and twisted, and the electric wires had been cut through, so i needed to remove both these parts from my original door.

P1000356-1.jpg


i bolted the door on, but found it needed lifting up as it wouldnt shut properly.
so i used a ratchet strap to lift the door up with all the bolts slackened off. once the ratchet strap had lifted the door up i tightened all the bolts up.

P1000357-1.jpg


bent catch and new one ready to be fitted.

P1000360-1.jpg


fitted my electrics and rear washer hose through into the body.

P1000361-1.jpg


next i removed all the latch parts from the bottom of the door as there very badly rusted. i will use the ones off my old door once the new doors been painted, as my old ones are in better condition.

P1000362-1.jpg


P1000363-1.jpg


need to remove my old rear window as its tinted.

P1000364-1.jpg


the rust inside the new door, much worse than my old door, but at least the door is straight.

P1000366-1.jpg


P1000367-1.jpg


treated it with rust killer.

P1000368-1.jpg


P1000369-1.jpg


the inside of all the doors will be getting a very good coat of waxoil to hopefully prevent any further rust.

nice straight doors.

P1000375-1.jpg


P1000376-1.jpg


i definitely want some new wheels with more off set, as the wheels still seem far to far inside the arches.

P1000373-1.jpg


i then used some seam sealer in a few small areas in the wheel arch where i couldnt get into weld.

P1000374-1.jpg


and that was it for today. :handgestures-thumbup:

quick question.................

are all these hoses needed coming out of the tank to the filler neck?

P1000318-1.jpg


theres 3 hoses in particular that i want to do away with, as one of them has a hole in it due to rust. theres 3 hoses coming off the tank next to each other. 2 go up to a cylinder thing, then one comes off the top and links back to the tank.

P1000336-1.jpg


P1000338-1.jpg


P1000337-1.jpg


any one know what there for, and if i can get rid of them? :thumbup:
 
I can't answer your question Ben ... but thats amazing work you're doing to your 70 :cool: :cool:
 
The two pipes from the circular mounting are the fuel pipe to pump and the return pipe from the engine overflow. The other 3 pipes are for venting purposes and they incorporate a check valve. You need to make certain that the tank can breath air in so that it does not collapse as the fuel is used up. If you remove the system as Toyota designed it, you may find difficulties in filling the tank if you use high capacity (ie commercial) pumps at fuel stations.

By the way, you need to tighten the bottom shock mounts until the rubbers are compressed to about 75% uncompressed thickness.

Roger
 
I agree the is is really good work.

I wish I had a garage like you have to work in. I spent this evening under the LandCruiser with it on wheel ramps attacking the rear axle with the wire brush on the grinder and painting it. Looks much easier your way! :doh:
 
Don't like the adverts?  Click here to remove them
thanks guys, its getting there slowly. :thumbup:

Roger Fairclough said:
The two pipes from the circular mounting are the fuel pipe to pump and the return pipe from the engine overflow. The other 3 pipes are for venting purposes and they incorporate a check valve. You need to make certain that the tank can breath air in so that it does not collapse as the fuel is used up. If you remove the system as Toyota designed it, you may find difficulties in filling the tank if you use high capacity (ie commercial) pumps at fuel stations.

By the way, you need to tighten the bottom shock mounts until the rubbers are compressed to about 75% uncompressed thickness.

Roger

thanks Roger i thought your probably know.

not sure what i will do yet, i either need to remove those 3 breather pipes altogether and see how the truck runs, or try and source a replacement fuel filler neck.
might see what the 4-runner's got on it.

as for high capacity pumps. i always use them. most shell fuel stations have the high pressure pumps usually for lorries. fills the tank so quick, and you dont need to stand there holding the nozel in the tank, just click the lcoking tab in place and it clicks off when the tank's full. :thumbup:


ModelMakerMan said:
I agree the is is really good work.

I wish I had a garage like you have to work in. I spent this evening under the LandCruiser with it on wheel ramps attacking the rear axle with the wire brush on the grinder and painting it. Looks much easier your way! :doh:

yes definitely easier on the bench, but i think your ways probably quicker. :)

tonight started off quite well.

first i decided to finish the last of the welding on the back of the truck.

so there was one hole on the bottom right of the new rear door.

P1000378-1.jpg


a little bit where the new arch meets the sill.

P1000379-1.jpg


gave an area of rust on the bottom left of the door a blast with a flap wheel disc in the grinder.

P1000380-1.jpg


which uncovered a bit of rot and a hole after id dug all the rot out.

P1000381-1.jpg


welded a patch over the hole, and ground over the welds.

P1000382-1.jpg


same on the sill.

P1000383-1.jpg


next i decided to get the brushable seam sealer applied to all the joints and welds on the new arches and inside the inner arches.

P1000384-1.jpg


P1000385-1.jpg


P1000386-1.jpg


P1000388-1.jpg


P1000391-1.jpg


P1000392-1.jpg


so with that all done, im now ready to apply the body shutz inside all the arches, followed by copious amounts of waxoil.

so i decided to turn the truck around and begin on the front, so i thought i may aswell take it for a spin while its out of the workshop.

so i jumped in and pushed the break pedal to the floor, as i hadnt yet bled the brakes after disconnecting them to remove the rear axle.

i tried connecting the eazi bleed kit weve got, but none of the caps would fit my master cylinder, so with no one around to help me i looked around for what i could use to wedge the break pedal down, after pumping the pedal, while i got underneath and opened the bleed nipple.

shovel fitted perfectly and worked a treat.

P1000394-1.jpg


i now had a break pedal that felt better than it had ever felt.
i then remembered that i had no clutch pedal as the slave cylinder has been leaking. so out with the shovel again, but this time i had to add a piece of 4" x 2" as the shovel wasnt long enough.

P1000395-1.jpg


i now had a clutch and brakes, so i stuck 20litres of cooking oil in the fuel tank and tuned her over. she fired straight up and was running perfectly.

after a few seconds she started to splutter and miss fire a bit. so i pumper the plunger on top of the fuel filter for a while, but this didnt make much difference.

i backed her out of the workshop anyway.

P1000397-2.jpg


P1000398-1.jpg


P1000399-1.jpg


she still wasnt running right and kept stopping. i thought the only thing it can possibly be is the 2 fuel lines coming from the tank, ones flow and ones return, maybe ive connected them the wrong way around. so i climbed under the truck and attempted to swap the hoses around, but one of the hoses was no longer attached to the tank. :thumbdown:

i think it must have got caught when i was refitting the tank, and with the lines being a bit rusty, just snapped straight off. so next job now is to take the tank back off, and try and fix the broken fuel line. :(

Mitch turned up so i got him to push me back into the workshop with his landy.

P1000401-1.jpg


P1000402-1.jpg


P1000404-1.jpg
 

Attachments

  • P1000378-1.jpg
    P1000378-1.jpg
    44.6 KB · Views: 116
i think it must have got caught when i was refitting the tank, and with the lines being a bit rusty, just snapped straight off. so next job now is to take the tank back off, and try and fix the broken fuel line.

thats one of the problems I had. Got a new pickup pipe and filter form the main dealer as the old one was fag-paper thin! Common problem from what I gather. Cracking job on the 70 :clap: :clap: Just reminded me I need to get the waxoyl out ready for the winter!
 
As above, its a common problem. I had to replace mine because it was leaking and causing rough running, when I came to have a look I barely touched it and it fell off. Bought a new one from the stealer, wasnt impressed with the price for what is essentially 2 pipes and a flange.
 
went to main dealer today for a price on the fuel pick up/return pipes, i was expecting about £80 which i dont think i would have been willing to pay.

was pleasantly surprised at £41 with the VAT. so ordered one and it will be here in the morning. :thumbup:

i wont be ordering a new filler neck, as that was £162 with the VAT! :shock:
 
I had a couple of pipes rusted through on my filler. I just cut off the the worst bits and joined the bits that were left with PVC tubing.
 
ModelMakerMan said:
I had a couple of pipes rusted through on my filler. I just cut off the the worst bits and joined the bits that were left with PVC tubing.

i would have done that in this instance had they not snapped off to short to do that. i did think of cutting the pipes off the flange that bolts onto the tank, drilling out the flange, and then re-attaching the flange to the pipes with some weld, leaving enough pipe sticking up from the flange to attach a rubber fuel hose onto, it would have just meant my fuel pipe would be slightly higher up in the tank, so id have slightly less range on the tank.

but i thought for £40 id just buy a new one. :thumbup:

i got to the farm at 7am today so i could do an hour on the truck before work. :cool:

so i removed the fuel tank, and examined the damage. the other pipe had almost snapped off aswel. :thumbdown:

the screws were also very rusty so i had to use pliers to remove 3 of them, and then cut a slot in the other 2 with a hacksaw and use a flat bladed screw driver to get them out.

P1000406-1.jpg


P1000407-1.jpg


P1000408.jpg


P1000409.jpg


new one will be here tomorrow. £41 from main dealer.

i also picked up some new fuel hoses today to go with the new fuel pickup/return pipes.

P1000410.jpg


after work today i managed another 4 hours.

first i removed the drivers side inner wheel arch. this is so i can bash out the dent that the bumper made when that bentley jumped out in front of me. :lol:

will also make removing the snorkel easier, aswell as removing the old aerial and fitting the new one.

old arch removed after resorting to cutting some of the bolts out, after the captive nuts chose to spin.

P1000411.jpg


P1000412.jpg


P1000413.jpg


dent in the wing.

P1000414.jpg


i started hammering it out, and realised it would be easier to do if i removed the grill, indicator and front panel.

P1000415.jpg


managed to hammer a lot of the dent out.

P1000416.jpg


P1000417.jpg


P1000418.jpg


next i removed the snorkel.

P1000419.jpg


i then decided to remove the old aerial ready to fit the new one. the new aerial which is asmall flexible one only has a short cable on it, to the point where it will only be long enough if it takes a straightish run from the aerial to the head unit.

so i had the idea of taping a piece of wire to the end of the old aerial cable, so that when i pull the old aerial cable out, it will pull the wire through with it, i can then tape the wire to my new aerial cable and pull it back through.

so i taped the wire on.

P1000420.jpg


unfortunately the old cable was snagged some where behind the clocks, so they too needed to come out. a few screws later the clocks were out.

P1000421.jpg


while disconnecting the speedo cable from the back of the clocks i remembered that the speedo hadnt been working for the last few months, so i tried turning the cable and it turned freely. i then tried pulling the inner cable and it pulled straight out, and the other end has clearly snapped.

so i will order a new one tomorrow from the main dealer.

P1000422.jpg


old aerial removed.

P1000424.jpg


i then decided to finish the last of the welding. i needed to weld over the holes left in the wing from the brackets for the fibre glass arches.

P1000425.jpg


so i cleaned around the holes with a flap wheel disc.

after denting the metal around the holes in a little with the hammer, i cut some small metal tabs, and welded them over the holes.

P1000427.jpg


P1000426.jpg


all welded.

P1000428.jpg


P1000430-1.jpg


ground them down flush with the surrounding metal using a flap wheel disc.

P1000431-1.jpg


there was a few more to do on the other side.

P1000432-1.jpg


P1000433-1.jpg


so i pick the metal tabs up using a large magnetic tipped flat bladed screw driver and then hold them in place while i tack weld them on.

P1000434-1.jpg


all welded and ready for grinding down with a flap wheel disc.

P1000435-1.jpg


so plan for tomorrow is to do an hour before work and hopefully get the new aerial fitted, and tighten all the bolts on the rear axle for the trailing arms, and panhard rod, and also the rear shocks that Roger noticed need to be tighter.

then after work i want to refit the fuel tank with the new part fitted, and then start stripping the front down. :thumbup:
 
Excellent work happening there Ben .... you'll have a minter once you've finished :cool: :cool: :cool:

will it be ready for Lincomb ???
 
thanks mate. :thumbup:

im hoping to have the rebuild done by next weekend, at the latest. but a lot of this will depend on if my mates can get it sprayed this weekend :pray:

ive got a laning trip to the lakes on the 11th september. then on the 17th and 18th of september im camping and laning in wales. then the start of october is lincomb. :dance:

i doubt i will have the rock sliders and back bumper made and fitted by then, and i doubt the new engine will be in. im thinking of fitting the new engine the weekend after lincomb. :thumbup:

im very much looking forward to Lincomb. last time there was only my LJ70 & Jims LJ78 for 70 series, but this time there shoiuld be a few more, what with yours, Rogers, and Trevor's. :twisted:
 
I'm hoping to go in my 78 as well, but havent had the pass authorised yet.

That build is going well, be like seeing a film star actually seeing it in real life!

Pete
 
wobbly said:
I'm hoping to go in my 78 as well, but havent had the pass authorised yet.

That build is going well, be like seeing a film star actually seeing it in real life!

Pete


would be great if you could go pete ... :thumbup:
 
Blimey! I just realised where Lincomb is, its only 60miles from me. Hmmmm I might be tempted :D
 
great. more 70's the better! :thumbup:
 
did a bit before work today.

cheap maplins aerial.

P1000436-1.jpg


P1000437-1.jpg


it didnt take long to fit, but getting my hand up to tighten up the 10mm nut really was tricky, and im sure would have been almost impossible without flexy head ratchet spanners.

P1000438-1.jpg


taped the new cable onto the piece of wire id pulled through when i removed the old aerial and cable.

P1000439.jpg


my idea worked faultlessly, and after refitting the head unit i tested it and ive now got perfect reception on all channels. :dance:

P1000440.jpg


i picked up the new fuel pipe assembly today.

P1000441.jpg


18 years worth of crud had really taken its toll on the old one.

P1000442.jpg


i should have ordered some new bolts for it but i forgot.
i managed to find some but they were a bit long so i had to cut them down.

P1000443.jpg


all bolted up.

P1000444.jpg


i then decided to replace the old rubber hoses.

P1000445.jpg


cut the new ones.

P1000446.jpg


fitted the sheathing off the old hoses onto the new.

P1000447.jpg


and fitted them to the tank.

P1000448.jpg


getting the tank back in was a lot harder than getting it out. the truck is sat on its wheels and not jacked up at all, and the tank had 20litres of veg oil in it, but i managed to eventually wrestle it in place and get it bolted up, and then connect the new lines.

P1000449.jpg


when collecting the new fuel pipe part from toyota today i enquired about a new speedo cable.................................£77 +VAT! :shock: :thumbdown:

theres no way im going to pay that. im not sure if any after market places selling them?

if i cant find one i will wait till i strip the 4-runner and see if that one might fit.

as i wont be fitting a new speedo cable yet, i refitted the clocks.

P1000450.jpg


i then tightened all the bolts up on the rear axle. :thumbup:
 
Back
Top