Don't like the adverts? Click here to remove them
You are using an out of date browser. It may not display this or other websites correctly.
You should upgrade or use an alternative browser.
You should upgrade or use an alternative browser.
LJ70 Build Thread!
- Thread starter Ben
- Start date
- Joined
- Oct 13, 2010
- Messages
- 6,058
- Country Flag

ARB Air Locker Fixed, Rear Disc Brake Conversion & Chassis Stands.
OK a little update on LJ........
I got LJ up on stands and pulled the wheels off.


Drained the diff oil which looked pretty clean.

Pulled the prop shaft off.

Half shafts out.


Comparing my old half shafts that had drum brakes on to the ones going back in for the disc brake conversion.


Pulled the diff out.

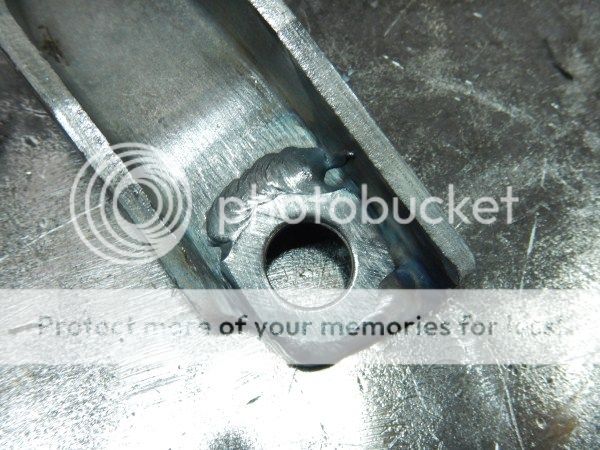
Got it in the vice to locate and inspect the damage.

The damage was obvious!
The ARB center had worn through the copper air line, this is why the locker would some how still engage, but the compressor would run continuously. This had resulted in the diff oil being forced past every oil seal on the rear axle!


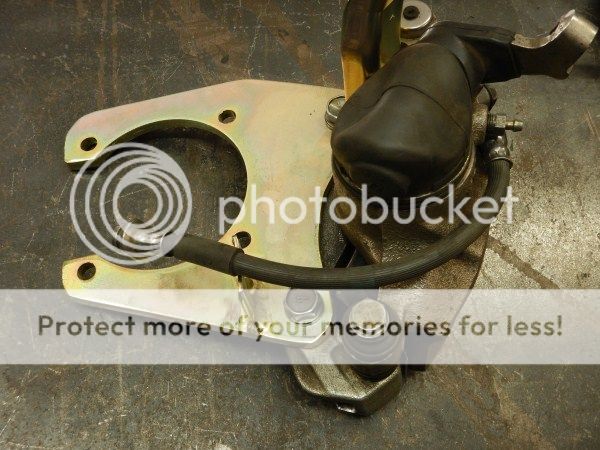
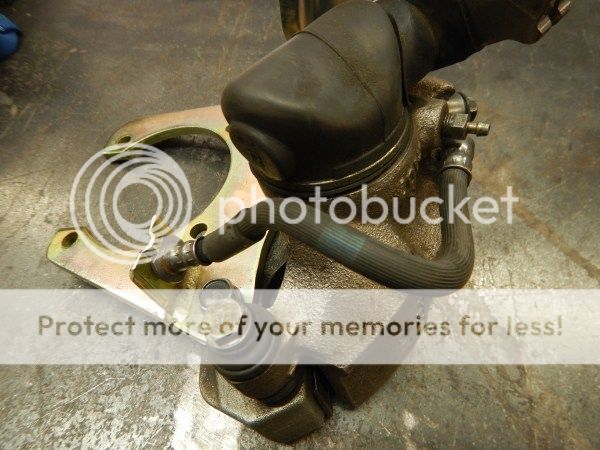
Picked up a replacement seal housing from ARB HQ and with me now getting ARB parts and products at cost price it was less that half the price of the last one I got!

Removed the old damaged one.


I didnt build this locker into this diff but looking at the ARB instructions the copper air line hadnt been run quite how they tell you to.

Fitted.

Testing the locker with my big workshop compressor.

Had to push some half shafts in to test it properly.


Cleaned up the axle and applied plenty of RTV sealant.

Diff back in.

Followed by prop shaft.

I cracked on with the disc brake conversion.
Half shaft slid in place.

Bolted in place.

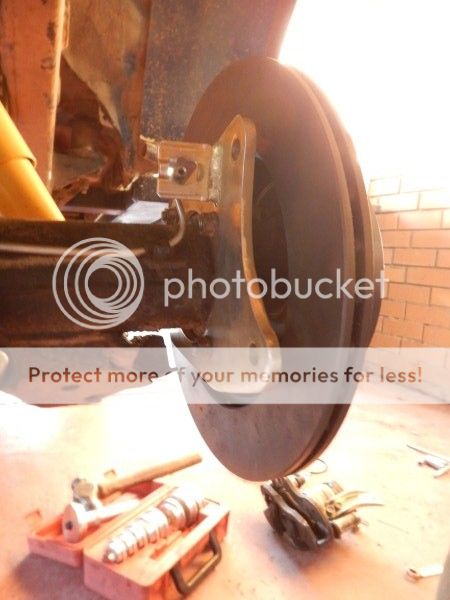
Nissan GQ Patrol rear disc on next.


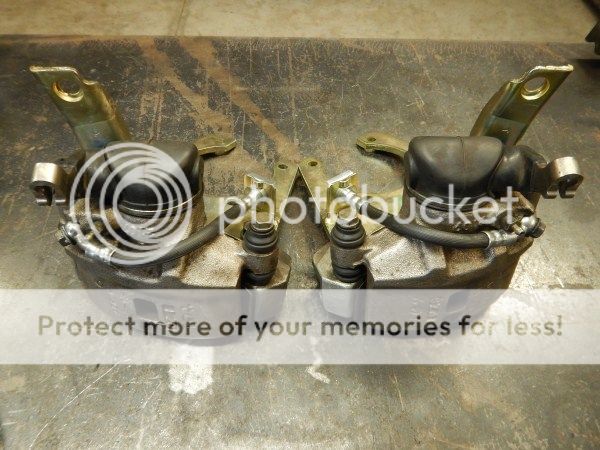
Started working out the position of the Subaru L series caliper.


Initial thoughts were that I may be able to use the standard 70 series handbrake cable/linkage.


I had read online that when doing this conversion the Subaru L series calipers need grinding out slightly. When positioning the caliper on the disc it was clear to see why this was necessary.

Because these calipers must work with smaller discs on the Subaru, the pads wont have full surface contact on the Patrol discs without grinding some caliper away.


Marked what needed removing.

Got the caliper in the vice ready for grinding.

Ground down.

I had to wind the pistons back slightly.


I found a bicycle tool worked great for this.

Checked to make sure the discs and calipers will fit inside a 15" wheel, which they will, just!


I started drawing out the caliper brackets using simple geometry.


I made a bracket out of 3mm sheet steel.

I had wanted to just cut a section out of the bottom and bolt it on with all 4 studs, but I found the 90mm central hole wasnt quite big enough, so I ended up cutting the corner off this first prototype.

Bracket on.

We happened to have a customers Jimny on the hoist and I spotted the handbrake system had 2 cables going to the wheels, which then split to one going into the cab which is what I really needed for LJ.


Sourced a Jimny handbrake bracket and cables.

Pulled the drivers seat out.

To give me more access to the handbrake lever.

Old cable.

Old cable compare to the Jimny one.


Jimny one fitted.


Fitted a cable to work out a route for it.


Which in turn would help dictate the position of the caliper.


I would need to do something about the excess cable on the end of the Jimny cables though.


With more measurements taken I made another prototype, this time out of 6mm thick steel.

And a slightly bigger central hole.


Trimmed the bottom section out.


They just fit by twisting and turning them on.


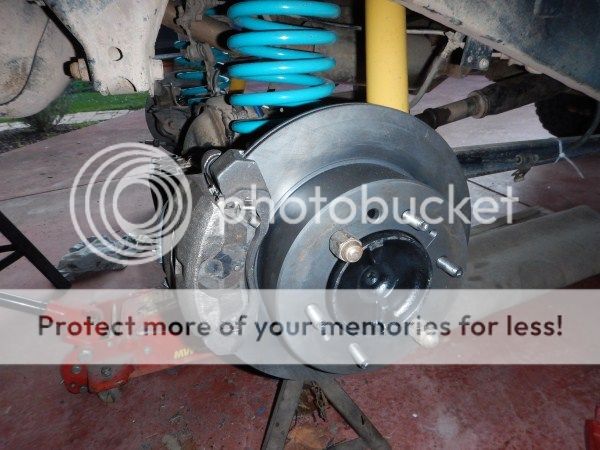
Bolted the disc and caliper on and then checked to ensure a 15" wheel would definitely fit.


I found that one of the caliper mounting holes needed moving slightly.

I was by this point confident, after my 2 prototypes that I could make the real ones.
Bought some off cuts of 8mm thick steel from the place where I've bought the last few work bench tops from.

Drew around the 2nd prototype with a couple of tiny changes.

Cut them out with the 9" grinder.

Tacked the 2 together with the TIG.

Marked out the big hole center.

15mins on the drill press and plenty of oil to keep the 105mm hole saw nice and cool while it cut through the 16mm of solid steel.


I found with my previous 2 prototypes I had got the holes ever so slightly out for the 4 studs that will hold the bracket in place. On the prototypes I just drilled the holes bigger, but on the real ones I wanted 100% perfect accuracy, so 10mm holes for the M10 studs!
So I cut a section out of the old backing plates to help ensure I had got it bang on.


4 x 10mm holes drilled for the studs, 2x 12mm for the M12 caliper mounting bolts and marked out what needed removing for the caliper.

Cut it roughly out with the oxyacetylene.

Cleaned up with the grinder and cut the center section out.

Cut through the tack welds and separated the 2 identical brackets.

With the slightly bigger central hole they twisted into position beautifully!


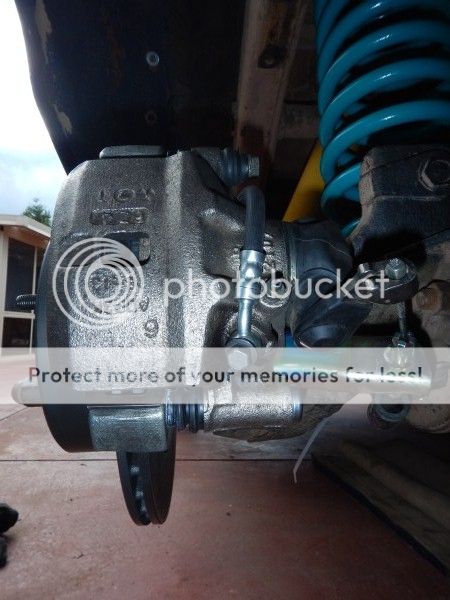
Disc and caliper fitted.

Perfect clearance this time.


So the old handbrake cable.

Will be replaced by Suzuki Jimny ones.


I still needed to come up with a solution for the caliper end of the cables.

One other thing I would need to do is to make something on the lathe from either alluminium or plastic to seal the small Jimny cable through the bigger hole in the floor pan, the same as what is on the X-ENG X brake cable.


Fitted the other bracket.


The original cable brackets will need to be bolted onto the calipers and I need to weld washers over the holes to reduce them slightly.

I thought of a solution that would save me having to cut the end off the handbrake cables and get new nipples fitted, which is what I was thinking I would have to get done.

Trimmed the springs off the cables with side cutters.


The cables now work perfectly with the calipers and at the other end I can just move the cable bracket to take up the slack.

Found I was even able to bolt one of the cable brackets onto the axle to help secure the cable.


The cables will then run up the trailing arms.


They then run up to the bracket where they split.


Bolted in place for a quick test.


Pulling the handbrake lever inside resulted in the calipers locking up on the discs perfectly!

The next job is the new brake hoses to connect from the copper brake line on the axle to the calipers. Unlike other people doing this conversion using the L series calipers and Patrol discs I wont be using 80 series front hoses as IMHO they would be far too long and a much neater option will be to have the correct length hose made. This will also ensure they can never get caught and damaged between the wheel, caliper and disc as everything is a snug fit!


I'm hoping to get some little brake line brackets designed, built and welded to my caliper mounting brackets, then they can go to get electroplated.
Then I need to get the hoses made and fitted.
Then its just a case of fitting a brake booster and master cylinder and hooking everything up.
I also got the new chassis stands finished and pained.


OK a little update on LJ........
I got LJ up on stands and pulled the wheels off.
Drained the diff oil which looked pretty clean.
Pulled the prop shaft off.
Half shafts out.
Comparing my old half shafts that had drum brakes on to the ones going back in for the disc brake conversion.
Pulled the diff out.
Got it in the vice to locate and inspect the damage.
The damage was obvious!
The ARB center had worn through the copper air line, this is why the locker would some how still engage, but the compressor would run continuously. This had resulted in the diff oil being forced past every oil seal on the rear axle!
Picked up a replacement seal housing from ARB HQ and with me now getting ARB parts and products at cost price it was less that half the price of the last one I got!
Removed the old damaged one.
I didnt build this locker into this diff but looking at the ARB instructions the copper air line hadnt been run quite how they tell you to.
Fitted.
Testing the locker with my big workshop compressor.
Had to push some half shafts in to test it properly.
Cleaned up the axle and applied plenty of RTV sealant.
Diff back in.
Followed by prop shaft.
I cracked on with the disc brake conversion.
Half shaft slid in place.
Bolted in place.
Nissan GQ Patrol rear disc on next.
Started working out the position of the Subaru L series caliper.
Initial thoughts were that I may be able to use the standard 70 series handbrake cable/linkage.
I had read online that when doing this conversion the Subaru L series calipers need grinding out slightly. When positioning the caliper on the disc it was clear to see why this was necessary.
Because these calipers must work with smaller discs on the Subaru, the pads wont have full surface contact on the Patrol discs without grinding some caliper away.
Marked what needed removing.
Got the caliper in the vice ready for grinding.
Ground down.
I had to wind the pistons back slightly.
I found a bicycle tool worked great for this.
Checked to make sure the discs and calipers will fit inside a 15" wheel, which they will, just!
I started drawing out the caliper brackets using simple geometry.
I made a bracket out of 3mm sheet steel.
I had wanted to just cut a section out of the bottom and bolt it on with all 4 studs, but I found the 90mm central hole wasnt quite big enough, so I ended up cutting the corner off this first prototype.
Bracket on.
We happened to have a customers Jimny on the hoist and I spotted the handbrake system had 2 cables going to the wheels, which then split to one going into the cab which is what I really needed for LJ.
Sourced a Jimny handbrake bracket and cables.
Pulled the drivers seat out.
To give me more access to the handbrake lever.
Old cable.
Old cable compare to the Jimny one.
Jimny one fitted.
Fitted a cable to work out a route for it.
Which in turn would help dictate the position of the caliper.
I would need to do something about the excess cable on the end of the Jimny cables though.
With more measurements taken I made another prototype, this time out of 6mm thick steel.
And a slightly bigger central hole.
Trimmed the bottom section out.
They just fit by twisting and turning them on.
Bolted the disc and caliper on and then checked to ensure a 15" wheel would definitely fit.
I found that one of the caliper mounting holes needed moving slightly.
I was by this point confident, after my 2 prototypes that I could make the real ones.
Bought some off cuts of 8mm thick steel from the place where I've bought the last few work bench tops from.
Drew around the 2nd prototype with a couple of tiny changes.
Cut them out with the 9" grinder.
Tacked the 2 together with the TIG.
Marked out the big hole center.
15mins on the drill press and plenty of oil to keep the 105mm hole saw nice and cool while it cut through the 16mm of solid steel.
I found with my previous 2 prototypes I had got the holes ever so slightly out for the 4 studs that will hold the bracket in place. On the prototypes I just drilled the holes bigger, but on the real ones I wanted 100% perfect accuracy, so 10mm holes for the M10 studs!
So I cut a section out of the old backing plates to help ensure I had got it bang on.
4 x 10mm holes drilled for the studs, 2x 12mm for the M12 caliper mounting bolts and marked out what needed removing for the caliper.
Cut it roughly out with the oxyacetylene.
Cleaned up with the grinder and cut the center section out.
Cut through the tack welds and separated the 2 identical brackets.
With the slightly bigger central hole they twisted into position beautifully!
Disc and caliper fitted.
Perfect clearance this time.
So the old handbrake cable.
Will be replaced by Suzuki Jimny ones.
I still needed to come up with a solution for the caliper end of the cables.
One other thing I would need to do is to make something on the lathe from either alluminium or plastic to seal the small Jimny cable through the bigger hole in the floor pan, the same as what is on the X-ENG X brake cable.
Fitted the other bracket.
The original cable brackets will need to be bolted onto the calipers and I need to weld washers over the holes to reduce them slightly.
I thought of a solution that would save me having to cut the end off the handbrake cables and get new nipples fitted, which is what I was thinking I would have to get done.
Trimmed the springs off the cables with side cutters.
The cables now work perfectly with the calipers and at the other end I can just move the cable bracket to take up the slack.
Found I was even able to bolt one of the cable brackets onto the axle to help secure the cable.
The cables will then run up the trailing arms.
They then run up to the bracket where they split.
Bolted in place for a quick test.
Pulling the handbrake lever inside resulted in the calipers locking up on the discs perfectly!
The next job is the new brake hoses to connect from the copper brake line on the axle to the calipers. Unlike other people doing this conversion using the L series calipers and Patrol discs I wont be using 80 series front hoses as IMHO they would be far too long and a much neater option will be to have the correct length hose made. This will also ensure they can never get caught and damaged between the wheel, caliper and disc as everything is a snug fit!
I'm hoping to get some little brake line brackets designed, built and welded to my caliper mounting brackets, then they can go to get electroplated.
Then I need to get the hoses made and fitted.
Then its just a case of fitting a brake booster and master cylinder and hooking everything up.
I also got the new chassis stands finished and pained.
- Joined
- Oct 13, 2010
- Messages
- 6,058
- Country Flag
Ben,
I haven't had time to read through your whole disc brake rear process yet, so apologies if you already know this info.
I have a LJ70 with 1KZ that I bought with a disc rear conversion already done. Subaru L-Series calipers, patrol rotors, profile cut 10mm caliper mounting plates.
The car also apparently has a 80 series master cylinder but original booster, and late model hilux front calipers and rotors.
All this equipment was on the car when I bought it, but untested and not connected. I have hooked everything up and it is working, but it's not very impressive. The rear bias still needs more adjustment due to being lifted so high, but I am not impressed at all.
15" rims will not fit for a start, I have had to go to 16's. Then there is the handbrake assy. Subaru is designed to have the cable split, with 1 "leg" going to each cylinder. Bundera has the cable going to one wheel, with a 2nd cable going across to the other side. This means that there is less travel at the cylinder than subaru intended and the cable comes in on the wrong angle. Modification of the input arm is required but even then it's not an ideal setup.
Last week I bought a KZJ78 for parts which we don't really get here in aus, but when I looked it has a factory rear disc setup and double diaphram brake booster. I haven't even pulled the wheels off yet to look closely but with your contacts in UK you might have more access to those kind of parts. Handbrake cable setup is same style as my factory bundera. Looks like it would be a better option
Cheers
Dave
Dave, any chance you can take a pic of the double diaphram brake booster please mate so I know what I'm looking for.

Very nice conversion Ben, now you've got me wondering on my 80 (with only drum brakes at the back).
I guess you'll have to be careful on a road test to be sure the rears don't lock up before the fronts, particularly in the wet and muddy conditions.
It could be lethal in an emergency stop or on a steep muddy decent offroad.
I was also thinking (bit late now though) that couldn't the cause of the damage to the copper air-pipe in the diff be down to the surge of oil moving the copper pipe about?
In all fairness, you must have carefully positioned the copper pipe in the first place, so what moved it? There is only the oil. That makes me think it needs a mid-way support bracket of some sorts. Either that or some added protection, such as a tough plastic shrouding.
Just thinking out loud mate...
Great work all ways round!
- Joined
- Oct 13, 2010
- Messages
- 6,058
- Country Flag
Thanks Clive.
IMO drum brakes dont belong on a 4wd that is used off road, even as just the handbrake. As like I said previously they just fill with mud which then acts like grinding paste!
There also horrible to work on! Where as discs and calipers are so much better in every way!
Regarding the rear brakes locking up..............................
I might need to adjust my LSV by bending the rod going from the rear axle, or even by buying and fitting one of the adjustable ones I've seen people fit.
Interesting ideas regarding the copper airline.........................
Yes I suppose its possible the oil surging moved it into the ring gear. It certainly wasnt rubbing when it first went in and it was fine for a while until it started leaking.
I didnt position it last time, my diff guy did and he wasnt following the ARB instructions (he worked at ARB HQ for over 10 years fitting air lockers) so he actually ran the copper air line in a slightly different position to the ARB instructions. Whether the way he routed it had anything to do with it rubbing through, I dont know.
A bracket securing it or protective sleaving is a good idea, bit late now, but certainly if it does it again its something I will look at.
I certainly wont be fitting ARB air lockers to any of my future 4wds!
I'm definitely going with the Eaton E lockers that Terrain Tamer are selling. They look much better!
Ben, I've taken a couple of quick pictures. It's covered in red dirt like everything up here. Let me know if you want any better pics.
As expected I like your handbrake cable solution and would like to buy it! Ha
Seriously though there are very few Jimny's around here so I might have to try get one sourced from down south somewhere.


As expected I like your handbrake cable solution and would like to buy it! Ha
Seriously though there are very few Jimny's around here so I might have to try get one sourced from down south somewhere.
Don't like the adverts? Click here to remove them
- Joined
- Oct 13, 2010
- Messages
- 6,058
- Country Flag
Thanks Dave. [emoji106]
I'm going to have a look at the one on my bosses 79 today and see if I think that would work. Then I will give Allfourx4 wreckers a call for a booster and master cylinder. [emoji41]
You should be able to source the Jimny handbrake cables easy enough from a wreckers I'd have thought.
I've just finished machining up the alluminum adaptor to fit the cable through the floor pan, it's turned out great! [emoji3]
Sent from my iPhone using Tapatalk
TBH Ben, I've found that my 80 (with no rear discs) doesn't suffer too badly from mud in the rear drums. I don't know why that is, but it works very well. I agree that discs are a better option in principle, you've definitely got me thinking...
- Joined
- Oct 13, 2010
- Messages
- 6,058
- Country Flag
Solar Suzuki, Air Boat, 80 Series Bull bar & LJ's Rear Disc Brake Conversion.
Update time guys..................................
Work stuff first:
Solar Suzuki.
Theres a nice article on the failed world record Simpson Desert crossing by solar power attempt, in Pat Callinans online magazine:
http://www.unsealed4x4.com.au/issue015/#89
The solar panels proved slow and troublesome to setup and take down, so I've been making fold out roof panels.


Lots more to do on that project to get it ready for the next attempt at the desert crossing, which will be next year now after the summer has passed.
We got it out in the sun to test how much power the panels are putting in.


Air Boat Project.
Back to the fuel tank build.


I needed to fit a boss into the top of the tank for the fuel pump and sender to mount to.


Hole sawed a hole in the top of the tank.

Welded it on.

Weighted the top down and welded it on.


Drilled and taped some M6 holes for the fuel pump to bolt to.


Welded some folded 3mm alluminium to the sides next to help support the top deck.


Built a frame out of thick walled 25mm box.

Tried bending some 50mm tube.

But it just kinked it badly as it really needs to be mandrel bent!

So I decided to make my own bend.
Cut some 22.5 degree cuts.

Welded them together.


Welded some bottom mounts onto the tank.
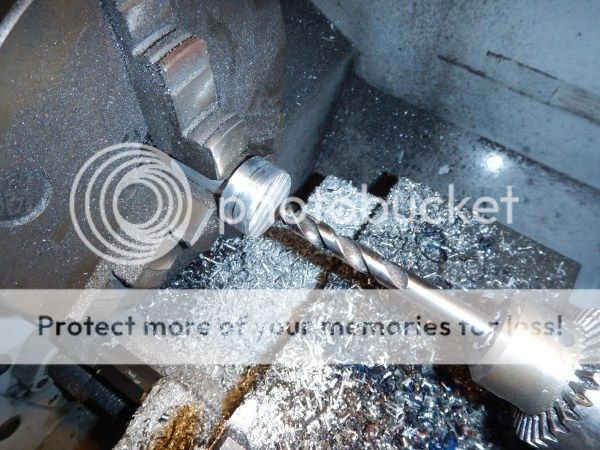
Then drilled up from below, to prevent swarf entering the tank, with a hole saw for the filler neck


Welded the filler neck on.

Tank back in.


Hole sawed the top deck section.


Fitted rivnuts for the top deck to bolt down to.


All bolted down!

My Bosses 80 Series.
We fitted a new ARB bull bar to my bosses 80 as he had decided to upgrade from a normal low mount winch and fit a Warn 8274 high mount. ARB do 2 types of bars for most hardcore 4wd's, one for low mount winches and one for high mount winches.
The old low mount winch we removed worked fine but of course lacked the power and speed of a high mount, so it had to go!


I had to do a bit of drilling to bolt the side bars up to the new bullbar, but apart from that it all bolted on really easily.


Finally LJ.
So back to the rear disc brake conversion.
I was going to make some brackets for the brake hoses, but I decided it would be easier to just cut some off an old axle.

A couple of sexy little TIG welds later and they were glued to the caliper brackets.


I also welded some washers over the holes in the cable brackets to reduce the hole size slightly to ensure the handbrake cables would lock onto the brackets nicely.
All ready for electroplating.

Less than 24 hours after dropping the brackets off at the electroplaters they were ready.


The next issue was the brake hoses.
Now as mentioned previously when other people have done this rear disc brake conversion they have used 80 series hoses which I think would be far too long.
I found the hoses off the first calipers I bought, the Nissan 2000SX ones had the correct ends on them, but sadly even they were too long.
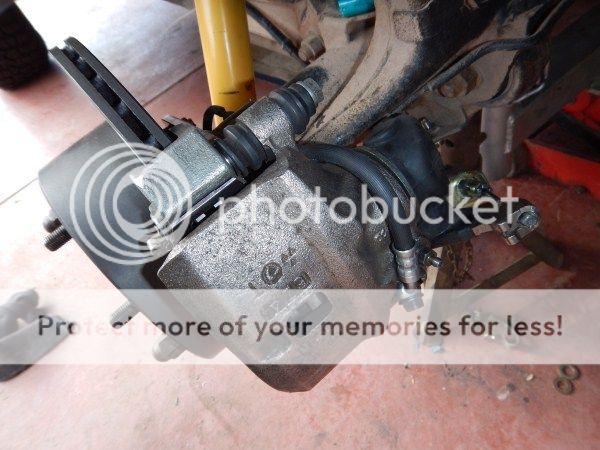
Bolted them on.


So a good few inches too long.

The ends were also 90 degrees out which meant the hoses were kinked when connected.

So I decided I would need to get some hoses made.
In the mean time I needed to replace one of the metal brake hoses on the axle which snapped when I gently tried to bend it.

Bolted the brackets on so I would know where the hose needed to go to.


Old hose removed to use as a template.

New one cut, bent and flared.

Fitted.


Dropped the calipers off at my local brake suppliers.

A few hours later and $50 later I had my old hoses back.

And my calipers back with nice neat hoses which are the perfect length.


Removed the old oil seal.


Decided to break my golden rule of only using genuine seals, after so many failures with the shitty ones Milner sell. But..............these kits down here dont come from Milners, so maybe there OK. We shall find out in due time!

Tapped in place using the correct tool.


The half shaft could then be slid back in with the disc attached.

Followed by the caliper.


Other side.


My master cylinder and brake booster would need changing.
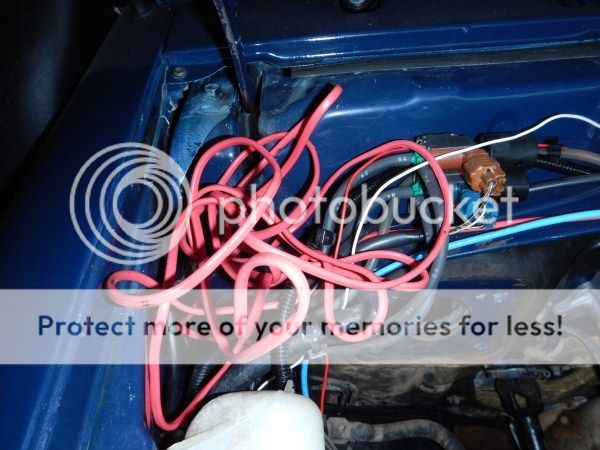
(You can see the absolute mess that is the electrics under the bonnet, but more on that later.)

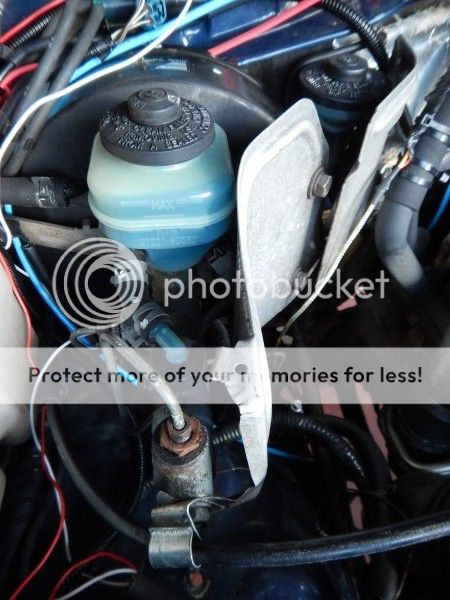
Old bits removed.


I took a chance and ordered a master cylinder and brake booster off a 2001 79 series, which has rear disc brakes as standard.
Not only did I get an awesome price, the service and super quick postage was awesome as ever!
www.All4xfour.com.au had one out to me the very next day.
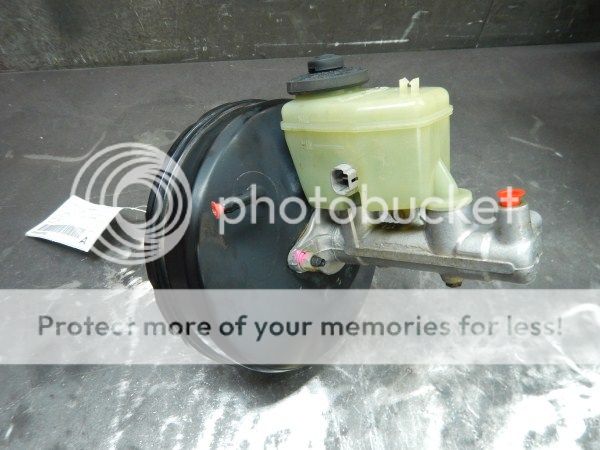

Comparing the new one to my old one.

A few quick measurements revealed it should bolt straight on!
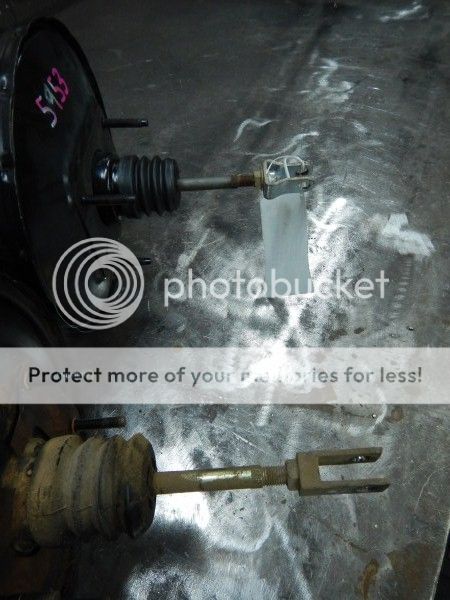

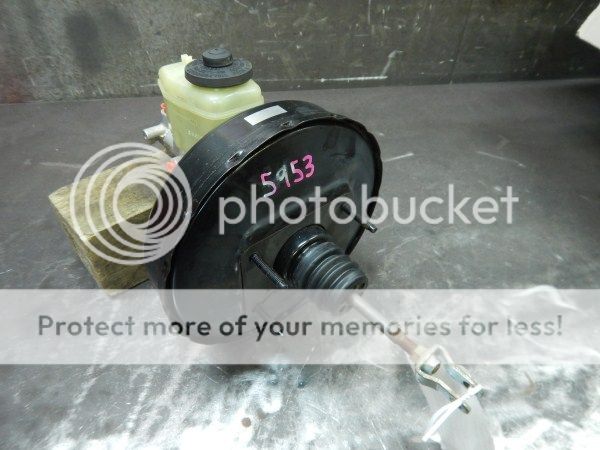
A couple of interesting differences.

My old master cylinder bolted on with 4 bolts.

Where as the new one has 2.

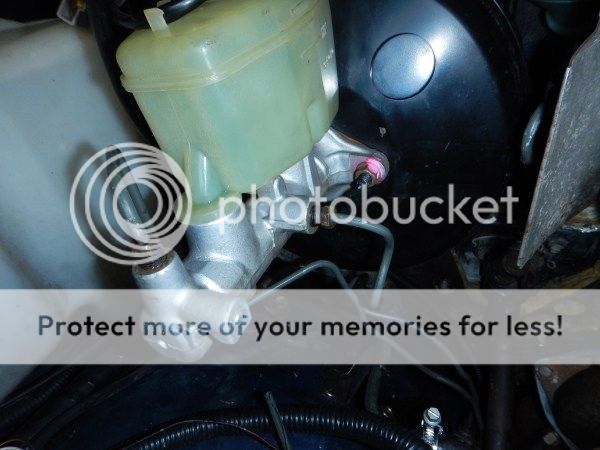
The new one has a much bigger reservoir.


The other difference is where the wires plug in for the low brake fluid warning light.


The easy solution, as the plug on my loom is different to the one needed to plug into the 79 series master cylinder, was just to change the lids over.


I came to fit the new master cylinder.

But decided to first do something about the excess wiring, which goes to the EGT probe in the exhaust down pipe. The auto electrician went for the easy option of just leaving all this excess wire here rather than shortening it.

With that bit of wiring sorted the brake booster and master cylinder could be bolted on.

It connected up perfectly on the inside.

The front brake pipe bolted straight on.

The other pipe needed bending slightly.

I made some rear bump stop spacers a while ago out of some really thick walled 50mm box section.

Finally got them bolted on.


Back to the handbrake cable......................
I picked up a 100mm length of 30mm machine grade alluminium bar for the pricely some of $2, for the adapter for the Jimny hand brake cable.

Got it in the lathe and started machining it down to match the nylon one on the X-ENG X brake.


Cut it to length on the Brobo saw.
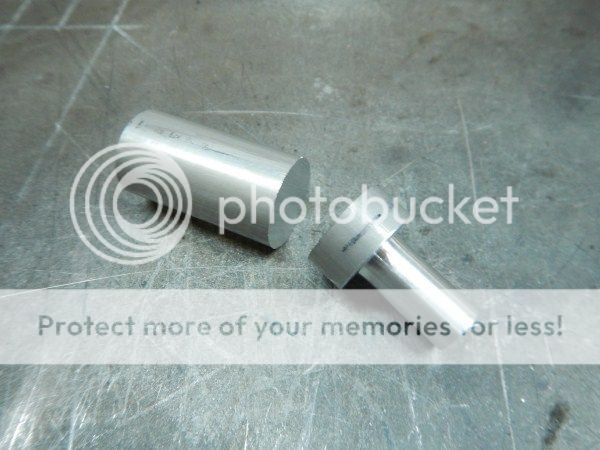
Drilled a hole through the center.

I also added two grooves. One for a circlip to lock it in place on the floor pan and one to secure the rubber boot firmly in position.


The rubber off the Jimny handbrake cable is designed to fit an oval and not a circular shaped section but I found it fits a round section fine.


The other end has a small hole which stretches over the nipple on the end of the cable.

I also ran a countersink bit through the ends of the hole to make it a bit smoother for the handbrake cable.


I fitted the alluminium adapter to the short Jimny handbrake cable.


Fitted it to the floor pan and handbrake lever.


Connected them to the bracket bolted to the floor.


I removed the axle stands so that the axle was at full droop.

To make sure that the Jimny handbrake cables were long enough, something I have found to be a problem in the past with the standard LJ70 handbrake setup, where by the cable was limiting the droop of the rear axle and even worse was pulling the handbrake on at times when fully articulated.
No such problem with this setup.
(You may notice a section of exhaust has been removed, but more on that later).


I needed to secure the handbrake cable along the trailing arm and decided to use one of the conveniently placed Jimny brackets. I drilled a 6mm hole through the center of the arm and bolted it on.

I decided to make use of an existing hole in the arm for another bracket.

With some P clips.


With one side now beautifully secured I did the same on the other side.


Got the wheels on next.


The calipers clear perfectly.


I'm fairly confident the new handbrake cables wont be too vulnerable off road.


I am absolutely made up with the disc brake conversion!!!!!
It has been a lot of work and has cost a bit more than I'd have liked but the handbrake works amazingly and I'm pleased with how well I've designed and built it all!
I'm trying to think of any changes I would make if I was to do it again and I cant think of anything I would do differently.
Anyway back to the build.......................
Re-fitted the drivers seat.

Pulled the grill off.

Ready to fit the aircon brackets that still needed fitting.

I also needed to replace the horns as LJ hasnt had a working horn for a few years now, I suspect it was that bog hole at Lincomb that finished them off!

Got some new ones out of the showroom at work.

I needed to change the plug on the end of my loom for the new horns and low and behold when I pulled back the sheething I found it was in fact full of Lincomb sand!

New horns fitted.

Followed by the aircon brackets.

Now that the auto electrician has identified which wires go where on my oil pressure sender and low oil warning light I could finally tidy up all the electrics in the engine bay.
Decided to run all the wires along the bulk head with the air locker lines and the hose going to the boost gauge together so they could then be neatly run in one length of split tubing.

And started running all the other loose wires in the correctly sizes split tubing.


The neatest it has looked since I've owned it!

I need help identifying this wire, which I believe and hope is the one which will go to the aircon pump once its fitted.
Anyone have any idea?


Grill back on.

And finally a nice neat engine bay free of the bird nest of wires!

OK.......................
Exhaust!
I've never been happy with the abortion of a job which I paid a lot of money for a few years ago. But I really cant justify the cost of having it re-done to a high standard, or buying a proper exhaust pipe bender and doing it myself, which would be my preferred choice as then I know it would be done right!
Anyway..................................
I was worried the silencer section was in the way of the new handbrake cable, so I pulled it off.

I think it would be/will be OK if it goes back on and sits a bit higher up, closer to the floor pan rather than hanging down so low.
One of the major faults in my system is the complete lack of brackets and hangers that they fitted when they fitted the system, something I'm now going to fix once and for all!
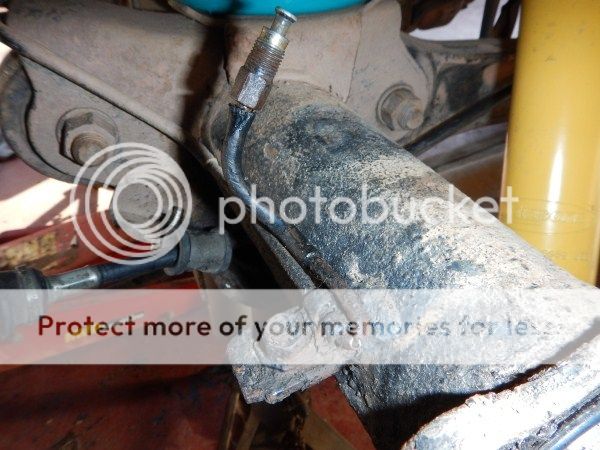
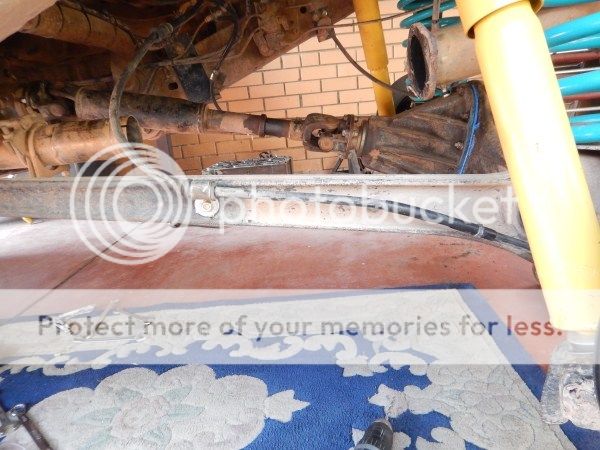
I strapped the exhaust pipes up where I want them.

As can be seen the handbrake cable is an issue, but there is sufficient length for the cable to hang below the exhaust.


Another consideration is it coming through the rear bumper, again due to lack of sufficient brackets it hasnt always been perfectly centered.
Clamped where I want it.


Whilst moving LJ around without the silencer fitted I noticed how nice it sounds and have decided to delete the silencer altogether. As LJ is just a toy I dont think it will be a problem and on long drives I can just turn the stereo up and get the sub thumping to drown out the exhaust if it gets annoying.
So I took some measurements.

And made a cardboard mock up of what I'm going to get our local exhaust shop to bend me out of 2.5" pipe.

This will provide heaps of clearance for the handbrake cable.


In other news.......................
I handed in my notice at Piranha and at Christmas were moving up to sunny Queensland to finally escape the freezing cold Melbourne winters and to finally start our dream of property renovations.
The last 2.5 years of working there have been amazing and it has very rarely felt like work! They are without doubt the best people I have worked for and its definitely the best job I've ever had!
I'm sad to be leaving!
If I could pick up Piranha and move the whole factory up to Queensland I would!
We havent got any jobs lined up yet but I dont think we will struggle to find work.
With my skills and the fact I'm a fully qualified carpenter and TIG welder and with Bec's qualifications as a NICU nurse and graphic designer, work wont be a problem to find and its looking like we should earn quite a lot more up there.
The 20+ hour drive up there which I'm going to have to do 6 times in total is though! 120 hours of driving to get all our stuff and cars up there is going to be exhausting!
Will be worth it though to be able to wear shorts everyday of the year!
Update time guys..................................
Work stuff first:
Solar Suzuki.
Theres a nice article on the failed world record Simpson Desert crossing by solar power attempt, in Pat Callinans online magazine:
http://www.unsealed4x4.com.au/issue015/#89
The solar panels proved slow and troublesome to setup and take down, so I've been making fold out roof panels.


Lots more to do on that project to get it ready for the next attempt at the desert crossing, which will be next year now after the summer has passed.
We got it out in the sun to test how much power the panels are putting in.


Air Boat Project.
Back to the fuel tank build.


I needed to fit a boss into the top of the tank for the fuel pump and sender to mount to.


Hole sawed a hole in the top of the tank.

Welded it on.

Weighted the top down and welded it on.


Drilled and taped some M6 holes for the fuel pump to bolt to.


Welded some folded 3mm alluminium to the sides next to help support the top deck.


Built a frame out of thick walled 25mm box.

Tried bending some 50mm tube.

But it just kinked it badly as it really needs to be mandrel bent!

So I decided to make my own bend.
Cut some 22.5 degree cuts.

Welded them together.


Welded some bottom mounts onto the tank.
Then drilled up from below, to prevent swarf entering the tank, with a hole saw for the filler neck


Welded the filler neck on.

Tank back in.


Hole sawed the top deck section.


Fitted rivnuts for the top deck to bolt down to.


All bolted down!

My Bosses 80 Series.
We fitted a new ARB bull bar to my bosses 80 as he had decided to upgrade from a normal low mount winch and fit a Warn 8274 high mount. ARB do 2 types of bars for most hardcore 4wd's, one for low mount winches and one for high mount winches.
The old low mount winch we removed worked fine but of course lacked the power and speed of a high mount, so it had to go!


I had to do a bit of drilling to bolt the side bars up to the new bullbar, but apart from that it all bolted on really easily.


Finally LJ.
So back to the rear disc brake conversion.
I was going to make some brackets for the brake hoses, but I decided it would be easier to just cut some off an old axle.

A couple of sexy little TIG welds later and they were glued to the caliper brackets.


I also welded some washers over the holes in the cable brackets to reduce the hole size slightly to ensure the handbrake cables would lock onto the brackets nicely.

All ready for electroplating.

Less than 24 hours after dropping the brackets off at the electroplaters they were ready.


The next issue was the brake hoses.
Now as mentioned previously when other people have done this rear disc brake conversion they have used 80 series hoses which I think would be far too long.
I found the hoses off the first calipers I bought, the Nissan 2000SX ones had the correct ends on them, but sadly even they were too long.
Bolted them on.


So a good few inches too long.


The ends were also 90 degrees out which meant the hoses were kinked when connected.


So I decided I would need to get some hoses made.
In the mean time I needed to replace one of the metal brake hoses on the axle which snapped when I gently tried to bend it.


Bolted the brackets on so I would know where the hose needed to go to.


Old hose removed to use as a template.

New one cut, bent and flared.

Fitted.


Dropped the calipers off at my local brake suppliers.

A few hours later and $50 later I had my old hoses back.

And my calipers back with nice neat hoses which are the perfect length.


Removed the old oil seal.


Decided to break my golden rule of only using genuine seals, after so many failures with the shitty ones Milner sell. But..............these kits down here dont come from Milners, so maybe there OK. We shall find out in due time!

Tapped in place using the correct tool.


The half shaft could then be slid back in with the disc attached.


Followed by the caliper.


Other side.


My master cylinder and brake booster would need changing.
(You can see the absolute mess that is the electrics under the bonnet, but more on that later.)


Old bits removed.


I took a chance and ordered a master cylinder and brake booster off a 2001 79 series, which has rear disc brakes as standard.
Not only did I get an awesome price, the service and super quick postage was awesome as ever!
www.All4xfour.com.au had one out to me the very next day.


Comparing the new one to my old one.

A few quick measurements revealed it should bolt straight on!


A couple of interesting differences.

My old master cylinder bolted on with 4 bolts.

Where as the new one has 2.

The new one has a much bigger reservoir.


The other difference is where the wires plug in for the low brake fluid warning light.


The easy solution, as the plug on my loom is different to the one needed to plug into the 79 series master cylinder, was just to change the lids over.


I came to fit the new master cylinder.

But decided to first do something about the excess wiring, which goes to the EGT probe in the exhaust down pipe. The auto electrician went for the easy option of just leaving all this excess wire here rather than shortening it.


With that bit of wiring sorted the brake booster and master cylinder could be bolted on.

It connected up perfectly on the inside.

The front brake pipe bolted straight on.

The other pipe needed bending slightly.


I made some rear bump stop spacers a while ago out of some really thick walled 50mm box section.

Finally got them bolted on.


Back to the handbrake cable......................
I picked up a 100mm length of 30mm machine grade alluminium bar for the pricely some of $2, for the adapter for the Jimny hand brake cable.

Got it in the lathe and started machining it down to match the nylon one on the X-ENG X brake.


Cut it to length on the Brobo saw.

Drilled a hole through the center.


I also added two grooves. One for a circlip to lock it in place on the floor pan and one to secure the rubber boot firmly in position.


The rubber off the Jimny handbrake cable is designed to fit an oval and not a circular shaped section but I found it fits a round section fine.


The other end has a small hole which stretches over the nipple on the end of the cable.

I also ran a countersink bit through the ends of the hole to make it a bit smoother for the handbrake cable.


I fitted the alluminium adapter to the short Jimny handbrake cable.


Fitted it to the floor pan and handbrake lever.


Connected them to the bracket bolted to the floor.


I removed the axle stands so that the axle was at full droop.

To make sure that the Jimny handbrake cables were long enough, something I have found to be a problem in the past with the standard LJ70 handbrake setup, where by the cable was limiting the droop of the rear axle and even worse was pulling the handbrake on at times when fully articulated.
No such problem with this setup.
(You may notice a section of exhaust has been removed, but more on that later).


I needed to secure the handbrake cable along the trailing arm and decided to use one of the conveniently placed Jimny brackets. I drilled a 6mm hole through the center of the arm and bolted it on.


I decided to make use of an existing hole in the arm for another bracket.

With some P clips.


With one side now beautifully secured I did the same on the other side.


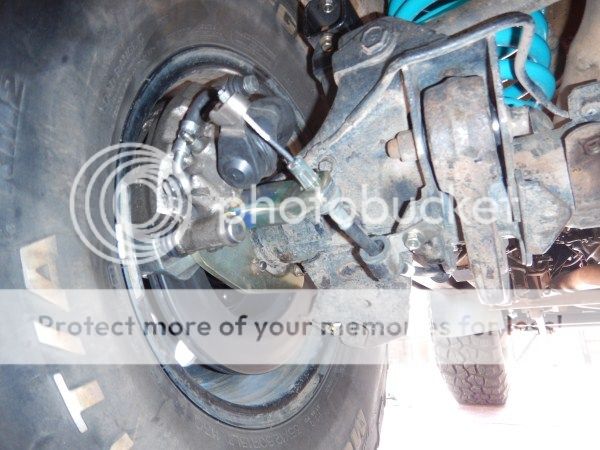
Got the wheels on next.


The calipers clear perfectly.


I'm fairly confident the new handbrake cables wont be too vulnerable off road.


I am absolutely made up with the disc brake conversion!!!!!
It has been a lot of work and has cost a bit more than I'd have liked but the handbrake works amazingly and I'm pleased with how well I've designed and built it all!
I'm trying to think of any changes I would make if I was to do it again and I cant think of anything I would do differently.
Anyway back to the build.......................
Re-fitted the drivers seat.

Pulled the grill off.

Ready to fit the aircon brackets that still needed fitting.

I also needed to replace the horns as LJ hasnt had a working horn for a few years now, I suspect it was that bog hole at Lincomb that finished them off!

Got some new ones out of the showroom at work.

I needed to change the plug on the end of my loom for the new horns and low and behold when I pulled back the sheething I found it was in fact full of Lincomb sand!

New horns fitted.

Followed by the aircon brackets.

Now that the auto electrician has identified which wires go where on my oil pressure sender and low oil warning light I could finally tidy up all the electrics in the engine bay.
Decided to run all the wires along the bulk head with the air locker lines and the hose going to the boost gauge together so they could then be neatly run in one length of split tubing.

And started running all the other loose wires in the correctly sizes split tubing.


The neatest it has looked since I've owned it!

I need help identifying this wire, which I believe and hope is the one which will go to the aircon pump once its fitted.
Anyone have any idea?


Grill back on.

And finally a nice neat engine bay free of the bird nest of wires!

OK.......................
Exhaust!
I've never been happy with the abortion of a job which I paid a lot of money for a few years ago. But I really cant justify the cost of having it re-done to a high standard, or buying a proper exhaust pipe bender and doing it myself, which would be my preferred choice as then I know it would be done right!
Anyway..................................
I was worried the silencer section was in the way of the new handbrake cable, so I pulled it off.

I think it would be/will be OK if it goes back on and sits a bit higher up, closer to the floor pan rather than hanging down so low.
One of the major faults in my system is the complete lack of brackets and hangers that they fitted when they fitted the system, something I'm now going to fix once and for all!
I strapped the exhaust pipes up where I want them.

As can be seen the handbrake cable is an issue, but there is sufficient length for the cable to hang below the exhaust.


Another consideration is it coming through the rear bumper, again due to lack of sufficient brackets it hasnt always been perfectly centered.
Clamped where I want it.


Whilst moving LJ around without the silencer fitted I noticed how nice it sounds and have decided to delete the silencer altogether. As LJ is just a toy I dont think it will be a problem and on long drives I can just turn the stereo up and get the sub thumping to drown out the exhaust if it gets annoying.
So I took some measurements.

And made a cardboard mock up of what I'm going to get our local exhaust shop to bend me out of 2.5" pipe.

This will provide heaps of clearance for the handbrake cable.


In other news.......................
I handed in my notice at Piranha and at Christmas were moving up to sunny Queensland to finally escape the freezing cold Melbourne winters and to finally start our dream of property renovations.
The last 2.5 years of working there have been amazing and it has very rarely felt like work! They are without doubt the best people I have worked for and its definitely the best job I've ever had!
I'm sad to be leaving!
If I could pick up Piranha and move the whole factory up to Queensland I would!
We havent got any jobs lined up yet but I dont think we will struggle to find work.
With my skills and the fact I'm a fully qualified carpenter and TIG welder and with Bec's qualifications as a NICU nurse and graphic designer, work wont be a problem to find and its looking like we should earn quite a lot more up there.
The 20+ hour drive up there which I'm going to have to do 6 times in total is though! 120 hours of driving to get all our stuff and cars up there is going to be exhausting!
Will be worth it though to be able to wear shorts everyday of the year!
Last edited:

Craigmorley
Well-Known Member
- Joined
- Apr 26, 2014
- Messages
- 341
- Country Flag

Wow Ben can't believe how much you get done mate full of ideas top job bud!!!

Brill job on LJ Ben, love that set-up.
Good luck with the move, I hope you both get jobs with good folks, it makes all the difference. Your boss is gonna miss you for sure mate!
Good luck with the move, I hope you both get jobs with good folks, it makes all the difference. Your boss is gonna miss you for sure mate!


- Joined
- Oct 13, 2010
- Messages
- 6,058
- Country Flag
Thanks guys.
Were both really excited and just want to get up there now, but weve got to wait!
Were flying up on holiday for 8 days in November, so were going to do some driving around and hopefully decide on an area and maybe even find a job.
Were looking at anywhere from the Gold Coast up to the Sunshine Coast.
If Byron wasnt in New South Wales I'd move there for sure but I dont want to live in NSW, for a number of reasons. One of them being not wanting to go back to yearly MOT style tests! Queensland like Victoria doesn't have tests so obviously saves money and hassle!
It is but I like to be self sufficient and dont like having to rely on anyone. I'm also not sure I trust strangers with all my tools and workshop equipment.
I might get a quote from a removal company for the one load of house stuff, but I will still want to do a load myself for the garage stuff. Then theres 3 cars to drive up!
Were both really excited and just want to get up there now, but weve got to wait!
Were flying up on holiday for 8 days in November, so were going to do some driving around and hopefully decide on an area and maybe even find a job.
Were looking at anywhere from the Gold Coast up to the Sunshine Coast.
If Byron wasnt in New South Wales I'd move there for sure but I dont want to live in NSW, for a number of reasons. One of them being not wanting to go back to yearly MOT style tests! Queensland like Victoria doesn't have tests so obviously saves money and hassle!
120 hours of driving
It is but I like to be self sufficient and dont like having to rely on anyone. I'm also not sure I trust strangers with all my tools and workshop equipment.
I might get a quote from a removal company for the one load of house stuff, but I will still want to do a load myself for the garage stuff. Then theres 3 cars to drive up!
- Joined
- Oct 13, 2010
- Messages
- 6,058
- Country Flag
Red, you need to start a new thread mate asking your seat question. As this is a build thread/blog its not really the place to ask questions not related to this thread and you will find you should get a much better response by starting a new thread.
- Joined
- Oct 13, 2010
- Messages
- 6,058
- Country Flag
Right update time..................................
I've been busy doing more work on the Solar Suzuki.
On the last world record attempt my boss noticed that on corrugations the whole cage was shaking like crazy, so we decided to add more tube.


I chose to replace the first hinges I made on the folding roof panels as they were only made from 3mm thick alluminium so wernt as strong as I'd like and they wernt allowing quite enough rotation of the panels.

I went for 5mm thick alluminium this time and decided to go for a double leaf hinge, complete with 2 sets of needle bearings.


We've been playing around with the panels to ensure we can adjust them to really maximise the efficiency of the sun as it moves across the sky.


For the morning and evening sun the panels will need to be almost vertical. At these times the middle panel wont be doing much but we decided we needed to sacrifice it to ensure that the panels arnt too high up in the air, as the whole setup needs to be easily setup by 2 people, quickly.


The panels are locked in place using pieces of tube that I've welded a length of rod through which sticks out each end of the tube, with R clips pushed through holes in the rod.


I then started making the 2 free standing panel frames which will be carried on top of the folding ones and lifted on and off when stopped for recharging.


We took the car out for a test drive over some rough stuff to see if adding the extra tube had stopped the movement over bumpy terrain.


I machined some 10mm rod down so M8 rose joints would slip on.

Pretty hard to clamp the rod on for welding, but some wire twisted round in a tourniquet style worked perfectly.


My boss bought an awesome new, old machine from an auction.

This thing punches holes and slots in metal effortlessly.

So I used it to punch some slots in some 6mm alluminium which will be welded to the bottom of the frames for pegs to go through.
Now I could have done these on the milling machine but that would have been quite slow, where as this new machine did all these in seconds!

That was as far as I got on the Solar Suzuki this week.
Time for a little announcement.................
What I'm about to say is not something I ever thought I'd say again!
I'm going back to the Simpson Desert!
I've decided it would be nice to go along with my boss on the World record attempt and see my creation make it into the record books!
We will be living up in Queensland by then, but that will mean a much shorter journey for Bec and I and LJ is a lot better setup now than when I went last year! Gone is the EFS suspension and the Dobinsons I've replaced it with is a huge improvement.The aux fuel tank will be very useful as will the internal roof rack I built above the fridge for sleeping bags and pillows.
The trip should be a lot of fun with my boss, work mate and the rest of the crew.
Ok..................Back to LJ.
My exhaust guy couldn't neatly bend me the section I wanted as he doesn't have a mandrel tube bender.
But he did have some mandrel bends which he sold me.

By adding a few careful cuts I could create the section I needed from just these 2 bends.


Welded them together.

Test fitting.

Marked where it needed cutting and flaring.

Cut it to length.


Picked up a flange and gasket.

Tack welded it on.


Got the exhaust guy to flare the end for me.


Made an exhaust bracket and hanger.


Took the new section to work complete with the other section that it fits over.

Welded it.

This new pipe work isnt stainless like the rest of the system so I gave it a coat of high heat paint.


Added some more hangers.


Sounds sweet now with the straight through exhaust!
Las week I said I was 100% happy with the brakes and wouldn't change anything.
I think I cursed myself.
In my mission to get the calipers mounted so I would have an awesome handbrake with super neatly mounted cables I didn't consider which way up the calipers were being mounted.
fast froward to this week when I came to bleed them and try as I might I couldn't get all the bubbles out of the lines.
The solution.............................
Un-bolt the calipers, flip them over, put a piece of ply in between the pads and the air was all out within a few seconds of commencing bleeding!


The brakes work awesome now!

I've found by not using LJ for some times weeks at a time the batteries some times go flat.
I took it to work and we tested the batteries and found one of them to be faulty.
I'm thinking of fitting a pair of Optima yellow tops but I thought it would be nice to have a proper volts gauge fitted in LJ so I can monitor the actual voltage of the batteries. This will also help detect if the alternator ever decides to stop working or if it starts over charging.
So I picked up a nice slim line gauge.


But where to mount it..........................
I did think of mounting it on the end of the dash, here.

But I've decided a better spot will be down here.


I will design and make a mount for it this week at work.
I'm thinking I will fold up and weld a sort of box out of allumium, get it powder coated grey and bolt it on with the gauge fitted and room for any future switches or other gauges that I might one day want to fit.
I also want to get a solar panel which I can use when on trips to keep the fridge running when parked up for multiple days but also to keep some charge going into the new batteries when its parked up for a week or 2 at a time.
As we will soon be leaving Victoria I think one last epic High Country adventure is needed as it will most likely be many years until were back down this way in LJ. Once were up in Queensland, Fraser and Moreton Island need exploring and a trip up the cape will also be on the cards. Not to mention exploring the Glass House mountains and shooting down to the Coffs Coast, both of which areas have some awesome 4wding!
Anyway.........................
Back to the High Country..................
Were flying up to Queensland for 8 days in November to hopefully get a house and jobs sorted, as well as a much needed holiday! But before we go we've got 3-4 days off work and I'm thinking that will be the perfect time for a 4wd trip to the High Country.
In a couple of weeks I've got a big road trip up to Bathurst to watch the big race, then in December were making the big move! Exciting times ahead!
I've been busy doing more work on the Solar Suzuki.
On the last world record attempt my boss noticed that on corrugations the whole cage was shaking like crazy, so we decided to add more tube.
I chose to replace the first hinges I made on the folding roof panels as they were only made from 3mm thick alluminium so wernt as strong as I'd like and they wernt allowing quite enough rotation of the panels.
I went for 5mm thick alluminium this time and decided to go for a double leaf hinge, complete with 2 sets of needle bearings.
We've been playing around with the panels to ensure we can adjust them to really maximise the efficiency of the sun as it moves across the sky.
For the morning and evening sun the panels will need to be almost vertical. At these times the middle panel wont be doing much but we decided we needed to sacrifice it to ensure that the panels arnt too high up in the air, as the whole setup needs to be easily setup by 2 people, quickly.
The panels are locked in place using pieces of tube that I've welded a length of rod through which sticks out each end of the tube, with R clips pushed through holes in the rod.
I then started making the 2 free standing panel frames which will be carried on top of the folding ones and lifted on and off when stopped for recharging.
We took the car out for a test drive over some rough stuff to see if adding the extra tube had stopped the movement over bumpy terrain.
I machined some 10mm rod down so M8 rose joints would slip on.
Pretty hard to clamp the rod on for welding, but some wire twisted round in a tourniquet style worked perfectly.
My boss bought an awesome new, old machine from an auction.
This thing punches holes and slots in metal effortlessly.
So I used it to punch some slots in some 6mm alluminium which will be welded to the bottom of the frames for pegs to go through.
Now I could have done these on the milling machine but that would have been quite slow, where as this new machine did all these in seconds!
That was as far as I got on the Solar Suzuki this week.
Time for a little announcement.................
What I'm about to say is not something I ever thought I'd say again!
I'm going back to the Simpson Desert!
I've decided it would be nice to go along with my boss on the World record attempt and see my creation make it into the record books!
We will be living up in Queensland by then, but that will mean a much shorter journey for Bec and I and LJ is a lot better setup now than when I went last year! Gone is the EFS suspension and the Dobinsons I've replaced it with is a huge improvement.The aux fuel tank will be very useful as will the internal roof rack I built above the fridge for sleeping bags and pillows.
The trip should be a lot of fun with my boss, work mate and the rest of the crew.
Ok..................Back to LJ.
My exhaust guy couldn't neatly bend me the section I wanted as he doesn't have a mandrel tube bender.
But he did have some mandrel bends which he sold me.
By adding a few careful cuts I could create the section I needed from just these 2 bends.
Welded them together.
Test fitting.
Marked where it needed cutting and flaring.
Cut it to length.
Picked up a flange and gasket.
Tack welded it on.
Got the exhaust guy to flare the end for me.
Made an exhaust bracket and hanger.
Took the new section to work complete with the other section that it fits over.
Welded it.
This new pipe work isnt stainless like the rest of the system so I gave it a coat of high heat paint.
Added some more hangers.
Sounds sweet now with the straight through exhaust!
Las week I said I was 100% happy with the brakes and wouldn't change anything.
I think I cursed myself.
In my mission to get the calipers mounted so I would have an awesome handbrake with super neatly mounted cables I didn't consider which way up the calipers were being mounted.
fast froward to this week when I came to bleed them and try as I might I couldn't get all the bubbles out of the lines.
The solution.............................
Un-bolt the calipers, flip them over, put a piece of ply in between the pads and the air was all out within a few seconds of commencing bleeding!
The brakes work awesome now!
I've found by not using LJ for some times weeks at a time the batteries some times go flat.
I took it to work and we tested the batteries and found one of them to be faulty.
I'm thinking of fitting a pair of Optima yellow tops but I thought it would be nice to have a proper volts gauge fitted in LJ so I can monitor the actual voltage of the batteries. This will also help detect if the alternator ever decides to stop working or if it starts over charging.
So I picked up a nice slim line gauge.
But where to mount it..........................
I did think of mounting it on the end of the dash, here.
But I've decided a better spot will be down here.
I will design and make a mount for it this week at work.
I'm thinking I will fold up and weld a sort of box out of allumium, get it powder coated grey and bolt it on with the gauge fitted and room for any future switches or other gauges that I might one day want to fit.
I also want to get a solar panel which I can use when on trips to keep the fridge running when parked up for multiple days but also to keep some charge going into the new batteries when its parked up for a week or 2 at a time.
As we will soon be leaving Victoria I think one last epic High Country adventure is needed as it will most likely be many years until were back down this way in LJ. Once were up in Queensland, Fraser and Moreton Island need exploring and a trip up the cape will also be on the cards. Not to mention exploring the Glass House mountains and shooting down to the Coffs Coast, both of which areas have some awesome 4wding!
Anyway.........................
Back to the High Country..................
Were flying up to Queensland for 8 days in November to hopefully get a house and jobs sorted, as well as a much needed holiday! But before we go we've got 3-4 days off work and I'm thinking that will be the perfect time for a 4wd trip to the High Country.
In a couple of weeks I've got a big road trip up to Bathurst to watch the big race, then in December were making the big move! Exciting times ahead!
- Joined
- Oct 13, 2010
- Messages
- 6,058
- Country Flag
Forgot the cake pics!
It was my Birthday on Wednesday and I got home from work to a surprise cake, Bec had baked me!

It was seriously cool!


I loved how she had positioned trucks with wheels in the air and tyres and bull bars caked in muddy chocolate!


It tasted sensational!
Then we went out for dinner at a really nice steak place! Good times!!!
It was my Birthday on Wednesday and I got home from work to a surprise cake, Bec had baked me!
It was seriously cool!
I loved how she had positioned trucks with wheels in the air and tyres and bull bars caked in muddy chocolate!
It tasted sensational!
Then we went out for dinner at a really nice steak place! Good times!!!
Last edited:
Similar threads
- Replies
- 6
- Views
- 368