Don't like the adverts?  Click here to remove them

Hedgehog - LC100 build thread

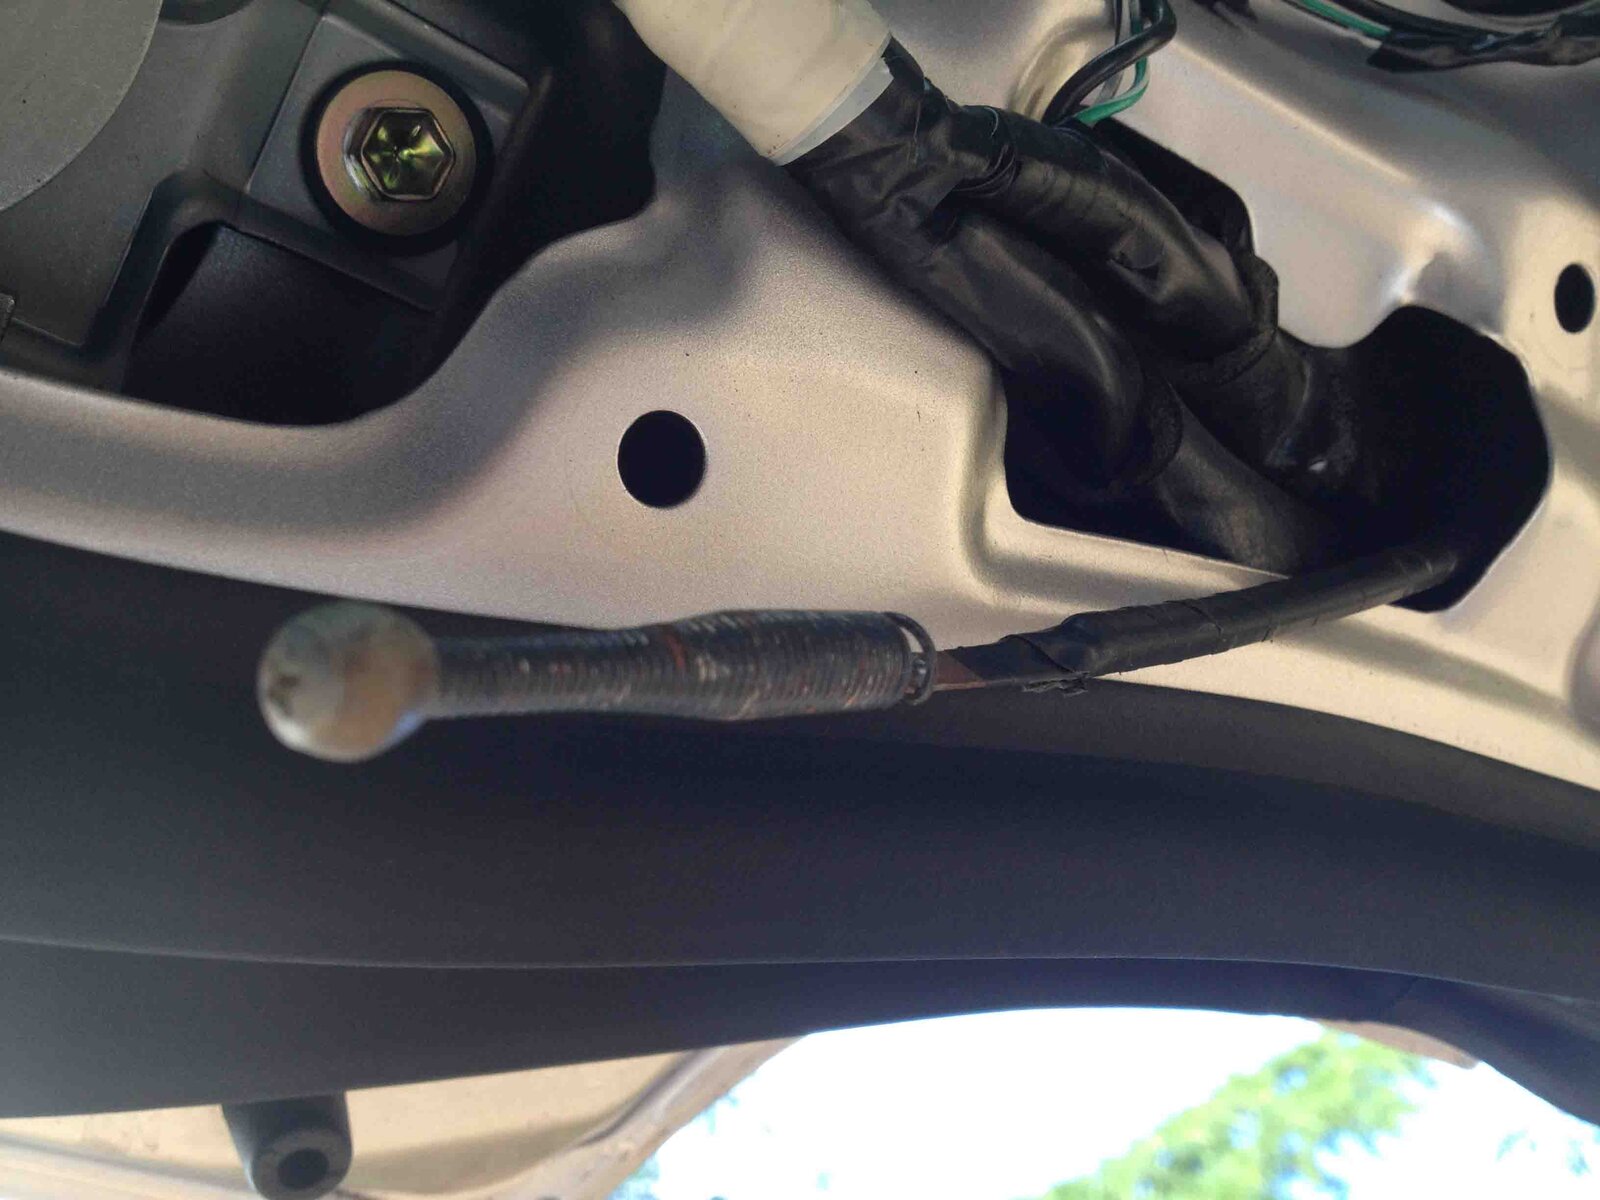
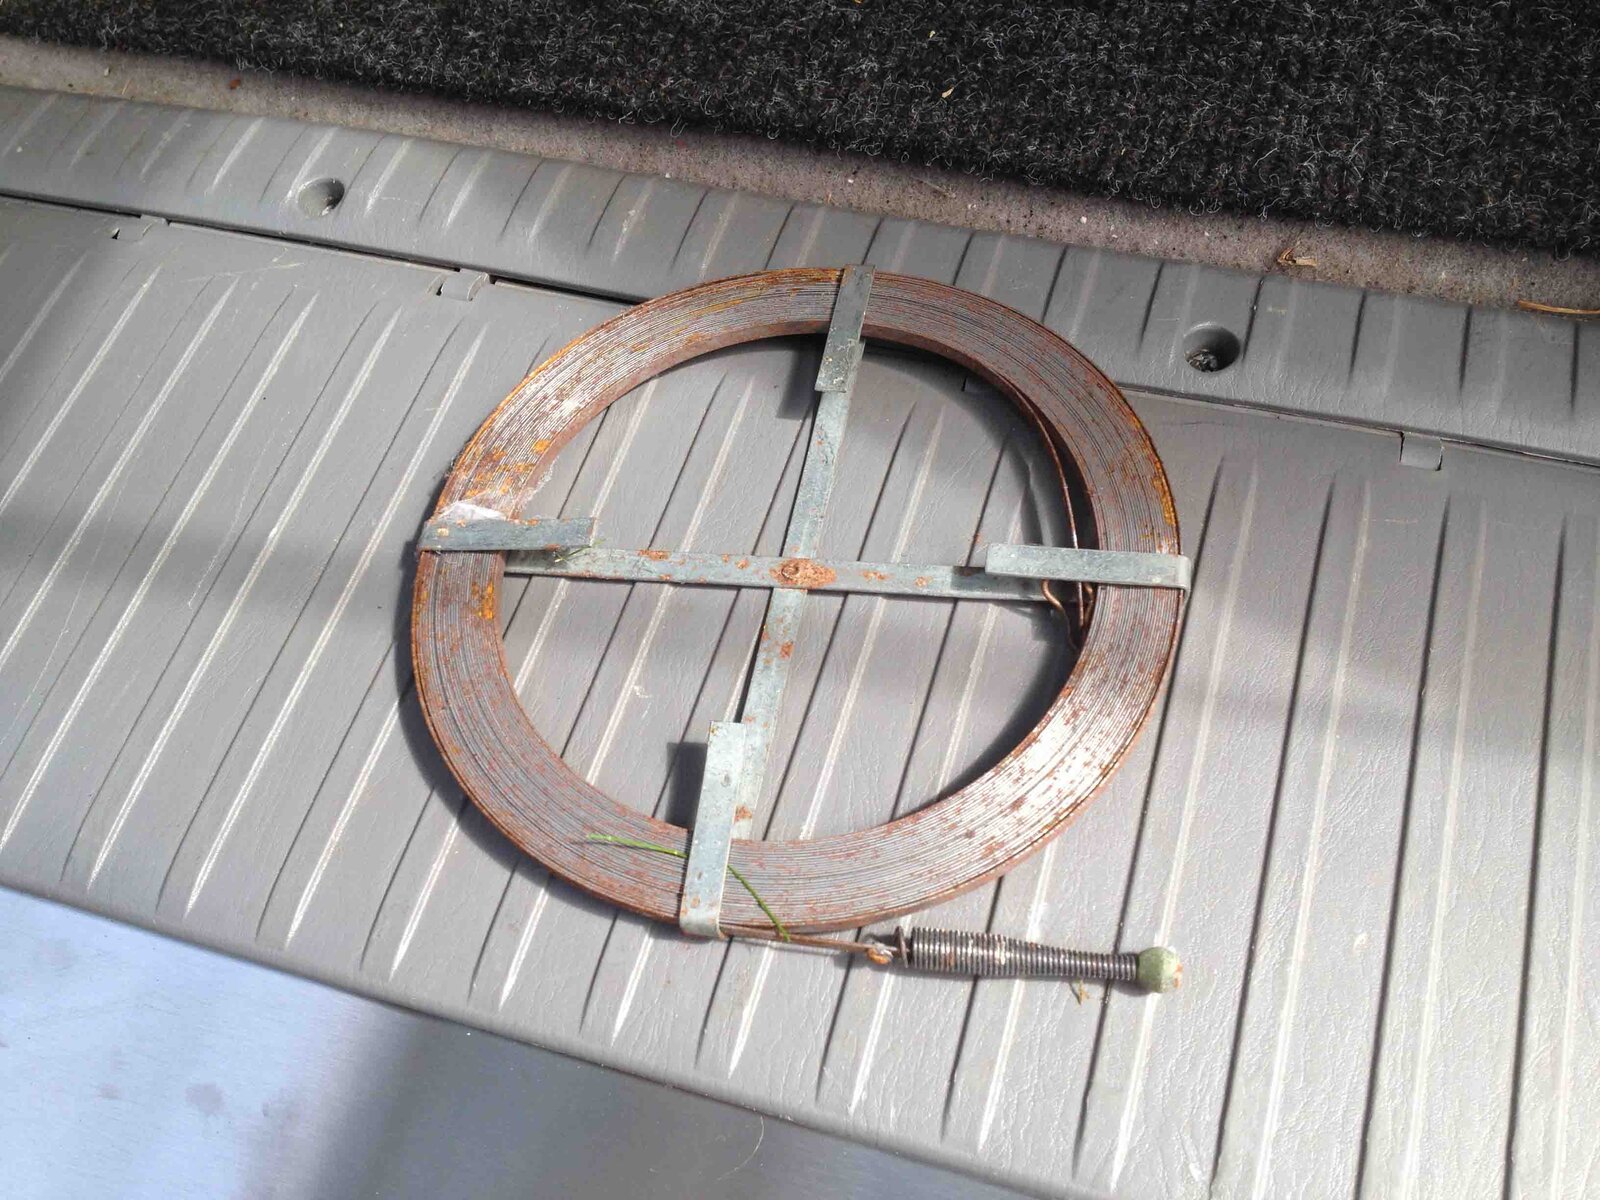
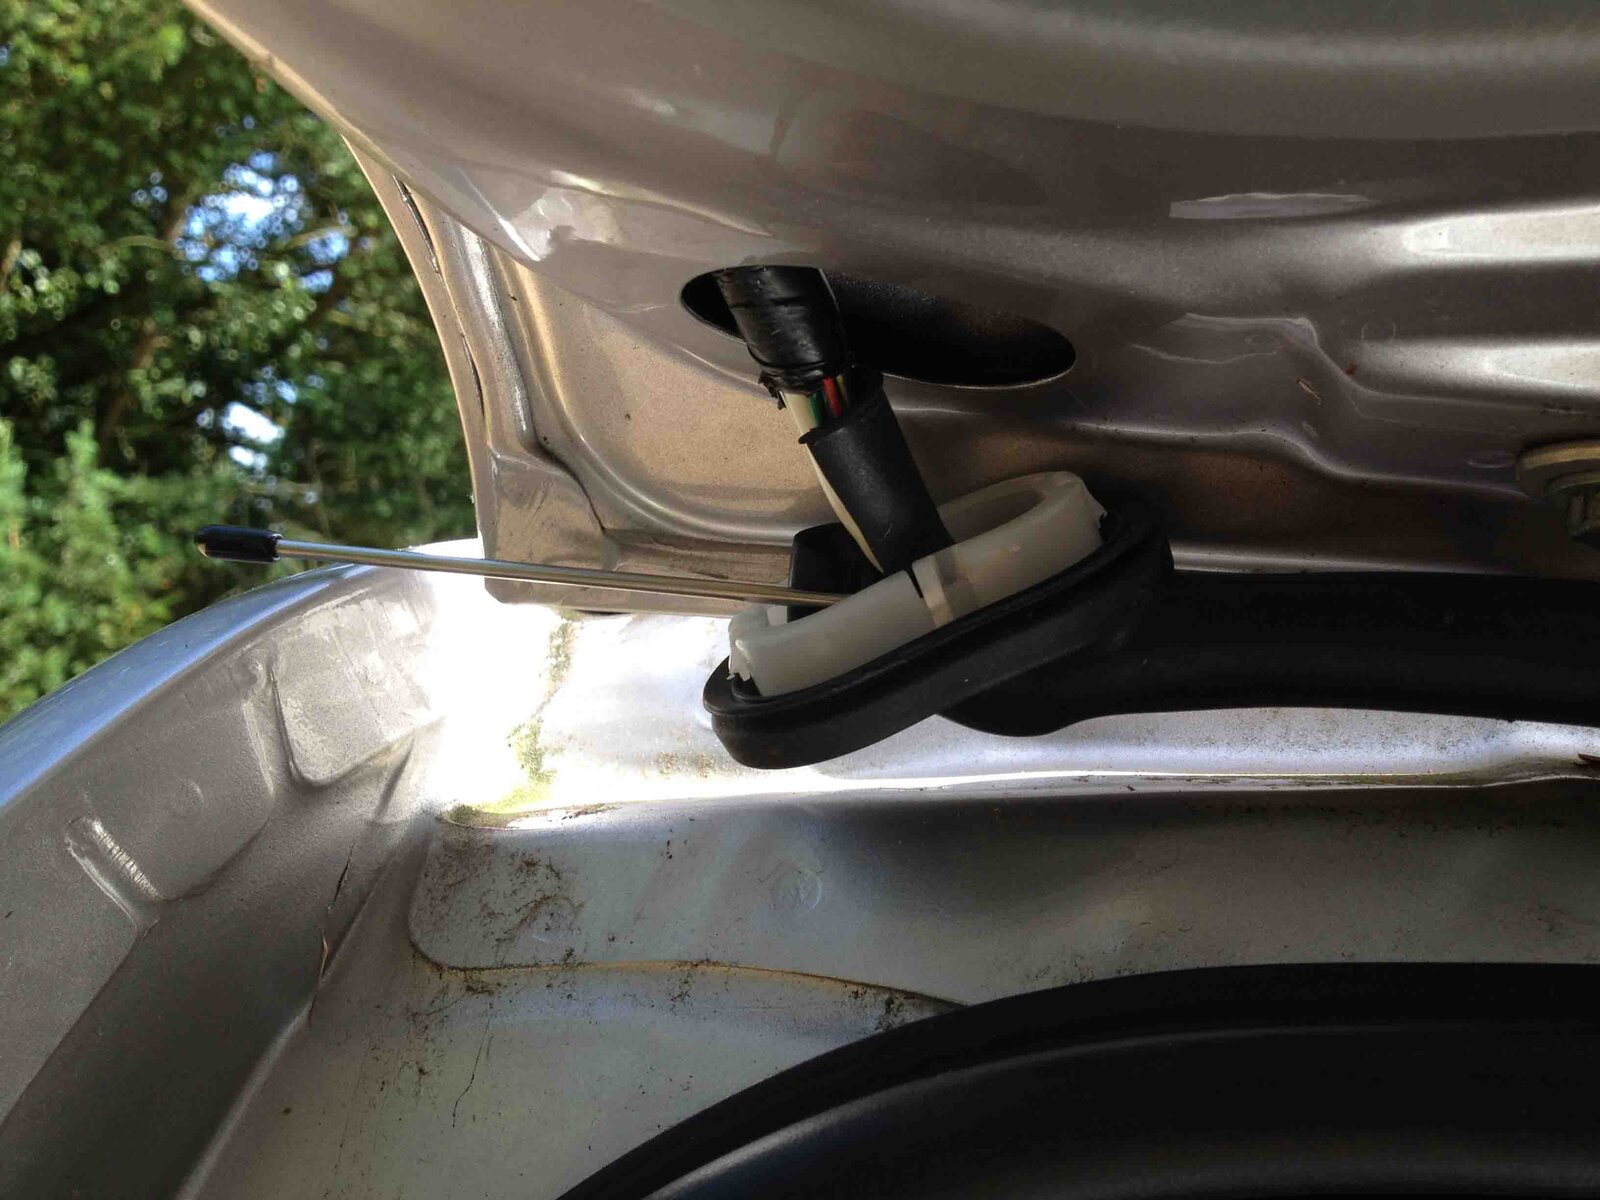
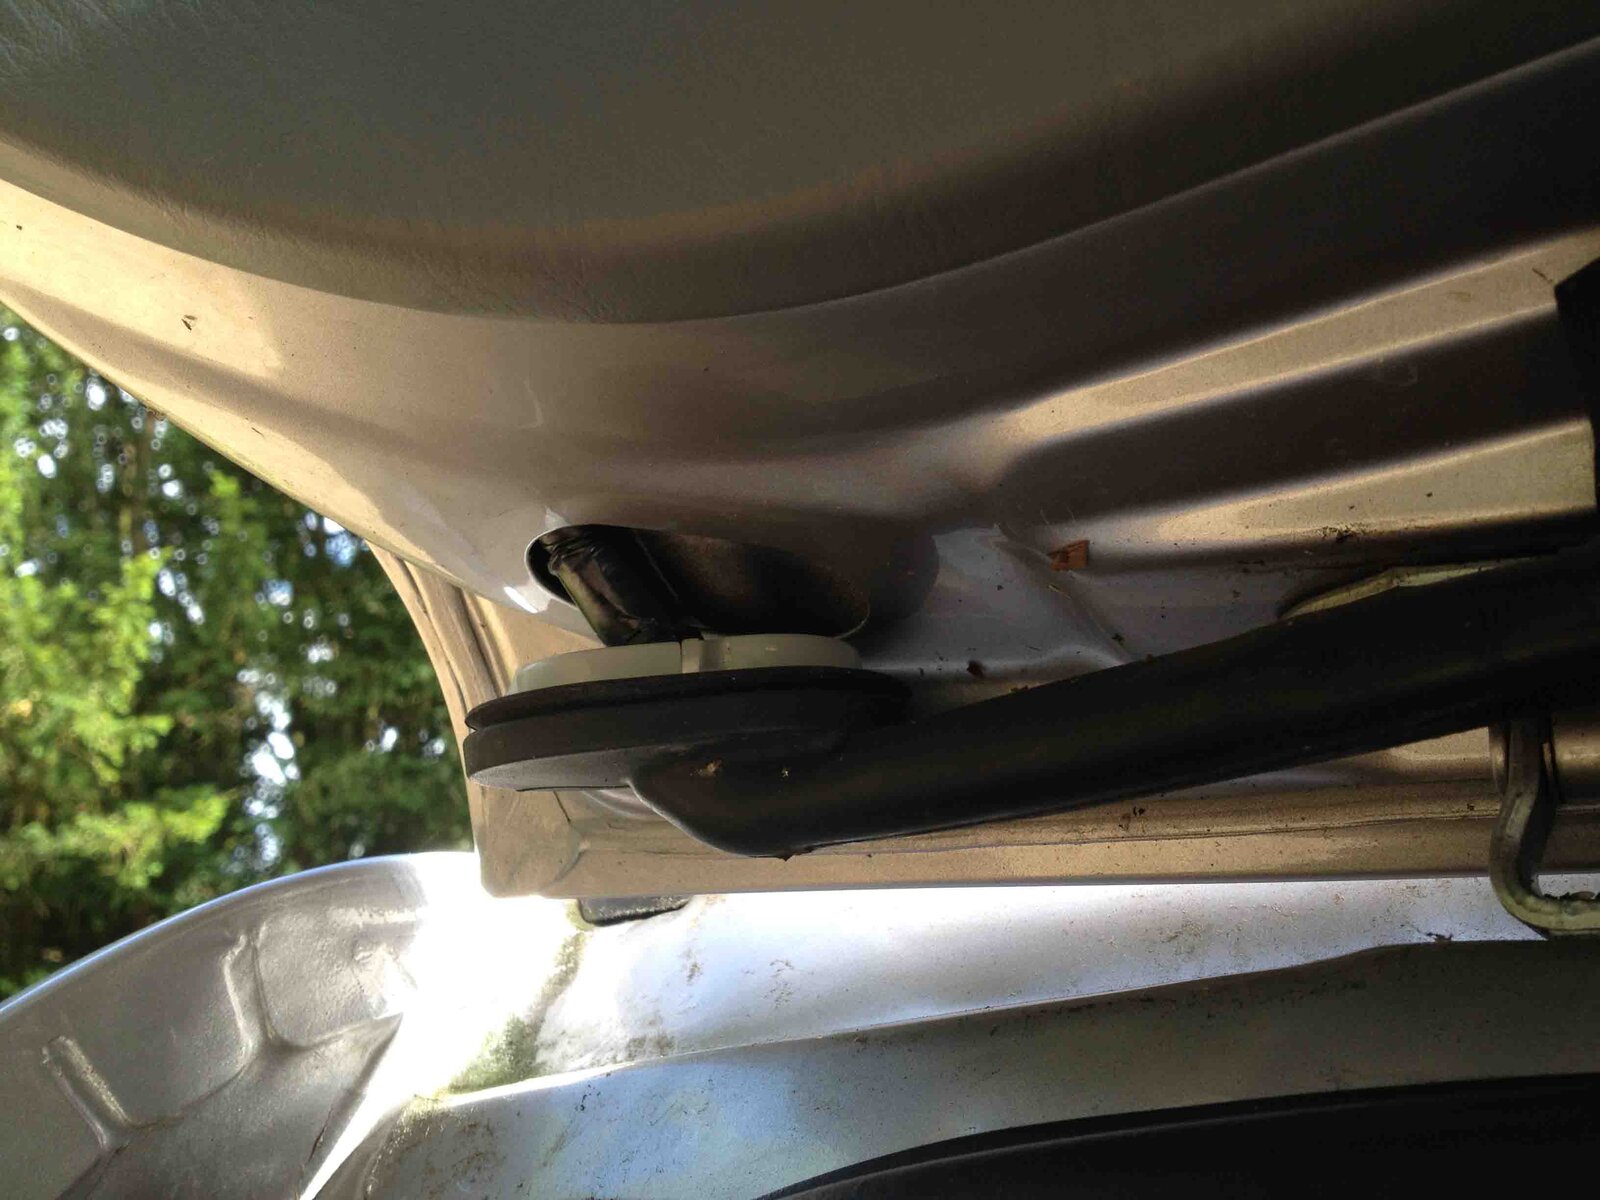
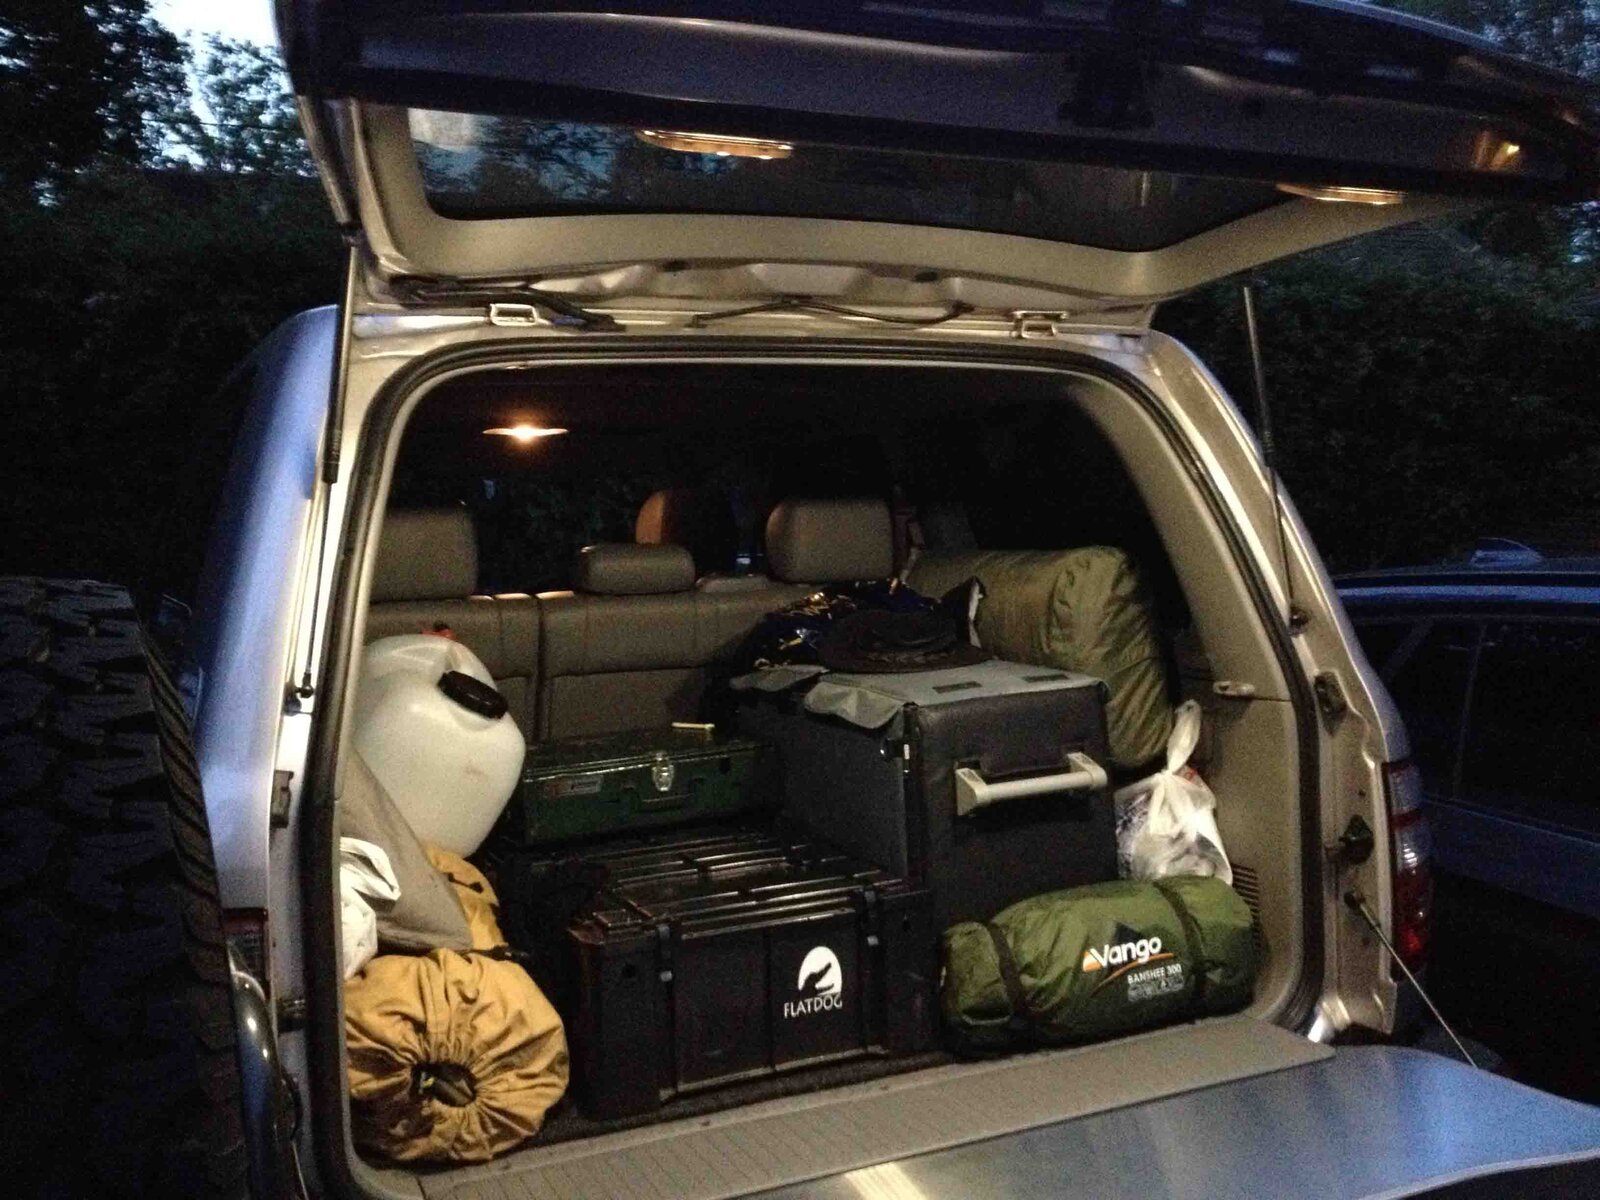
Have completed the additional 'kitchen' lighting. The 12V was taken from the dome rear light (as this switches on door opening etc and the 0V is switched by the tailgate open switch in the upper tailgate. I ran a small diameter twin mains wire from the dome light rear above the roof lining to the rubber umbilical that links the upper tailgate. I pushed the wire along the roof lining using a long steel rule, working from the rear (with Christmas trees holding the rook lining in place removed to allow the rule to be shoved in. With the wire in position there I then threaded a steel wire (in this case my CB aerial) through the rubber umbilical, taped the other end of the cable to it and pulled back and out: the cable now threaded through the umbilical. Next step was to thread the cable down the LHS tailgate channel. For this I used an electricians tape with the cable taped to the steel. Once pushed through then the cable was temporarily fitted to the existing loom that runs across the bottom of the upper tailgate so that lengths and routing could be sorted. I left 'tails' in the cable routing so that I could attach the plastic surround holding the LED lights via spade terminals.

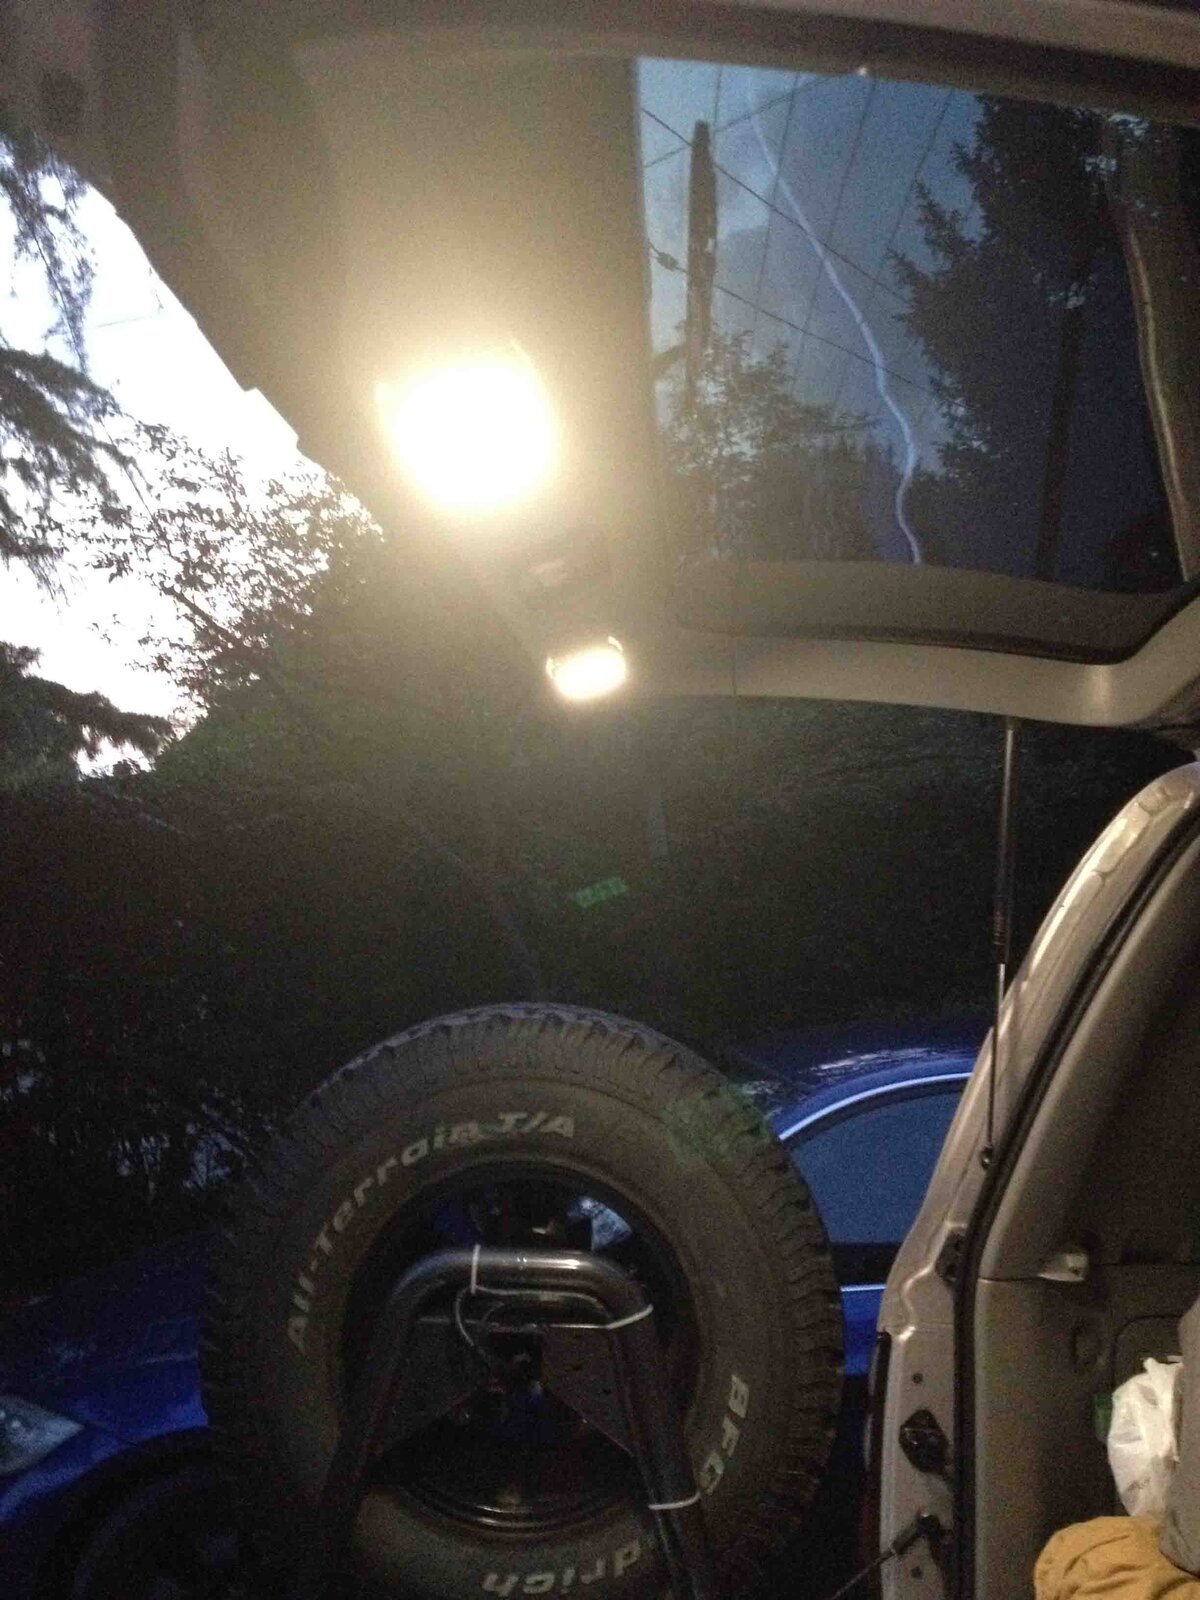
Once all the wiring was in approximate location and the tails terminated the cabling was commissioned. Continuity checks completed. The 12V coming from the dome light attached to a metal strip in the light moulding carrying unswitched 12V (from the vehicle master interior light controller. This has to be done as the wiring to the switch is of a flexible circuit type rather then traditional cabling. The connection to the dome light 12V was made by wrapping the wire around the metal strip (a bit like a wire-wrap post) and then fixing with a miniature tie wrap and some super glue. At the other end the 0V was connected to the switched side of the tailgate open switch (so there was now a live circuit. Voltage checks completed and then the LEDs connected. All working!!
 

Attachments

  • IMG_1170 low res.jpg
    IMG_1170 low res.jpg
    153.9 KB · Views: 504
  • IMG_1169 low res.jpg
    IMG_1169 low res.jpg
    274.4 KB · Views: 503
  • IMG_1166 low res.jpg
    IMG_1166 low res.jpg
    178.2 KB · Views: 519
  • IMG_1162 low res.jpg
    IMG_1162 low res.jpg
    184.4 KB · Views: 524
  • IMG_1160 low res.jpg
    IMG_1160 low res.jpg
    168.7 KB · Views: 503
  • IMG_1159 low res.jpg
    IMG_1159 low res.jpg
    134.8 KB · Views: 519
Lights in operation - pretty pleased with these.
 

Attachments

  • IMG_1174 low res.jpg
    IMG_1174 low res.jpg
    220.1 KB · Views: 505
  • IMG_1173 low res.jpg
    IMG_1173 low res.jpg
    189.7 KB · Views: 501
The LED replacement bulbs for the 8W festoon style (30mm) have arrived. When fitting you need to try them in both directions to see which way they work. Before I installed them I was wondering whether they ramp up and down in brightness, like the OEM bulbs do, and can confirm that they do do this. Very white light compared to the yellow incandescent style

IMG_1175 low res.jpg

Bought from autobulbsdirect.co.uk.

Fit perfectly in the dome unit
 
Preparing the way for the Safari Snorkel. The breathers are also going to be extended up the snorkel too. No going back!

20140714_125300 low res.jpg
 
Don't like the adverts?  Click here to remove them
Snorkel fitted complete with the breather extensions to the top and wound over. I decided not to use a manifold but to extend all the breathers up the snorkel. The diff lock compressor gets a breather too.


20140717_084515 low res.jpg
 
Diffs new and old. Old diff in good condition and will be up for sale soon - 35k miles '03

20140721_182711 low res.jpg20140721_144429 low res.jpg


Also compressor mounted up but waiting for pump up kit to arrive to finish off the install (needs the quick release valve)

20140721_112149 low res.jpg
 
Carling switch for locker compressor and 80 Series locker front and rear locker switch used to replace the rear-only locker OEM switch. A bit more background can be found here

http://www.landcruiserclub.net/foru...d-Front-Diff-Lock-Use-80-Series-Locker-switch


20140721_111845 low res.jpg20140721_111838 low res.jpg


I wanted to keep the compressor separately switched to air up tyres etc, but there is no reason why you could not have that switched off the turn-knob as well. My own driving style is to pre-arm the compressor if it looks like I may need to lock the diffs anyway, and to keep it armed if I'm in the tricky stuff even if diffs not locked - gives more flexibility in my view. Ergonomically I think it better to put your hand in one place to actuate the actual diffs rather than moving it around while you're being shaken all round the place.
 
A few photos of the Dinitrol works. Paul Brown @ Far Corners has done a great job. I will take it through the winter and then get a second coat inside and out in the spring. Truck was stripped down, descaled, rust treatment and then light Dinitrol followed by HD Dinitrol. Box sections injected too.

IMAG1075 low res.jpgIMAG1071 low res.jpgIMAG1061 low res.jpgIMAG1048 low res.jpg
 
Black Widow drawers arrived today. Just drawers, side wings and a drawer lid. I've offered up the drawers to the load space and it looks like the side wings will need some fettling on one side (RHS) to make them fit (just the plywood top surface) the profile of the truck. I'll be out with the jig-saw at the weekend. Mounting is by 4x M10 bolts through the boot floor. I'll see how study this is and will likely add another 2 or 4 M10s to really pin it down. Pictures of assembly to follow
 
I've split down the drawer system to allow ir be man-handled into the truck. These are very heavy drawers and are a really a 2 man lift. The drawer units can be removed easily from the carcass, and the carcass plywood top can be removed from the base area. The side wings and brackets are delivered disassembled.

As noted above I had a lot of debate with BOAB/BW on what model of Land Cruiser and which wing pack would fit my truck. The main drawers element are the same what ever. In the end having gone to BOAB and tried a number of different kits, none of which fully fitted my 2003 vehicle, I opted for the kit that almost and elected to re-profile the wings to suit the vehicle - this is needed only on 2 out of the 6 plywood sections. More on this in a later post.

The first job is to work out where to fit the drawers and for this the carcass, ply top and wings are needed to help centre the unit, taking care to allow the 2nd row seats to roll up/down. The optimum seems to be with the front edge of the drawers laying alongside the plastic tailgate strip as seen in the photos. This gives a half finger length between the rear of the drawers and the back edge of the seats
IMG_1188 low res.jpgIMG_1195 low res.jpg
Working under the car with the spare wheel removed and using the rear chassis rail as a datum I measured the distance and spacing ether side of a centre line for four pilot holes to be drilled which will take the M10 fixing bolts eventually. Take care not to snag the fuel lines and to avoid the spring mounts. This is pretty easy but worth taking a bit of time over. In my case I am about to get a long range fuel tank to take up the spare wheel space so I want to keep any bolt heads away from where that will mount as much as possible. I am almost certain that once the tank is in place I will not be able to gain access to all the drawer bolts so I intend to devise a way of gripping the bolt from above whilst tightening from above. There's a couple of ways to do this but I haven't decided which way yet.
IMG_1184 low res.jpg
I will retain the carpet in order that the drawers tighten down nicely and don't creak or rattle
 
Completed the Black Widow drawer install this weekend. Drilled the main 10mm holes (pilot holes already completed earlier), red lead on the exposed edges. I decided to to have the bolt heads on the outside of the truck and the threads and washers etc on the inside. The rear most pair of bolts I decided to file 2x flats onto the bolt threads to allow me to grip them should I need to tighten the bolts once the long range tank is in place and access to the bolt head is likely lost.

Once the main bolts were loosely tightened I used the side wings to position the whole system to the car making minute adjustments to the slotted fixings. Once centred the 4x bolts were torqued up, the top surfaces replaced and the drawers located on the rollers.

The fit of the drawers and the sturdiness of the whole assembly is fantastic. I'm very pleased with the BW system. There have been a few minor issues: one of the riv-nuts was missing, the side wings on one side just do not fit (I knew this ahead of time - there are many variants and UK/Europe variants are not catered for) and the assembly instructions, whilst not bad, could do with a few more photos and drawings

IMG_1196 low res.jpgIMG_1197 low res.jpg
 
Those drawers look good. Very solidly built.

Have you already ordered the Long Range water/diesel tank?
 
So back from 3 weeks camping in the south of France and onwards with the next stage of work.

The base plan is to have an internal 'emergency' sleeping platform. The Black Widow drawers form half of that but the rear seats need to come out - to save weight and space - but I will keep the single seat so that I can accommodate a guide or an additional passenger. They fold flat more or less in line with the black widow drawer top but nonetheless the double seat is not needed....so out it comes. Saves 40Kg of weight which is welcome. Next steps is to measure up and get the floor extended to the back of the driver's seat. Easy job to remove - pull off 2x plastic covers, remove 4x 14mm bolts and then lift out....2 man job as it is a bit awkward and there is a risk of scratching the paintwork.

PS - I'll put out a trip report with some video/piccs for those interestedIMG_1281 low res.jpg
 
Nice work. :thumbup:

Looking forward to how you build the sleeping platform. :icon-biggrin:

Trip report would be good. :icon-wink:
 
Beautiful work going into that 100 :thumbup:.

I'd love to have a drawer system, but I need the third row of seats. Even a stubby type of top opening box would be better than all my stuff chucked in the back :lol: :icon-rolleyes:
 
Back
Top