Sounds like a good trip, I'd like to go north nextSpinDrift said:Not till next year - current plan is to travel up through Norway into the Arctic Circle to Nordkapp then down through Finland and across into the Baltic states before zipping back to the UK. Will probably be July - to experience the mid-night sun.
Don't like the adverts? Click here to remove them
You are using an out of date browser. It may not display this or other websites correctly.
You should upgrade or use an alternative browser.
You should upgrade or use an alternative browser.
My Hundred
- Thread starter SpinDrift
- Start date
AndyCook
Well-Known Member
Norway is fantastic - but slow going with speed limit of 50mph, so would take 4 days to get to Nordkapp from Bergen for example.
We have had a couple holidays there, took ferry once when it used to run from Newcastle>Bergen, but only drove as far north as Trondheim.
and over there with work - Stavanger and Olso at least once every couple months.
not really any offroading though, apart from older roads over mountains where tunnels have now been drilled through them. certainly no or very few "unpaved trails like you get other areas of Europe.
Graham
Well-Known Member
I also lived in Oslo for almost 2 years, and the vehicle running costs are crippling.
Tolls every where.
Most are automatic, unmanned tolls, so you need to get a transponder, and stick it in your windscreen, some where behind the mirror.
These are available from most big Shell garages, and you need leave a fair deposit, you are billed back to your UK nominated bank.
Fuel!!!!!!!
You think UK is expensive? you will be glad to get back.
Sadly the DFDS is no longer running Newcastle to Stavanger.
Now it is ~~~~~
Harwich to Esbjerg on DFDS
Drive north to Hirtshals
Hirtshals to Larvik on Color Line
It is hard going when your out of the cities, get stuck behind a truck, and you can be behind him for 15 minutes easy, not that many places to overtake, (I also did a lot of coastal roads)
Gra.
I am still in the research phase. I am ok with there not being much off road, although I believe there are some gravel forest roads. I know about the speed limits and crippling fuel prices and fines. The idea is to wild camp to keep accommodation costs low.
I thought is was time to show what I have been up to on my cruiser over the last few months:
First job was to build a storage system in the back.
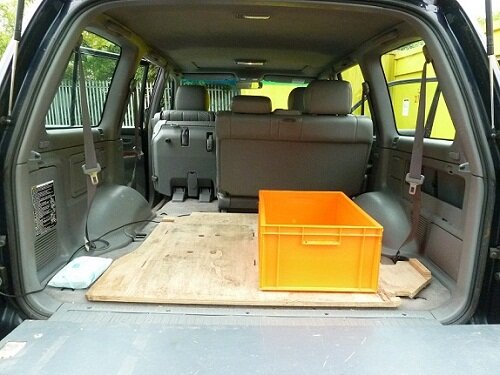
The footprint of the boot area in the 100 is wider than that of the 90. What you are seeing there is the base of the storage system I had in the 90 sitting in the rear of the 100. In the foreground you can see that the fabric top on the tailgate has been replaced with a ply top.
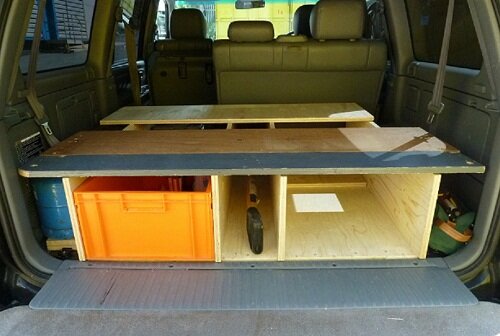
Starting to take shape. I decided to use the same principle I used in the 90: create an 18mm ply carcass and use plastic boxes as drawers, allowing me to load different kit without having to pack and unpack every time. The middle tunnel is the heavy tool storage area - shovel, land anchor and pins, sledge hammer etc. Unfortunately since the middle row of seats is still in place the tunnel is not long enough to store the hi-lift, even with the base removed.
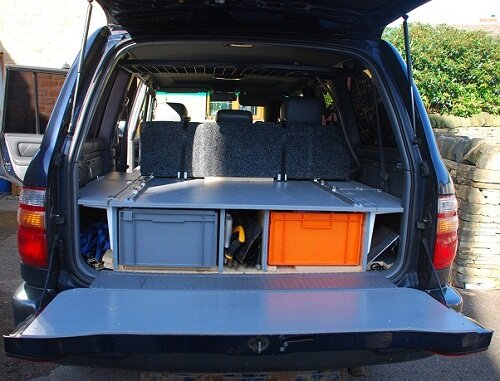
Deck fitted and painted, with ali tie down rails on either side.
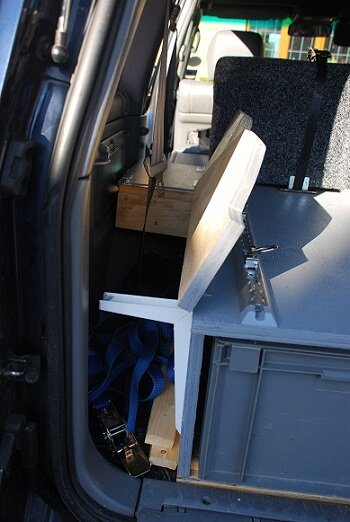
Wings on either side give access to two storage areas. I used (shortened) shelf brackets to support the lids and the lids are held shut with small slide bolts.
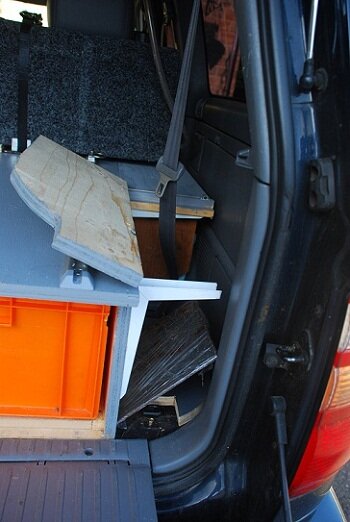
The plan was to stack additional crates on the raised deck and tied them down to the ali rails. This would allow six crates to be carried with additional storage space for things like soft bags, folding chairs etc on either side.
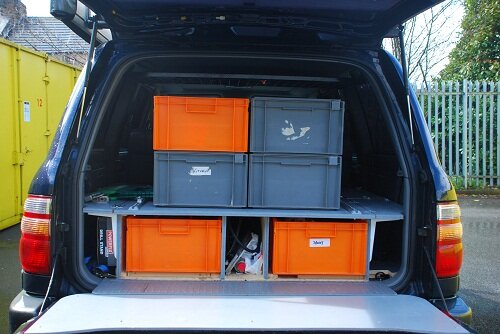
Below is what the 90 looked like when fully loads. The boot area of the 90 is narrower than the 100, but surprisingly, as you can see by looking at the crates stacked on top of each other, the 90's boot area is actually higher.
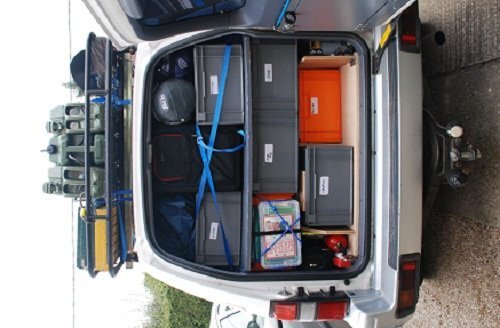
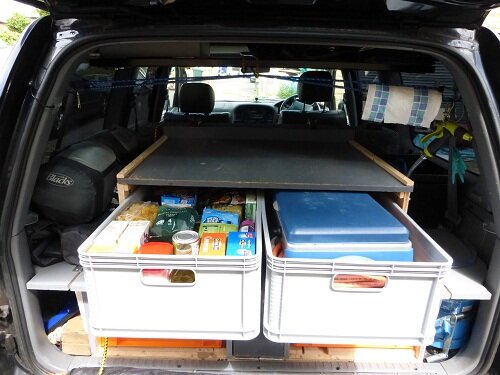
I decided that lifting the top crates out to get to the middle layer crates was not what I really wanted to be doing. So for when I am away on trips I built a shelf that sits on the raised deck and is tied down to the ali rails. This allows the middle layer crates to become drawers. In normal every day use this shelf is removed. The middle tunnel now has a door - but still needs a bolt - to preven things from sliding out when opening the tail gate in an incline. The upper drawers can be ratchet strapped across the front. The lower ones will probably have individual doors.
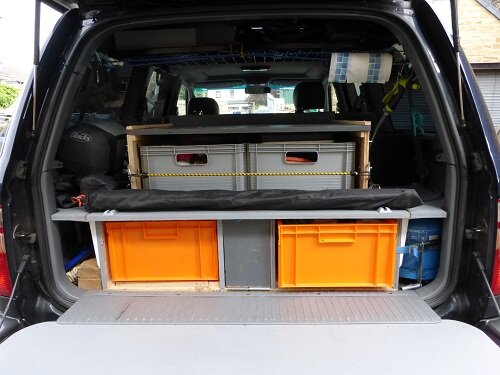
Lower drawers to be used for heavy stuff like recovery gear, camping stuff etc.

Middle layer is to be used to store food and kitchen gear. Having this stuff in the middle layer means that they can be accessed even when the tailgate top is cluttered during food preparation.
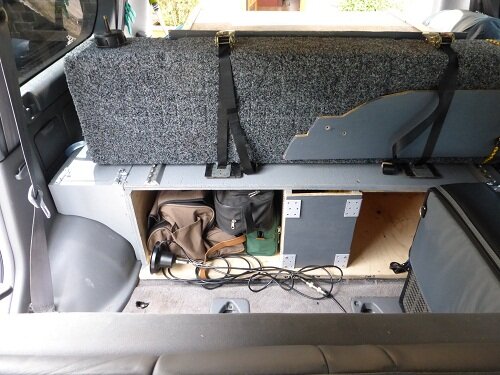
When looking back from the back seat you can see the 50L water tank, with two additional storage spaces behind the drawer space.
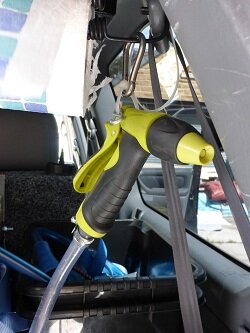
The water tank out let is a garden hose pistol grip. The tank can be pressurised with air to increase the flow of the water, but in order to economise I will rely on a gravity feed.
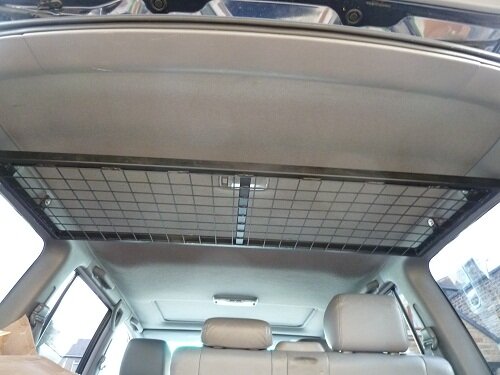
Above the boot space is a shelf for keeping stuff out of the way but accessible
First job was to build a storage system in the back.
The footprint of the boot area in the 100 is wider than that of the 90. What you are seeing there is the base of the storage system I had in the 90 sitting in the rear of the 100. In the foreground you can see that the fabric top on the tailgate has been replaced with a ply top.

Starting to take shape. I decided to use the same principle I used in the 90: create an 18mm ply carcass and use plastic boxes as drawers, allowing me to load different kit without having to pack and unpack every time. The middle tunnel is the heavy tool storage area - shovel, land anchor and pins, sledge hammer etc. Unfortunately since the middle row of seats is still in place the tunnel is not long enough to store the hi-lift, even with the base removed.

Deck fitted and painted, with ali tie down rails on either side.

Wings on either side give access to two storage areas. I used (shortened) shelf brackets to support the lids and the lids are held shut with small slide bolts.


The plan was to stack additional crates on the raised deck and tied them down to the ali rails. This would allow six crates to be carried with additional storage space for things like soft bags, folding chairs etc on either side.

Below is what the 90 looked like when fully loads. The boot area of the 90 is narrower than the 100, but surprisingly, as you can see by looking at the crates stacked on top of each other, the 90's boot area is actually higher.

I decided that lifting the top crates out to get to the middle layer crates was not what I really wanted to be doing. So for when I am away on trips I built a shelf that sits on the raised deck and is tied down to the ali rails. This allows the middle layer crates to become drawers. In normal every day use this shelf is removed. The middle tunnel now has a door - but still needs a bolt - to preven things from sliding out when opening the tail gate in an incline. The upper drawers can be ratchet strapped across the front. The lower ones will probably have individual doors.

Lower drawers to be used for heavy stuff like recovery gear, camping stuff etc.

Middle layer is to be used to store food and kitchen gear. Having this stuff in the middle layer means that they can be accessed even when the tailgate top is cluttered during food preparation.

When looking back from the back seat you can see the 50L water tank, with two additional storage spaces behind the drawer space.

The water tank out let is a garden hose pistol grip. The tank can be pressurised with air to increase the flow of the water, but in order to economise I will rely on a gravity feed.

Above the boot space is a shelf for keeping stuff out of the way but accessible

Don't like the adverts? Click here to remove them
Thanks Andy.
One of the big differences between the 90 and the 100 is that while the 90 has two seat mounting points on each wheel arch which can be used to secure the platform, in the 100 you dont and so have to build a complete box which you then need to secure to the mounting points in the floor.
One of the big differences between the 90 and the 100 is that while the 90 has two seat mounting points on each wheel arch which can be used to secure the platform, in the 100 you dont and so have to build a complete box which you then need to secure to the mounting points in the floor.
Thanks.
The orange boxes are from a company called Plastor They are based in Maidenhead. The boxes are part of the Euro Box range are quite tough and can come with loose of hinged lids. I have ten of these boxes. Some of the ones I have were used while others were production over runs.
The two grey boxes are more light weight but still seem to be quite good are are off the bay.
The boxes I use are 600mm by 400mm by 220mm. I used them as part of the storage system on a number of trips in the 90 and they worked well.
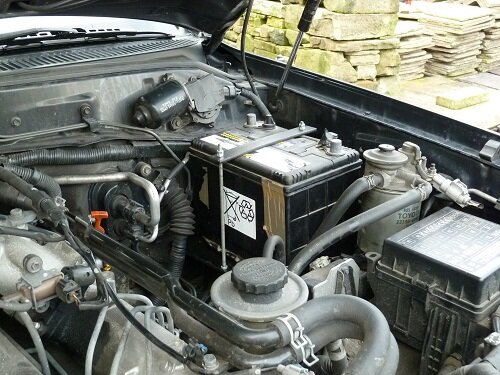
I fitted a leisure battery in the engine bay. It sits in the space created when the AHC reservoir was removed. The fuel filter had to move slightly forward to make a little more room.
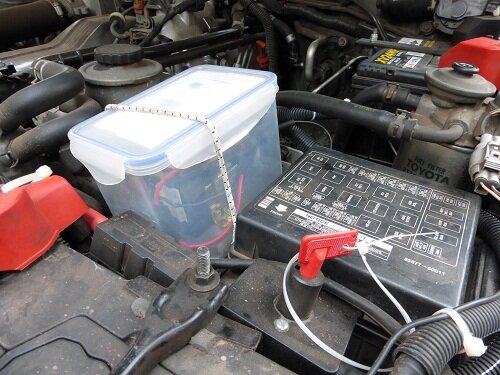
The split charge unit sits next to the main fuse box. It is the Cyrix unit I had in the 90 and in order to protect if from dirt and damp it now lives in a piece of tupperware.
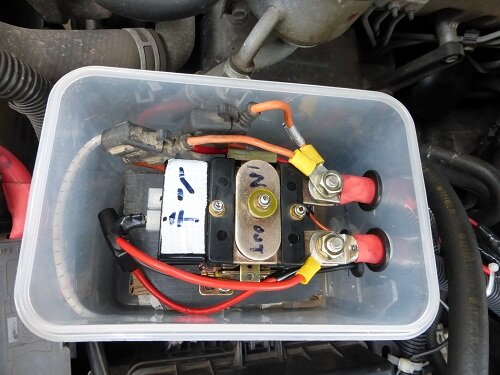
The output cable from the Cyrix feeds the leisure battery, from which cables (positive and negative) then enter the cabin through the grommit that sits just behind it. Once in the cabin the cables feed two fuse boxes, one under the dash and the other in rear.
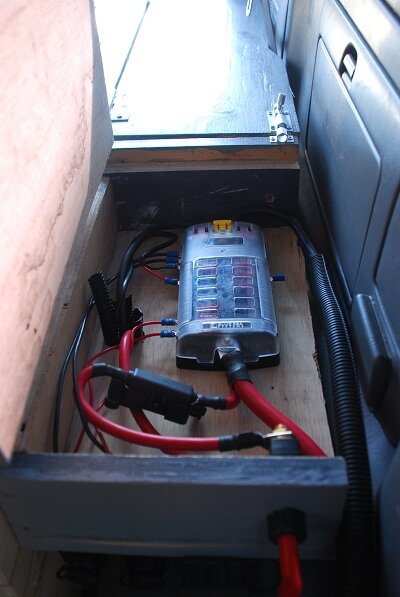
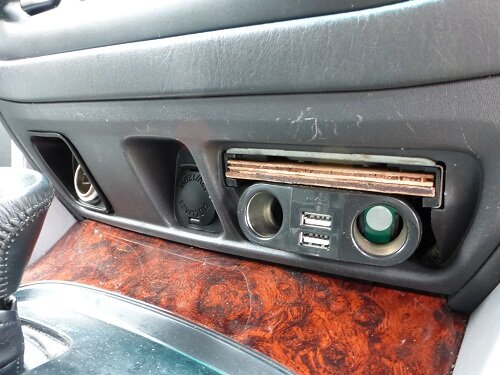
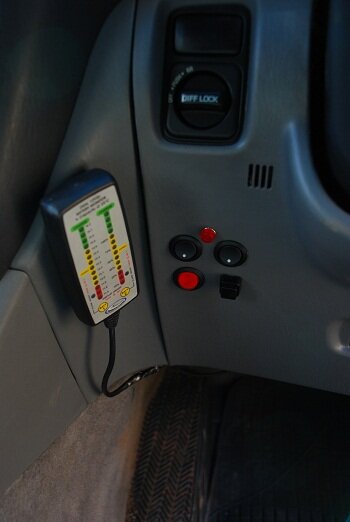
In the dash to leisure battery feeds two sockets (that live where the ashtray used to be), the CB, and the control switches for the on board computer. The red LED indicates that the leisure battery is being charged.
The on board computer - which is fitted when on a trip and then removed - sits in the rear.

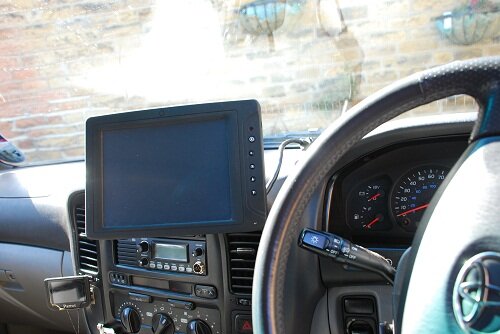
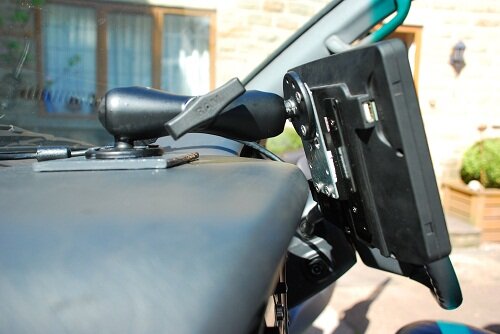
The monitor is mounted using RAM mount parts (third incarnation of the kit I had bought for the 90) using Jon's technique of attaching the base using adhesive pads. When I first tried out the monitor I found that it sat a little too high for my liking so I had to fit a drop plate.
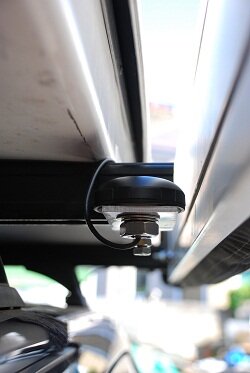
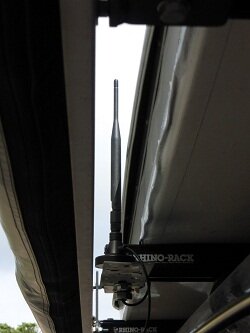
A gps receiver and wifi antenna (for connecting to free wifi at campsites, services etc) are mounted on the Rhino bars.
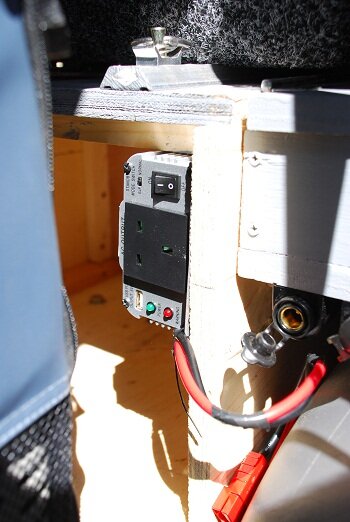
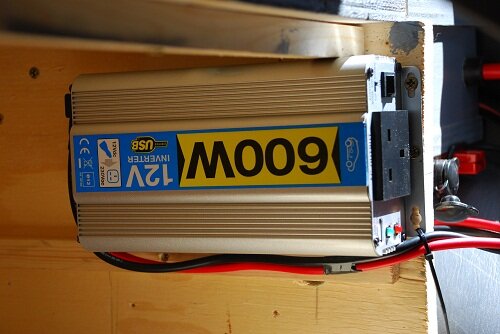
Next to the fuse box built into the storage system is an inverter for charging mobile phones and cameras
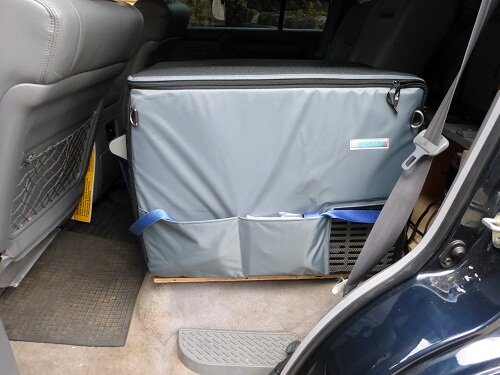
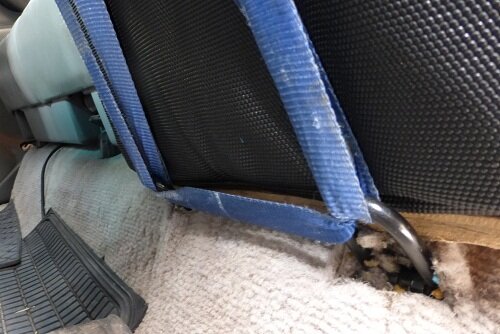
And in front of this sits a Waeco 40L fridge in place of the single rear seat. The fridge is ratchet strapped to tie down rings that have been bolted down using the seat mount points.
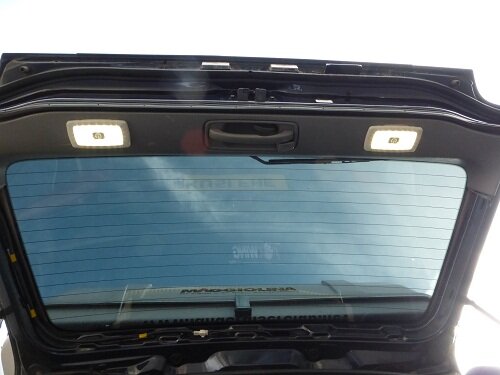
In the upper part of the tailgate I fitted two led lights. They are excellent as far as lighting up the tailgate work top and the boot area but I am not entirely happy with them as they are not flush with the surface (the surface being slightly curved) and I am afraid they will get knocked off at some point.

The split charge unit sits next to the main fuse box. It is the Cyrix unit I had in the 90 and in order to protect if from dirt and damp it now lives in a piece of tupperware.


The output cable from the Cyrix feeds the leisure battery, from which cables (positive and negative) then enter the cabin through the grommit that sits just behind it. Once in the cabin the cables feed two fuse boxes, one under the dash and the other in rear.

In the dash to leisure battery feeds two sockets (that live where the ashtray used to be), the CB, and the control switches for the on board computer. The red LED indicates that the leisure battery is being charged.


The on board computer - which is fitted when on a trip and then removed - sits in the rear.

The monitor is mounted using RAM mount parts (third incarnation of the kit I had bought for the 90) using Jon's technique of attaching the base using adhesive pads. When I first tried out the monitor I found that it sat a little too high for my liking so I had to fit a drop plate.


A gps receiver and wifi antenna (for connecting to free wifi at campsites, services etc) are mounted on the Rhino bars.


Next to the fuse box built into the storage system is an inverter for charging mobile phones and cameras


And in front of this sits a Waeco 40L fridge in place of the single rear seat. The fridge is ratchet strapped to tie down rings that have been bolted down using the seat mount points.


In the upper part of the tailgate I fitted two led lights. They are excellent as far as lighting up the tailgate work top and the boot area but I am not entirely happy with them as they are not flush with the surface (the surface being slightly curved) and I am afraid they will get knocked off at some point.

Thanks. No, I dont have a battery charger. The charging is all done directly from the alternator via the cyrix split charge relay.
All looks very nice Reinhard.
Do you have a battery charger in the setup at all? It would greatly improve the usable capacity of your leisure battery.
Last edited:
Thanks. The design evolved over 4 incarnations. I've tried to keep thinks as simple as possible.
I dont have a cargo barrier. I tied down all the boxes with ratchet straps. The loose items tend to be things like soft bags or sleeping bags. I might make one at some point but I think I would fit it when I need it. I am not too keen on the prison van look. And sometimes I remove the water tank, throw in a mattress and sleep in the back.
I dont have a cargo barrier. I tied down all the boxes with ratchet straps. The loose items tend to be things like soft bags or sleeping bags. I might make one at some point but I think I would fit it when I need it. I am not too keen on the prison van look. And sometimes I remove the water tank, throw in a mattress and sleep in the back.
That looks very well thought out and very practical.
I note that you don't have a cargo barrier - how do you stop the stuff at the top levels of the boot coming forwards?
Last edited:
Its been a while since I updated this thread. I've had a few things done over the last few weeks.
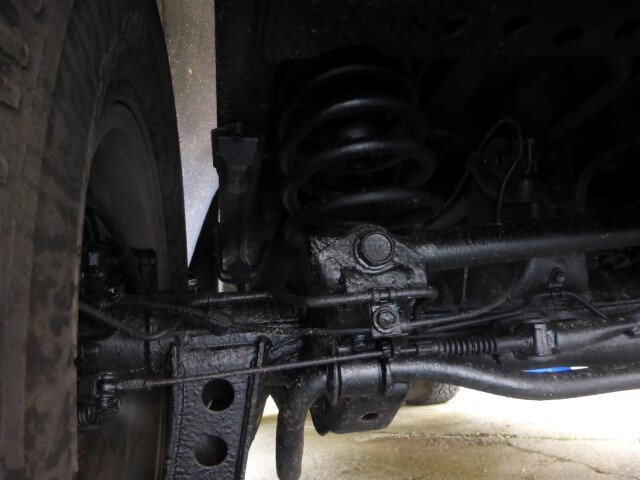
The underside has been power washed and rust protected. Didn't fancy spending time on my back in the wet and cold or the the messy job, so I took it here to have it done. I was referred to them by Dinitrol. They jet washed the underside and the channels, dried it and applied the treatment. The work comes with a 5 year warranty and annual inspections.

I also tidied up the tow bar - but I used Hammerite on that.
Last year I had bought a Goodwinch TDS-12c as part of the group buy. I managed to secure a used Ironman winch bumper from WC and got them to fit the lot.
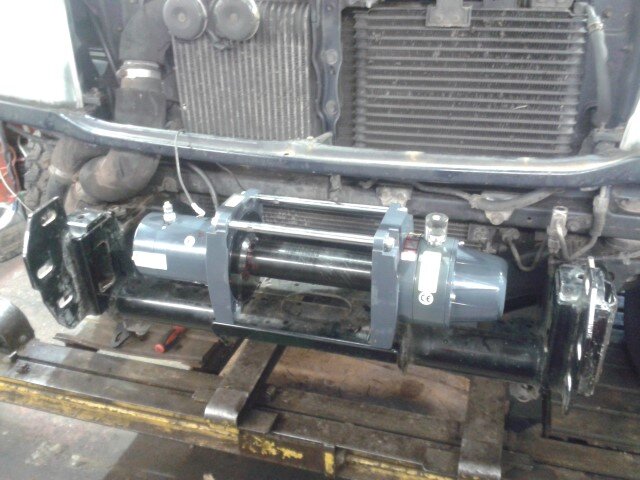
One of the good things about the Ironman bumper is that winch tray bolts on directly to the chassis. It seems that on some other bumpers the winch attaches to the bumper and then the whole (heavy) lot needs to be attached to the chassis.

The bumper looks pretty good with built in lights and two jacking points. It doesnt have any recovery loops in it so unless you modify it, you need to use the oem ones.
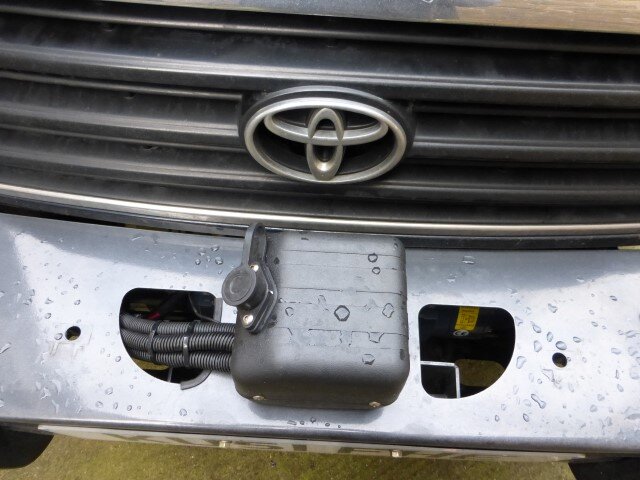
I am not so keen on the relay box sitting on the bumper and might relocate it at some point.
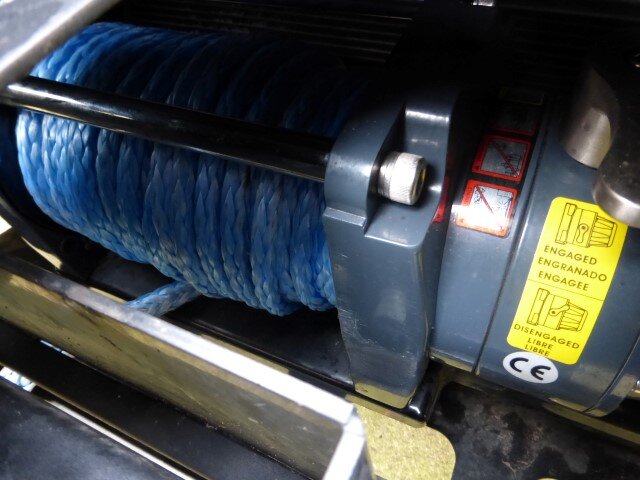
Thats the winch looking through the access holes in the bumper.
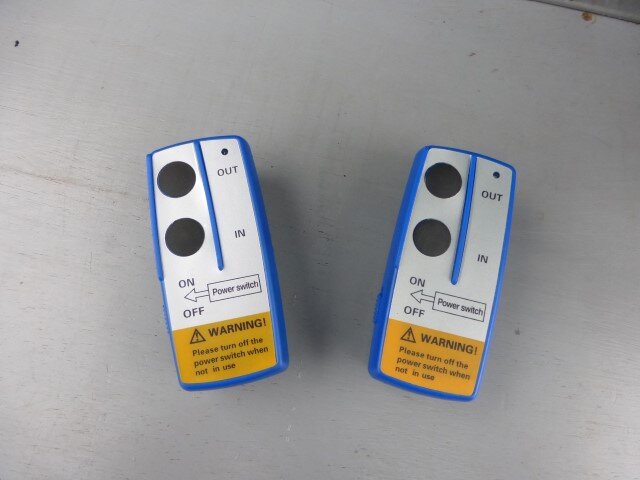
I got a wireless controller of the bay.
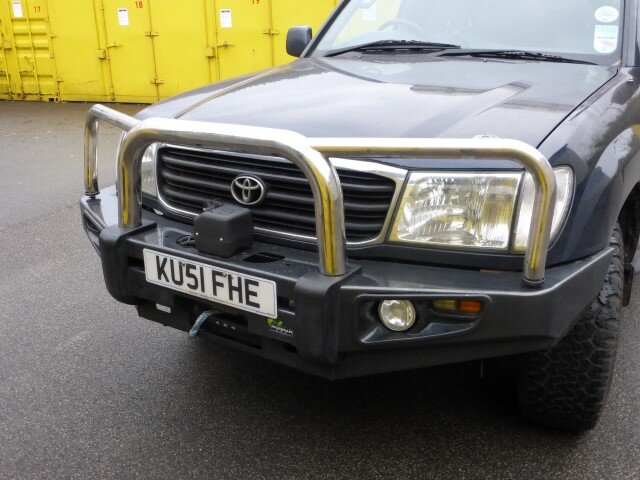
The bumper comes with chrome Aframe bar ... but I am not keen on the chrome so its staying off. I might powder coat it black at some time. The relay box begins to disappear with the bar, and would be pretty much hidden with a pair of spots.
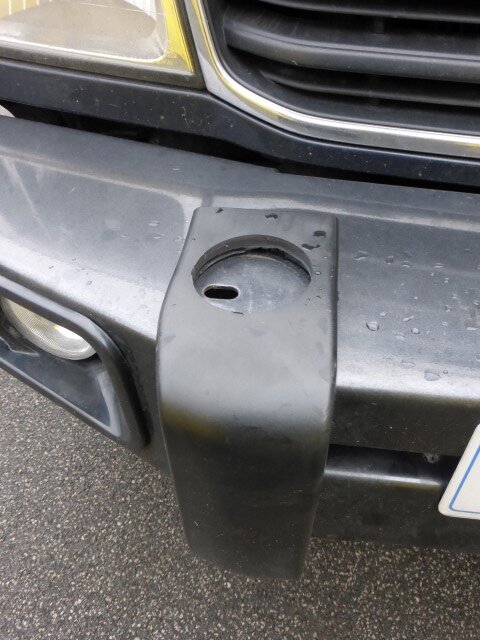
Apparently you can get covers for the mounting holes from ARB.
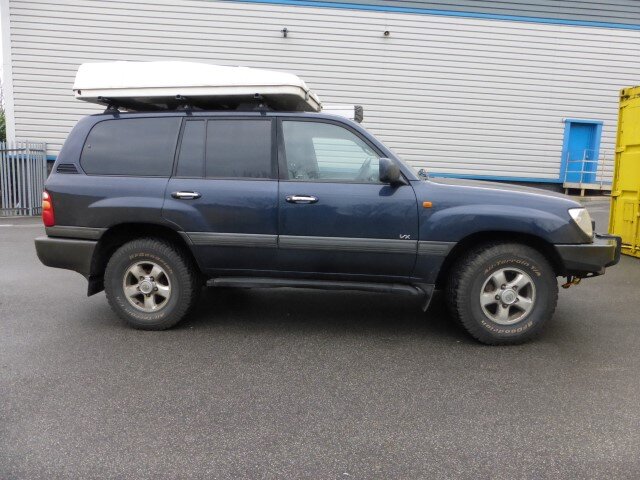
The bumper and winch are a little heavy and the front is now sitting a little low so I will need to adjust that.
Meanwhile the carputer is in for a rebuild. Hope to get that sorted shortly.
The underside has been power washed and rust protected. Didn't fancy spending time on my back in the wet and cold or the the messy job, so I took it here to have it done. I was referred to them by Dinitrol. They jet washed the underside and the channels, dried it and applied the treatment. The work comes with a 5 year warranty and annual inspections.


I also tidied up the tow bar - but I used Hammerite on that.
Last year I had bought a Goodwinch TDS-12c as part of the group buy. I managed to secure a used Ironman winch bumper from WC and got them to fit the lot.

One of the good things about the Ironman bumper is that winch tray bolts on directly to the chassis. It seems that on some other bumpers the winch attaches to the bumper and then the whole (heavy) lot needs to be attached to the chassis.

The bumper looks pretty good with built in lights and two jacking points. It doesnt have any recovery loops in it so unless you modify it, you need to use the oem ones.

I am not so keen on the relay box sitting on the bumper and might relocate it at some point.

Thats the winch looking through the access holes in the bumper.

I got a wireless controller of the bay.

The bumper comes with chrome Aframe bar ... but I am not keen on the chrome so its staying off. I might powder coat it black at some time. The relay box begins to disappear with the bar, and would be pretty much hidden with a pair of spots.

Apparently you can get covers for the mounting holes from ARB.

The bumper and winch are a little heavy and the front is now sitting a little low so I will need to adjust that.
Meanwhile the carputer is in for a rebuild. Hope to get that sorted shortly.
Last edited:
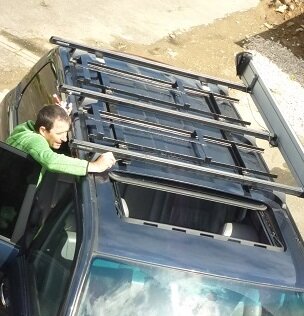
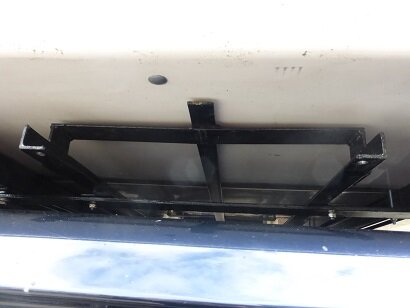
In preparation for this years trip I have built a storage system for the waffle boards. The storage system is slung under the Maggiolina roof tent and is attached to the Rhino Bars. It is a variation of a system built by others. I did all the cutting and a neighbour did the welding. I now know how much trouble it is to measure and cut everything accurately and how steel and buckle while welding. I tried my hand at welding but need more practice.
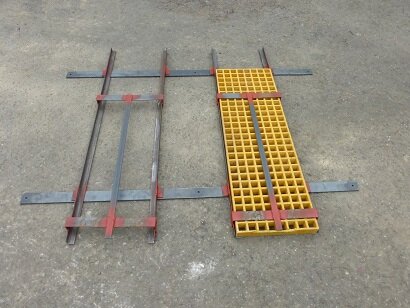
The system is made up of a cradle, the two bars running from left to right. These are 6mm steel flat bar and are bolted to the Rhino Bars. The reason for using 6mm is to reduce any flexing in the bars as there is very little clearance and I did not want the rack to flex upwards damaging the fibre glass underbelly of the roof tent.
Two racks are bolted to the cradle. The racks are 3mm steel angle and flat bar. The bars across the top are designed guide the waffle boards in and to prevent them from bouncing upwards and hitting the tent.
Securing in place
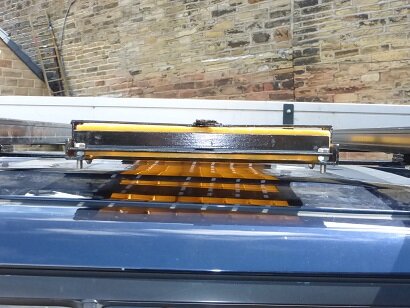
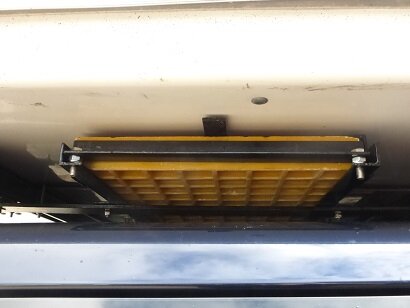
Each boards is secured in place by a gate - a section of angle that is bolted to the rack. I'll find some way of 'locking' them at some point.
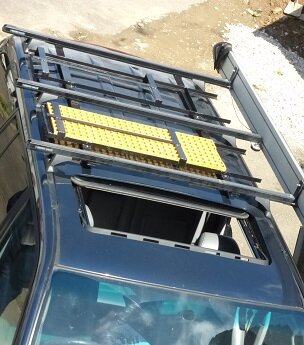
All fitted
With roof tent back in place. There is about 0.5 cm clearance between the rack and the tent.
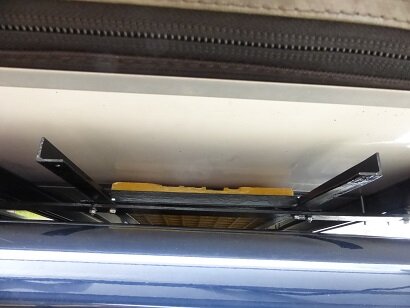
Room for expansion at the rear ... the current boards are 100 cm. The bar hold the board can be moved further back to accommodate 120 cm boards. Holes are ready drilled, so its just a question of unbolting and re-bolting in the new position.
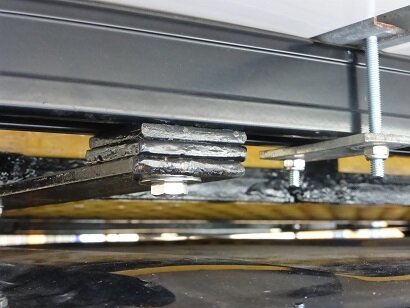
The Rhino Bars did not allow sufficient clearance so I had to add 2 x 6mm spacers.
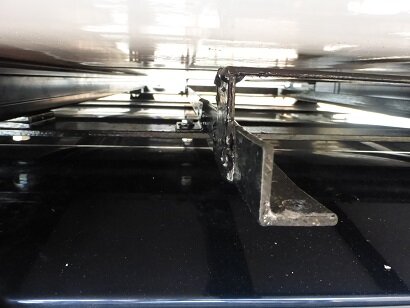
There isn't much space in there and securing the tent in place was a real pain!

The system is made up of a cradle, the two bars running from left to right. These are 6mm steel flat bar and are bolted to the Rhino Bars. The reason for using 6mm is to reduce any flexing in the bars as there is very little clearance and I did not want the rack to flex upwards damaging the fibre glass underbelly of the roof tent.
Two racks are bolted to the cradle. The racks are 3mm steel angle and flat bar. The bars across the top are designed guide the waffle boards in and to prevent them from bouncing upwards and hitting the tent.

Securing in place

Each boards is secured in place by a gate - a section of angle that is bolted to the rack. I'll find some way of 'locking' them at some point.

All fitted

With roof tent back in place. There is about 0.5 cm clearance between the rack and the tent.


Room for expansion at the rear ... the current boards are 100 cm. The bar hold the board can be moved further back to accommodate 120 cm boards. Holes are ready drilled, so its just a question of unbolting and re-bolting in the new position.

The Rhino Bars did not allow sufficient clearance so I had to add 2 x 6mm spacers.

There isn't much space in there and securing the tent in place was a real pain!


