Don't like the adverts?  Click here to remove them

My Split Charge Thread

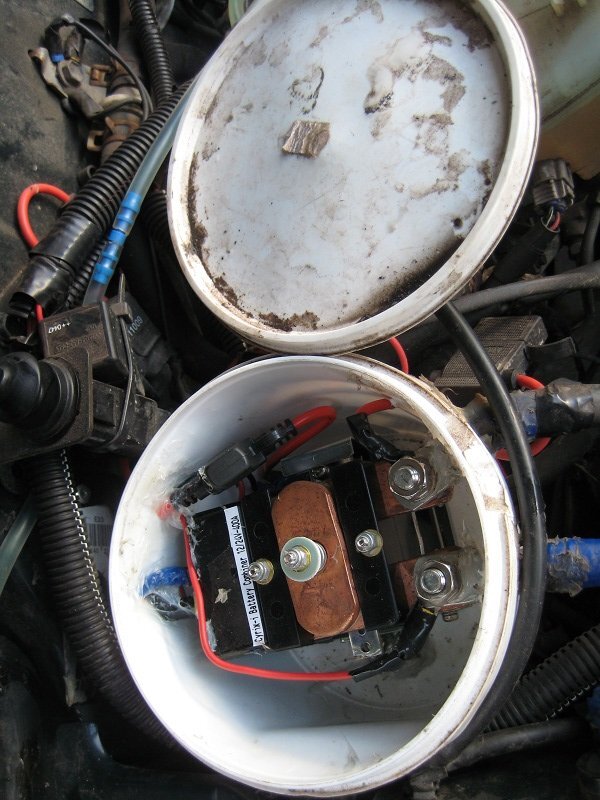
I didn't make as much progress today as I had wanted to but I have managed to solve another of the big problems that I was unsure about - mounting the voltage sensing relay (VSR). I have one of the 400A Cyrix relays that a few people on this forum bought - I was lucky enough to get mine off another member who no longer needed his.

On the Colorado/Prado most people mount the relay in the engine bay. If I had a sealed relay, or I had found a suitable sealed container and space in the engine bay, I would probably also have done that. Instead I decided to use some of the space above the control pedals behind the dash - there is quite a lot of room there. Access to not only take a look under there, but to actually work, is limited though (when you are me... :oops: ). I removed the drivers seat so that I could lie on my back with loads of room for tools - once again I was surprised by how many different tools were needed for a relatively small job. Taking the seat out is easy in the GX (no heated/electric seats) - only 4 bolts and the seat lifts out with its rails.

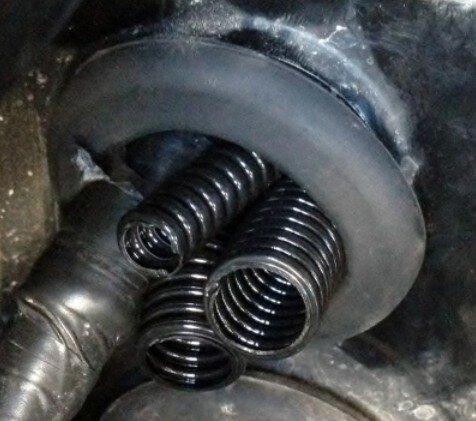
The next 30 minutes was spent staring at the footwell, then staring at the firewall from the engine bay, then staring at the firewall from under the truck, and finally staring at the clouds wondering if I should risk drilling through the firewall. After all what's the worse that could happen... drill into a heater pipe... drill into a brake pipe... drill into the wiring loom... Then I noticed what looked like an oval flap in the rubber sound deadening layer in the footwell:

IMG_0592.jpg


It was only connected at 4 points like a push out piece in a Airfix kit. I took another look in the engine bay and saw this:

IMG_0593.jpg


Woohooo!! :dance:

I pulled out the rubber tab and drilled a very small test hole just to be 110% sure that I wasn't drilling in the wrong place, but everything was OK so I used a step drill to enlarge the hole for the rivnut. I fitted the first rivnut and test fitted the VSR so that I could mark exactly where the second hole needed to be drilled. If you don't have a rivnut tool and you are thinking about getting one, don't waste your money on a cheap tool. Just buy a Memfast kit from the start (I bought a cheaper tool first - anyone is welcome to come fetch it foc). This is both rivnuts fitted:

IMG_0603.jpg


IMG_0598.jpg


This didn't go completely smoothly though. I had gotten used to my cheap rivnut tool and remembered how much force was needed on the spanner to fit rivnuts, and then mistakenly thought I needed to apply the same force with the Memfast tool. I didn't actually even need to use the spanner on the Memfast tool - you can turn the knob by hand for 4mm steel rivnuts. I stripped the thread on the first one, and then had to try and get it out again. This is a PITA job because you can't drill it out again (it just spins). I used a dremel to butcher it on the engine side and then pressed it back through the hole. In the pic above you can see where I touched up the firewall with black paint after the cutting and grinding discs scored the firewall.

The VSR is now test fitted ready for the cabling tomorrow. Once the cabling is done I will silicone seal the rivnuts to make sure water can't leak into the cabin.

IMG_0604.jpg


Tomorrow's challenge is figuring out where to take 2x40mm2 sheathed cables & a few thin wires through the firewall...
 
I got a bit more done today. My aim was to finish wiring in the VSR today, and I almost managed it.

First I had to decide where to feed the cables through the firewall. I was tempted to drill some new holes as I have exactly the right size grommets for the cable sheath that I am using. But in the end I decided that I would use an existing opening. There are 2 sealed grommets on the right side, right in the top corner of the firewall (above and to the right of the foot controls).

IMG_0608.jpg


Anyone know what the plug in the pic above is for?

Here is the top grommet trimmed to take the new sheathed cables:

IMG_0609.jpg


And a quick test fit of some offcut sheath to make sure that they will fit through the hole:

IMG_0610.jpg


Next I made up the 2 positive cables and fed them through the firewall, routing the leisure battery cable over the fan shroud again, and then around the starter battery (joining the starter battery cable ) and back through the opened grommet. Inside the cabin the cables tuck to the left straight away. I fitted a p-clip to an exisiting bolt (that holds part of the brake pedal assembly to the firewall). I will try to get some pics of all this tomorrow.

Here is the VSR all wired up and ready to go:

IMG_0613.jpg


I also fitted and wired in a start assist push button, and a bi-color LED.

IMG_0615.jpg


The start assist button seems to work fine, but the LED doesn't - I think that either I damaged a solder joint during fitting (most likely the resistor solder join), or maybe I don't need the resistor with the micro switch (I've not used a micro switch before)?? I'll whip out the multi-meter and sort it in the morning. I also forgot to set the VSR to programme 2, so another little job for the morning. Then I can put the seat back and reassemble the dash.

I still need a battery tray for the leisure battery which is just test fitted at the moment - I will probably get a local fabricator to knock something up for me. All I need is a flat surface the size of the battery with the edges turned up about 10mm.

Time for a beer!
 
Hi Fridayman,

Some good photos there to show more clearly what is available under the dash area.

One comment I would make, is to get a good seal around these.
[attachment=0:2np1fjh0]seal this up.jpg[/attachment:2np1fjh0]
I guess the other side is in the engine area, and as thus, if you go "swimming" you will probably get water coming into the cabin area?

May be wrong, but any way.
Some silicone sealant of sorts?

Gra.
 

Attachments

  • seal this up.jpg
    seal this up.jpg
    47.8 KB · Views: 305
Graham said:
Hi Fridayman,

Some good photos there to show more clearly what is available under the dash area.

One comment I would make, is to get a good seal around these.
[attachment=0:3tlmn3ck]seal this up.jpg[/attachment:3tlmn3ck]
I guess the other side is in the engine area, and as thus, if you go "swimming" you will probably get water coming into the cabin area?

May be wrong, but any way.
Some silicone sealant of sorts?

Gra.

That pic is actually the engine side. And yes, the hole will definitely be sealed, but I still need to run a few wires for the battery monitoring system first. I've also tried to make the sheathed cables waterproof - not so much to keep water out of the cabin, but I don't want moisture trapped in the cables/sheaths.

Here is a pic of the inside of the hole.

IMG_0616.jpg


And with the sound deadening material back in place.

IMG_0619.jpg


The pic above also shows the p-clip that I used to keep the cables away from the pedals.

I also got the bi-colour LED working, with red for VSR open and green for closed. If the LED is off it means the leisure battery has been isolated entirely with the isolation knob on the positive battery terminal. Yesterday I had the LED wired according to the diagram that came with them. This morning I figured out that the diagram had the polarity the wrong way around, so easily fixed. Everything is working perfectly now.

Pic of VSR completely wired up.

IMG_0618.jpg


Leisure battery still waiting for a battery tray and fastening strap.

IMG_0621.jpg


The starter battery is looking a little busy now.

IMG_0622.jpg


A tip for those that have not worked with thick cable before: I found the best way to cut the cable was to clamp it in a small hobby vice and saw it with a fine tooth hacksaw without using too much downward pressure. It gave neat cuts that were easy to crimp. The only time it didn't work was on a very short piece (10cm) where the blade teeth hooked the wire strands and this happened:

IMG_0620.jpg
 
That's the business!

Looking very professional. :thumbup:

Gra.
 
I find the easiest way to cut thick cable is with a slitting disc in an angle grinder.
 
Don't like the adverts?  Click here to remove them
Spent the afternoon installing the Reya battery monitor. I found a spot to the left of the steering column, just below the instrument cluster.

ImageUploadedByTapatalk1349638232.760411.jpg

ImageUploadedByTapatalk1349638247.675141.jpg

I'm getting some odd voltage readings - about 0.5V less than the multimeter shows. As long as this difference is consistent, it won't be a problem. I have to charge / discharge the batteries a few times before it can read the battery capacity accurately. And I still need to wire in the shunt to get the current reading.


Next job is running the power from the leisure battery under the hood, to the boot. I was tempted to run the cable from the existing 250A mega fuse holder (that connects to the VSR), but decided to rather fit another 175A mega fuse as originally planned - this is the max current that I will need for the inverter, and it will make fault finding easier if a fuse blows.

The cable is 40mm^2, sheathed in closed convoluted tube. The convoluted tube is exactly the right size for the cable, but this made feeding the cable through quite a pain. It took well over an hour to do both cables.

Both cables drop straight down from the leisure battery (on the left of the engine bay) to the chassis rail. The plan was to secure the cables to the chassis rail using p-clips screwed into rivnuts. I couldn't fit a drill inside the chassis rail at the front, so used a cable tie for the first bit - I might go back and look for a better solution at a later date.
Once again I have to say what a superb tool the Memfast rivnut tool is!

ImageUploadedByTapatalk1349639799.041281.jpg

ImageUploadedByTapatalk1349639870.506697.jpg

I used 4 sets of p-clips before the cables go back up over the round cross member at the back.

ImageUploadedByTapatalk1349639961.779444.jpg

From there the cables are loose for about 50cm before they are fed through a hole into the boot. The hole was already there with a rubber bung in it - there are 4 of these holes, I used the rear left one. No pics of this, as I'm not done with this yet - I have to find a way of securing that last bit of cable and then seal the hole.
 
Last edited:
When we ship the truck I can only fit 200 cu.ft in the container in addition to the truck, and we are not allowed to fill the truck with stuff. Equipment bolted to the tuck is a different matter however... So I found some time today to start making a rack to mount my solar panels.

Apparently not all solar panels are equal e.g. not all 100W panels will produce the same voltage under the same conditions. This is also true if you are comparing mono-crystalline panels with each other (as opposed to comparing with the now considered inferior poly-crystalline panels). Panels can also produce varying max voltages. I got a good deal on some 180W Sharp panels, and bought 2 so that I can harvest plenty of free power in as short a period as possible (14A at 12V in full sun), and so that I have a bit of resilience built into the system.

I would have liked to hook these 2 panels up to a CTEK DS250, but these panels can generate just over 30V, and the max input voltage on the DS250 is around 20V so no good to me.
To take advantage of the high output voltage of these panels, I looked around for a MPPT solar controller which can convert excess voltage into higher charge current (which is a good thing!). After a bit of research the Victron Blue Solar MPPT 40A seemed like exactly what I needed, but is a bit pricey at £230. Fortunately I found a chap on ebay selling an identical controller that is branded as Solarmate, for about £130. (It turns out the Victron unit is made by Solarmate.)

Back to the panels. They are not small at 1300x990... But then it occurred to me that this might be a good thing as I am taking a black truck to Australia. Anyone that has lived in a hot country will have noticed that there are fewer dark or red coloured cars because they get much hotter in full sun. So I built a rack to mount the solar panels onto the roof bars like a mobile car port, keeping me in the shade all the time.

The front and rear channel is 50mm to fully protect the panels against stones, branches, etc. but on the sides I have only used 25mm angle iron to save a little bit of weight (that sits up high). I'm not quite done yet, but here it is.

photo (1).jpg

The panels and frame will mount onto the 3 roof bars using u-bolts.

photo (2).jpg

The panels will be removable so that I can put the panels in sun and park the car in the shade if I want to.
 
Great thread. :clap:

Regarding your container, why arnt you allowed to put anything inside the truck?

Are you loading the container yourself? :think:

I want to load my container myself and was hoping to stick a few bits inside the truck. :icon-cool:
 
I'm just going to pay the shipping company to do the packing - my marriage wouldn't survive us doing it ourselves...

Several shipping companies told us not to put stuff in the truck - I think it was because the truck and other goods are inspected in different places by different departments.
 
This afternoon I had planned to prime and paint the frame, and decided to test fit everything first. Getting to the u-bolts on the passenger side where the Foxwing is, is a bit tricky (would be easier if I was double jointed or I had orangutan arms). Fortunately it all went together. I also stuck on the neoprene tape that I bought to help dampen the vibrations from dirt roads and corrugations.

IMG_0856.jpg

IMG_0865.jpg

IMG_0867.jpg
 
Ben - I just got a 90 and an 80 shipped to SA and I filled both to the BRIM. Literally just space for the driver. Passenger seat plus all storage spaces filled. We loaded the vehicles / did our own packing / left them in the yard the guys actually drove them in but it's all possible. It saved us over 1500gbp

Speak to the shipping agent as anything INside the vehicle was free for us IF you speak to them. I'd shop around till you get the same deal..
I have a contact if you're interested. Used them twice and they were worlds better than the sharks we used a year ago..


Great thread. :clap:

Regarding your container, why arnt you allowed to put anything inside the truck?

Are you loading the container yourself? :think:

I want to load my container myself and was hoping to stick a few bits inside the truck. :icon-cool:
 
Last edited:
MATTTTTT......good to hear form you stranger. How things going in sunny SA??

I will certainly drop you a call closer to our move date to pick your brain re shipping.

Hope its all working out for you.

End of hijack:text-threadjacked:
 
Ben - I just got a 90 and an 80 shipped to SA and I filled both to the BRIM. Literally just space for the driver. Passenger seat plus all storage spaces filled. We loaded the vehicles / did our own packing / left them in the yard the guys actually drove them in but it's all possible. It saved us over 1500gbp

Speak to the shipping agent as anything INside the vehicle was free for us IF you speak to them. I'd shop around till you get the same deal..
I have a contact if you're interested. Used them twice and they were worlds better than the sharks we used a year ago..

When shipping to Australia I think the problem is the AQIS inspections - vehicles and goods are inspected (and potentially cleaned) by different departments, so they don't want vehicles filled with stuff that they have to remove to do their quarantine inspection. I'm not sure what the outcome would be if you just did it anyway though...? But they can be real "£$%"£'s if they want to be (especially with anything that has a history with mud/vegetation/animals/etc, like a 4x4) - which ends up in you paying them lots of money to "clean" things that are already clean but not clean enough... So it is probably better to make life as easy as possible for them, and hopefully buy some goodwill.

All that said, I did fill my rear storage with all the equipment that will be in there for the trip (and not going in the camper trailer) i.e. fridge, tools, recovery gear,camping chairs, etc... and the packers had no problem with this. Every single item was cleaned individually though, most with Jeyes fluid, so that when they open the door and the vapour knocks them over there will be no doubt that I made an effort.
 
Good advice fridayman..
SA also inspects the goods separately from the vehicles and there are a few other restrictions eg. vehicle is a hazardous object and needs a special form etc. but provided the shipping company will allow it and you do lots of cleaning I think you'll be ok.
I've been in and out of Aus quite a few times and taken in wood and skin (small Zulu shield!) from SA and they were fine with it after I asked the official. I think you'll be in a better position than you think shipping from the UK as well. Shipments from Asia.. Not always so lucky!

When shipping to Australia I think the problem is the AQIS inspections - vehicles and goods are inspected (and potentially cleaned) by different departments, so they don't want vehicles filled with stuff that they have to remove to do their quarantine inspection. I'm not sure what the outcome would be if you just did it anyway though...? But they can be real "£$%"£'s if they want to be (especially with anything that has a history with mud/vegetation/animals/etc, like a 4x4) - which ends up in you paying them lots of money to "clean" things that are already clean but not clean enough... So it is probably better to make life as easy as possible for them, and hopefully buy some goodwill.

All that said, I did fill my rear storage with all the equipment that will be in there for the trip (and not going in the camper trailer) i.e. fridge, tools, recovery gear,camping chairs, etc... and the packers had no problem with this. Every single item was cleaned individually though, most with Jeyes fluid, so that when they open the door and the vapour knocks them over there will be no doubt that I made an effort.
 
I've been in and out of Aus quite a few times and taken in wood and skin (small Zulu shield!) from SA and they were fine with it after I asked the official. I think you'll be in a better position than you think shipping from the UK as well.

We have one of those little shields, and I was wondering if we should take it or not - decision made, it comes with us :)
 
YES YES! I've had mine since I was a baby so wasn't going ot give it up either way :p It's made of wood, skin, bone and clay - all the things the Australian customs love :p
We have one of those little shields, and I was wondering if we should take it or not - decision made, it comes with us :)
 
Andy,

How has your Cyrix taken to living in an ice-cream tub in the engine bay? Has it been effected by water corrosion at all? I am thinking of fitting mine in a tupperware container (I am open to other suggestions for waterproof containers) in more or less the same location in the engine bay of my 100.

In the 90 it had been installed in the cabin in the space above the pedals.

thanks

Reinhard

I used 50mm2 cable, but mounted the relay in engine compartment in a waterproof (old ice-cream tub).
It is bolted to a "L" bracket that bolts onto the firewall, on drivers side between wing and break fluid reservoir.

In hindsight i could just as easily mounted in cabin in the large acreage of space behind dash and above drivers feet. would have been very little additional cabling. I put a mega fuse on each +ve feed from main and auxillary battery.

wugg_battery-003.jpg


wugg_battery-004.jpg
 
seems OK -
nipped out and took a photo for you

Ive been through a few fords over tops of wheels and that bigger ford in the olive groves, you guys also went through near french border in spain
 

Attachments

  • IMG_4524.JPG
    IMG_4524.JPG
    104.5 KB · Views: 189
Ok. I'll probably mount mine there then. Thanks.

Sent from my HTC One V using Tapatalk 2
 
Back
Top