Don't like the adverts?  Click here to remove them

LJ73 1UZ build/repair in Dubai

Yes the dune sand will humble anyone...hope you had a decent spade......I have been transporting these sand mats that look like strips of tyre rolled into about a 1meter length for about a year now. Do you think these things would help in this type of situation?
 
I was looking that the same when I was at Dobinsons. On the wall near the roof top tent

IMG_20170819_1344151.jpg


Normally we just drive with at least two cars, driving solo is a good way to die (of dehydration normally). Even though I was only 600m from a track it took a friend several hours to get to me. I had 6L of drinking water with me.

http://gulfnews.com/news/uae/crime/chief-geologist-ignored-procedures-1.239294
https://www.thenational.ae/uae/trib...ho-died-of-dehydration-in-uae-desert-1.475846

But now I am serious considering either the roll up mats or some Maxtrax

driving-on-maxtrax-mkii.jpg


I think I would have been able to self recovery with a pair of these. I have a friend who has them, so I have asked for his opinion on soft desert sand recovery.
 
Looking for some recovery boards has been an interesting experience. Easy to get sued here so will stick to the facts.

TREDs

TJM - $260 AU
Mebar - $375 AU

Maxtrax

ARB - $375 AU
Icon - $515 AU
Adv HQ - $690 AU

There are some huge markups going on here, as the more expensive shops are just buying from the cheaper one.

In Australia where both products come from you are looking at around $200 and $300 respectively, including 10% goods and services tax (like VAT).

With no GST here and only 5% import tax, it is hard to justify the differences.
 
For me, part of this issue is the mindset that because I have these "toys" I can "relax" as the buried-in-sand scenario is covered.....
We have experienced both types..negatively. The roll-up type as well as the plastic board type with the tyre slipping on the surface. The plastic version has little-raised points (for traction) that if there is any wheel spin they grind away - and the roll-up version just makes skid marks.
I fully appreciate that you should not "spin" the tyre in these situations. Easier said than done when she's belly down in the sand and you essentially have to prevent ploughing.
So what to do?
Experience has taught me that one cannot be too relaxed about these issues - a small amount of fear/respect is a better mindset.
Hence the question?


(Sorry we are getting far away from your excellent build thread)

Interesting statistics in that second article Rob, (sorry for continuing the thread-jack, but I do think it important...

"Published in February this year, it found that 86 per cent of marshals at the Abu Dhabi Desert Challenge, 61 per cent of those working on the Formula One Abu Dhabi Grand Prix and 54 per cent of the volunteers for the Dubai Rally suffered from dehydration."

It just goes to show that if you're already to some extent dehydrated, it only takes a small incident to slip into the danger zone of loss of life.
 
No problems at all to talk about this, it is important and still related to this topic.

Although to switch around a bit, I have designed a water cutting profile to accept the electrical components required to drive 6 x 30 amp relays. These will be 2 x driving lights (spots / spreads), 2 x cooling fans, compressor, and a spare. Also a few spare fused power supplies and earth connections.

I want to tidy the engine bay up and have everything in one place. This is my first attempt, it will sit adjacent to the battery in front of the brake master cylinder.

Not shown are six fused relays on the back, which will have the fuses accessible from the top.

170821 LC 6 Relay board layout R00.jpg


So the power comes from the battery and then to the 100 Amp resettable relay. From there it powers the Blue Seas 12 circuit fuse board and the positive bus bar.

The 6 relays have power in via the yellow wires, and when the coils are close the red small wires to the six loads become energised.

Meanwhile the switches in the dash are fed power via the 5 amp fuses, which are then returned to the individual relays. The coils of the relays are earthed to the the bus on the circuit board.

I need to add a few more holes for bolting to the side of the battery bracket, and maybe something else.

If anyone has any comments it would be great to hear before I send off to profile cutting. The profile currently looks like this :

170821 Water Jet Profile R00.jpg


I will cut out a cardboard copy and test fit it up to see what modifications may be required.
 
Don't like the adverts?  Click here to remove them
Nice build. interested in the falcon perch as fly one myself : )

Hi mate,

It is not much, just seems to be a piece of wood covered in fabric, like a marine carpet or something. Screwed onto a small box which is in turn bolted onto the standard centre console.

The raised centre console is quite comfy, but the wood gets in the way of your elbow so I need to remove it.

IMG_20161125_1746091.jpg


The covers on the seats are quite worn, but when you look through the holes the original fabric seems in good condition. Will leave the covers on until I can get all the messy jobs done I think,
 
In my shed I seem to have about 3 or 4 old compressors which don't seem to work that well. Handed over to me from friends that have left Dubai for Oz or whatever.

So until I have the time to install the new double pumper, I make a ARB compressor in a box. My friend has one of these which I used for inspiration.

ARBHighOutputCompressor-Alpha11.jpg


So I bought a toolbox and had a go at making my own :

IMG_20170825_2211078.jpg


I got some new button headed M4s to replace these stupid cheese heads, will get those installed shortly.

Only issue I had was the pressure switch doesn't seem to cut the power. I have it wired in line with the switch side of the relay, since it is only rated at 5A.

I have a spare one, if that doesn't work I will steal the pressure switch off my friend's compressor as he is away in Spain on holidays. Not sure why he left the keys with me :)

Also when installing the over sized radiator, I lost the central bracket which supports the bonnet latch. When you went to close the bonnet, the whole cross member was twisting and failing to lock. The only way to close it was to take the bonnet rod off, poke it though the grill and use the end of the rod to hold the latch mechanism with one hand and slam the bonnet shut with the other.

Although it was a good party trick, it got tired quickly so I made a 'Z' profile bracket to tie into the grille. Even though it was light aluminium, it does the trick. Will upgrade to steel when I get organised and by some more flat bar.

IMG_20170826_0113162.jpg


After finishing the compressor and pumping up 4 tires from last weekend, it was still relatively early so I decided to get started on my next idea. The new electric fan moves a lot of air through the radiator, but once on that side the is the large block in the way and no where for the hot air to go. After a quick run in the desert I had noticed the area of bonnet above the front of engine was too hot to touch.

So I start installation of louvres to let the hot air up and out. Got the thing fitted and aligned, then 8 holes drilled and riv-nuts installed :

IMG_20170826_1414110.jpg


It is about 2mm shorted overall from the spacing of the fold down windscreen support brackets. I think it looks alright but more important is exactly in the 'hot spot'. I bought some proper length button head bolts to replace these temporary ones. Next step is to cut out the sheet metal through to the inside. At this stage the idea was to remove the outer skin only, and not cut through the support ribs on the underside.

Sorry for the blurry photo, but the underside view shows roughly where the cut outs will be in red markup :

IMG_20170826_1414179.jpg


Going to take my time on this, as there will be hardly any 'replacement' bonnets I could find locally as this is a grey import vehicle in this market.

I also need to finish making the wooden template for the relay board and doing a mock up for confirming the fixing holes and checking clearances.

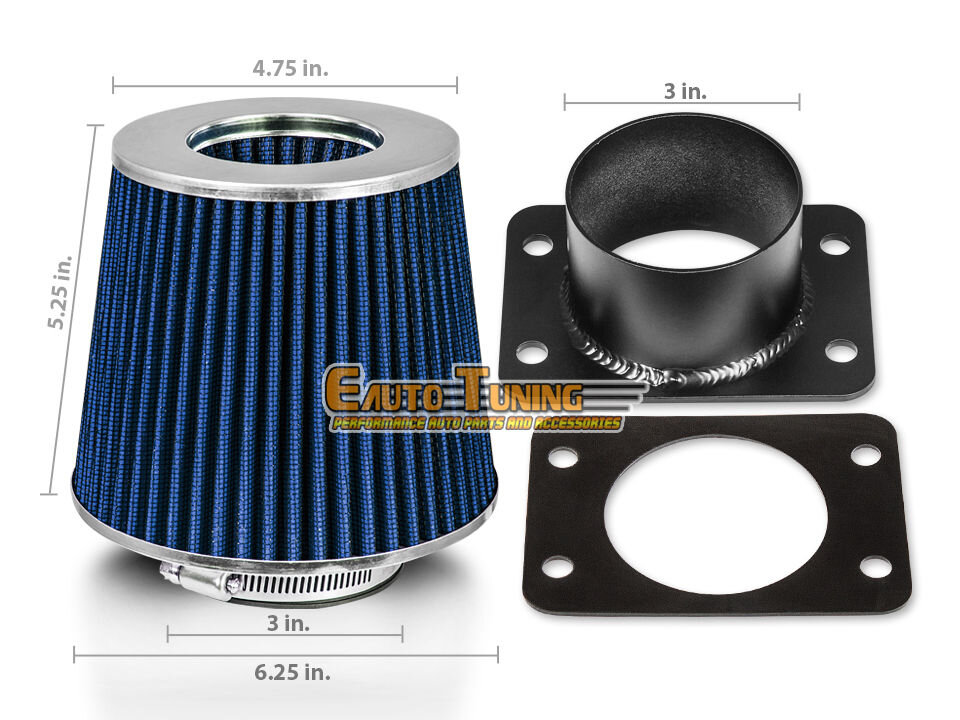
I bought a replacement air filter and an adapter plate to mount it properly. The previous filter is buggered and the rubber is torn, and the adapter plate is a home made by previous owners mechanic. Will have to post pics of it when I remove, it is quite bad.

Something similar to this is going on. I need a pod filter because I don't have the original airbox, not because of the extra 100 hp it is sure to release. s-l1600.jpg
 
  • Like
Reactions: Ben
Since I have the Dobinson suspension on the way, I am also going to replace the rubber buckets the springs sit on at the same time. They are well and truly perished.

Once thing I can't work out is which one to order in the rear. My LJ is a 1991 model, but I don't know the month. Looking at ToyoDIY there are two different types. Without the month of production I don't know which one to order. Note even sure if it is just an upgrade and either will fit.

Maybe Ben knows as he has mucked around with some many different coil models....

COIL SPRING BUCKET.jpg
 
Good idea, I forgot about that one. But it doesn't matter now because Toyota have confirmed they are not available at all. So I will need to reuse the old worn ones for now.

I was thinking I could check out what a GQ Patrol uses, as the rear springs fit the LC.

I also found out yesterday from my axle build code G145 that my 8" rear diff should be a factory LSD. However it is old enough now it is just a SD.

I think by the time I remove it I may as well just put a locker in there rather than try to replace the clutch packs.
 
Your build date should come up on Toyodiy when you put the chassis number in, I know mine does, even down to the month. :ugeek:

I dont think the rubber boots under the springs are that critical so I wouldnt worry about. If anything they can hold dirt and cause corrosion, but thats probably not a problem where you are. :icon-biggrin:

Out of curiosity does yours have rear disc brakes? I imagine it would, same as the LJ/KZJ78's. :think:
 
If I take them out Ben, will be losing some lift :)

Found this photo :

IMG_20170819_1421196.jpg


Yep, looks like discs :

IMG_20170819_1421019.jpg


That's the old POS shock on the way out.

Way too long and letting the spring fall out of the bucket :

IMG_20170819_1516540.jpg


See the different in droop between old and new :

IMG_20170819_1517580.jpg


Also need to increase the length of the diff breather tube, comes off at full extension. The brake line is ok, but might end up adding 2" just in case
 
  • Like
Reactions: Ben
.. electrical components required to drive 6 x 30 amp relays. These will be 2 x driving lights (spots / spreads), 2 x cooling fans, compressor, and a spare. Also a few spare fused power supplies and earth connections.
..
Not shown are six fused relays on the back, which will have the fuses accessible from the top.
..
So the power comes from the battery and then to the 100 Amp resettable relay. From there it powers the Blue Seas 12 circuit fuse board and the positive bus bar.

The 6 relays have power in via the yellow wires, and when the coils are close the red small wires to the six loads become energised.

Meanwhile the switches in the dash are fed power via the 5 amp fuses, which are then returned to the individual relays. The coils of the relays are earthed to the the bus on the circuit board.
..

View attachment 131587

I will cut out a cardboard copy and test fit it up to see what modifications may be required.
Like the look of that. Very nice. Post pics and a new thread on it
 
For the LJ73, Dobinson only offer their 'heavy duty twin tube gas long travel shocks' and linear springs.

So there are only options of standard height toyota spings with their shocks or lifted. I chose +60mm front and +65mm rear.

Note that the square headlight and round headlight series have different suspension.

Find the correct Toyota model here :

https://www.dobinsonsprings.com/index.php/toyota-4x4-suspension?start=25


Hell
For the LJ73, Dobinson only offer their 'heavy duty twin tube gas long travel shocks' and linear springs.

So there are only options of standard height toyota spings with their shocks or lifted. I chose +60mm front and +65mm rear.

Note that the square headlight and round headlight series have different suspension.

Find the correct Toyota model here :

https://www.dobinsonsprings.com/index.php/toyota-4x4-suspension?start=25
Hello! I joined this forum to contact you regarding my Lj73 I bought few weeks back, I live in Abu dhabi is it possible to share your contact information, appreciate it.
 
Like the look of that. Very nice. Post pics and a new thread on it

Hi mate. Sorry I sold the Cruiser and moved home to Oz. Never finished that setup but still have all the bits. Might use it on something else one day .
 
Hello! I joined this forum to contact you regarding my Lj73 I bought few weeks back, I live in Abu dhabi is it possible to share your contact information, appreciate it.

Hi Mohammad. Glad you have my old Cruiser, hope the info I sent you via PM will help.
 
Back
Top