Don't like the adverts?  Click here to remove them

'SWAMPY' MY 02 LWB 3.0 D4D GX Colorado

Anyway, managed to get most of what I wanted done and got away on my first off-road trip in the new truck Swampy and what an interesting and pleasurable experience it was.


First time driving an Auto off road and it was great :)

First time experiencing a front locker first hand and it was awsome :) :)

What can I say about the D4D lump compared to the TD except plus 40BHP :auto-layrubber:


I did however sustain some damage over the weekend :shifty: :eusa-whistle:


I had a tiny argument with the smallest of bomb-holes on the first day that resulted in a small amount of bumper damage and molding release :icon-exclaim:

The molding pushed straight back on to be fair although it'll need a few new trim clips. I think I need to start keeping a stock of these molding clips :icon-biggrin:

IMG_8940_zpsef7590e2.jpg


IMG_8941_zpsd1406746.jpg

The bumper on the other hand :eusa-whistle:

IMG_8942_zps3e2c1572.jpg


IMG_8943_zps17810b99.jpg

I also lost one of my beautiful crystal clear side repeaters down one of the more pin stripy tight lanes :(

IMG_8956_zps69719316.jpg

This is the repair for now as the company I bought them from is currently out of stock! At least I'll have a spare when I eventually get them. Every cloud :) ;)

IMG_8957_zpsf674a74d.jpg

One of my nice new 80 series alloys also took a bit of a knock, sorry Karl :eusa-whistle:

IMG_8959_zpse186f843.jpg

So I touched it in with some Satin Black Hammerite

IMG_8960_zpsd7fb813e.jpg

At first I thought OMG! That looks shite!

IMG_8961_zps689be42c.jpg

Now it's dry it's not looking so bad :icon-biggrin:

IMG_8962_zps1edd1aec.jpg

I removed the front bumper and cut some more from off of it to reduce its rigidity a little more

IMG_8950_zps4235a572.jpg

Once I'd removed the bumper I realized very quickly that the damage was more extensive that it had appeared on the outside and I found the back of the fog light was all smashed up. It had been pushed up into the supporting arm for the bumper bar!

I considered for a moment buying another one, but soon came to my senses, popped up the shed and came back with some mesh and P40 :)

I used a soldering Iron to melt the mesh onto the back of the light. Holding it in place while I applied the P40 :)

IMG_8944_zpsf3f94bd3.jpg


IMG_8945_zpsab642890.jpg


IMG_8946_zpseb457957.jpg


IMG_8947_zps5dad0c4f.jpg


IMG_8948_zpsd63f64d3.jpg


IMG_8949_zps9e8ffddd.jpg

Gave it a quick spray with some silver paint that I also had in the shed and I think it's turned out not so bad IMHO :)

IMG_8951_zps00713512.jpg

These photos are not great, but I also completely removed the parts of the bumper support bar that fix to the very lower edge of the bumper as this lower edge no longer exists following the trimming. I also reduced the depth of the bumper support bar brackets by at least 70% by cutting them back and welding a bit of 20x10mm flat back in for strength. It was these that smashed the fog light as it was pushed back! The fog light completely clears these now even when pushed back :)

IMG_8953_zps91c23cce.jpg


IMG_8954_zps0c0e3ebe.jpg

Bumper back on and all repairs finished :)

Well apart from painting the bumper. Got the paint, but going to wait for the warmer weather before I do it and just waiting for the side repeaters to come back into stock.

IMG_8955_zps011fc4b7.jpg


IMG_9010_zps669870cc.jpg
 
Swampy has come on leaps and bounds Steve, very nice. Must have been a big milestone to take it out on the first trip, shame about the mishap but great repair work. Looking forward to seeing it in action at Lincomb.
 
Swampy has come on leaps and bounds Steve, very nice. Must have been a big milestone to take it out on the first trip, shame about the mishap but great repair work. Looking forward to seeing it in action at Lincomb.
Thanks Trevor :) I'm very much enjoying D4D LWB ownership and use her as often as I can in place of the Passat :) The damage is part of the territory and was not so bad. I could have got out to see why I wasn't moving forwards and placed a waffle instead of engaging all my lockers and nailing it! You should know better than most about the kind of damage one can get from this hobby of ours :eusa-whistle: Must catch up with you for news on Fiery, is you sister back using her yet?
 
You should know better than most about the kind of damage one can get from this hobby of ours :eusa-whistle: Must catch up with you for news on Fiery, is you sister back using her yet?

Ahem, might know a bit about Muntjac damage. Sis is currently driving from Verbier to Geneva, then Zermatt and Chamonix next week. Feel free to give us a buzz, I'm usually about.
 
Ahem, might know a bit about Muntjac damage. Sis is currently driving from Verbier to Geneva, then Zermatt and Chamonix next week. Feel free to give us a buzz, I'm usually about.
Muntjac damage?! And Water damage! Is sis doing that in Fiery? Cool :icon-cool:
 
Damage TO a Muntie or damage FROM a Muntie? There is a difference. One's a trip to the body shop and the other is a visit to the BBQ suppliers.
 
Don't like the adverts?  Click here to remove them
Damage TO a Muntie or damage FROM a Muntie? There is a difference. One's a trip to the body shop and the other is a visit to the BBQ suppliers.
:laughing-rolling:
 
It was recently my birthday and I got a few really good Man Presents for a change, lots of hinting and suggestion was made in the lead up :icon-biggrin:

So here is the important pile, I've left out the cheque, cash, socks and Jack Daniels opting to share the items that I'm happiest with :) :)

IMG_8964_zps7d6e22fd.jpg

Firstly a Dickies waterproof, padded, thermal, hooded pair of overalls. OMG! It's like stepping back into the womb putting these on and I could very easily live in a pair of these for an entire weekends laning. They really are just so comfy I would highly recommend a trip into Machine Mart to try a pair on :)

IMG_8965_zpsc19253e5.jpg

Then this little pile :) A new ratchet strap to replace one I have with a damaged strap, a couple of 1/8"BSP 8mm brass tail fittings for extended breathers, a pair of pliers for crimping CV boot clips and single ear pipe clips, an lifting equipment chain coupler for connecting my winch hook to my synthetic rope, a set of five locking wheel nuts, a new clear 3x4m tarp and a Coast 300Lm LED head torch that importantly takes AA batteries the same as my small hand LED torch :)

IMG_8966_zps0596a96d.jpg

I asked for this connector to enable me to occasionally attach my winch hook when away for a weekends laning

IMG_8967_zps752a69f7.jpg

I also had to repaint my hook from red to black

IMG_8968_zpsc79247dd.jpg

This is how I would like to have the business end of my synthetic rope stored for most of the time. tucked out of the way, but still available for use with a shackle

IMG_8969_zps38ca0ba7.jpg

Trouble is that this is fine for occasional use, but when doing a lot of winching recently the speedy way a hook can be used was massively missed

IMG_8970_zps89f014f0.jpg

As I'm using a locked Brummel splice the entire winch rope needs to be removed each time I wish to undo it as it requires the entire length of the rope to be pulled through the splice!

IMG_8971_zpse5dbe06a.jpg

So I thought this would be a good alternative to carrying out that operation. As yet I've not yet tried to remove it and it looks as though it could be a bit of a bugger

IMG_8972_zps21de3968.jpg


IMG_8973_zps81550d68.jpg

I've also fixed this strap loop to the top of the bumper bar for hanging the hook onto when it's fitted


IMG_8975_zps09e2aa4c.jpg


IMG_8976_zps60b27cb3.jpg

But it can be tucked up out of sight when it's not

IMG_8977_zps6afcfed9.jpg

Shiny new locking wheel nuts

IMG_8980_zps5898fafd.jpg


IMG_8981_zpsfee99210.jpg

A very happy Man considering how grumpy my great age can make me :violin: :icon-biggrin: :icon-wink:
 
Last edited:
Stephen, I know what you mean about the end of the winch cable, but I have just gone this way - you put a shackle through it and it does everything you want it to do. Attatch to a strap or tree strop. Chain, another hook coming the other way etc. It's universal.

Eye.jpg
 
Great post(s) Steven, funny and informative. :clap:

Truck is looking great. :thumbup:

Wheres all the laning pics though? :icon-smile:

Stephen, I know what you mean about the end of the winch cable, but I have just gone this way - you put a shackle through it and it does everything you want it to do. Attatch to a strap or tree strop. Chain, another hook coming the other way etc. It's universal.

View attachment 11985

What was your reason for changing over to that Chris? I've seen them around for a few years now. :think:

Personally I like my large comp style hook which means I rarely use shackles as my hook snaps straight over the looped ends of tree trunk protectors/winch extension straps etc. Quick and easy and less parts required. :icon-smile:

Only times I use shackles now is to attach a snatch block to a tree or to use a bridle to spread the load of both chassis rails if I'm really stuck. :think:
 
Well I do a huge amount of winching Ben, but usually not because it's me that is stuck. I seem to be the rescue vehicle for our club and winching operations usually seem to end up needing a shackle so I just have one on the end of the rope. Not everyone has a winch or proper tow points and a hook isn't always the best option. A shackle is pretty universal. If all I had to do was rescue myself, I might just have a hook on the end. Why have a hook and then clip it onto a shackle? it's just an extra piece of iron. They pull into the alloy hawse nice and squarely too without damage too the bearing surfaces unlike a steel thimble.

Why? Why not. Not sure how a hook is less parts though. It's a thimble and a hook, this is a thimble and a shackle. My maths ain't brilliant but that's still 2 in each set up. These are nice and wide and I have some new shackles that are the same width as the end of the thimble so there is no side to side wibble. There is also a nice lead into the back of the thimble for the rope. If you snap and have to re thread, it's much easier to feed old rope into these than it is into a steel closed thimble. I am not a fan of the open eyes they tend to distort under heavy loads.

I like 'em.
 
Fair enough Chris. :thumbup:

Well I do a huge amount of winching Ben, but usually not because it's me that is stuck. I seem to be the rescue vehicle for our club and winching operations usually seem to end up needing a shackle so I just have one on the end of the rope. Not everyone has a winch or proper tow points and a hook isn't always the best option. A shackle is pretty universal. If all I had to do was rescue myself, I might just have a hook on the end. Why have a hook and then clip it onto a shackle? it's just an extra piece of iron. They pull into the alloy hawse nice and squarely too without damage too the bearing surfaces unlike a steel thimble.

Exactly! Thats why I love having a larger comp style hook as opposed to a regular sized winch hook so I can hook straight through the loops on the end of straps, as opposed to having to use shackles through the loops and then hooking onto the shackle with the hook.

Obviously if all your doing is recovering other people like you mention then I can see your logic. :icon-smile:

Why? Why not. Not sure how a hook is less parts though. It's a thimble and a hook, this is a thimble and a shackle.
My maths ain't brilliant but that's still 2 in each set up. These are nice and wide and I have some new shackles that are the same width as the end of the thimble so there is no side to side wibble. There is also a nice lead into the back of the thimble for the rope. If you snap and have to re thread, it's much easier to feed old rope into these than it is into a steel closed thimble. I am not a fan of the open eyes they tend to distort under heavy loads.

I like 'em.


To me it looks like you've got that big lump of metal (thimble) that you then attach another lump of metal to (a shackle).

where as all I have is a hook. :think:
 
Last edited:
So your rope just goes through the back of the hook Ben? No thimble at all? Are you sure? You must have an eye in the end of the rope first. That two bits. A big hook is a distinct disadvantage in many cases. A lot of these stricken idiots only have transportation eyes etc and you cannot get a hook through. Often the hook wont go right in and you end up with a lever effect like a tin opener that bends what ever you have attached it to. It's rare I am stuck but a very common occurence to be unsticking other people. This set up works well for me. And presumably then too :icon-rolleyes:
 
Great post(s) Steven, funny and informative. :clap:

Truck is looking great. :thumbup:
Cheers Ben :thumbup: I'm very very pleased with Swampy and how she's progressing. I'm wanting to replace the front suspension next with OME and am still very on the fence between 881 coils or 882 coils :think:

Wheres all the laning pics though? :icon-smile:
It's coming, I've sorted all of the photo "50 of them. Just need to find the time to sit down and thread up :icon-biggrin:
 
Last edited:
I bought a replacement headrest for the one that was missing when I bought Swampy for just £12.50 :dance:

IMG_8990_zpsa56dacbd.jpg

I just need the two for the very back row of seats and a pair of front mud flaps and I'm laughing :lol:
 
Last edited:
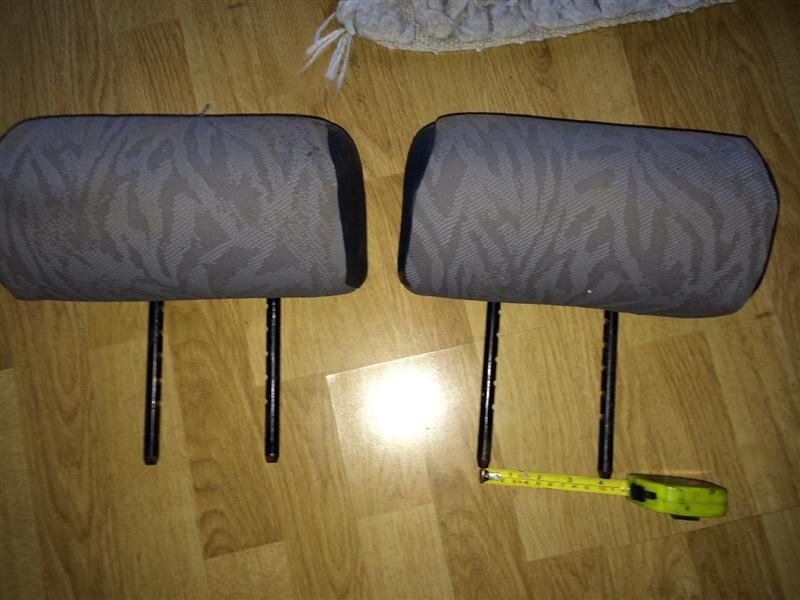
i just chucked two 3rd row seat headrests in bin this afternoon i can retrieve if you want!

what is distance between the holes? if you want them to make sure correct ones

they are grey cloth

ok they are out of the bin now

prongs are 10cm apart (centre to centre_

the metal prongs are at rear of headrest, and front of headrest is 13cm forward of the prongs
so this style of seat maybe different from yours

the rear 3rd row seats were one unit that bolted to floor of boot and folded forwards.

2014-03-08 17.33.13 (Medium).jpg
 
Last edited:
I'm not sure what the headrests in Swampy ever looked like as They were missing when I bought her, but in my mind for some reason I'm expecting them to be tall rubber coated ladder type of affairs. I shall measure the hole centers in the morning and do a little more research on them Andy before taking you up on your very kind offer :) One thing I would say is that the rear seats in Swampy the back of them folds forwards then each seat folds up out of the way side ways not forwards as yours did.
 
Last edited:
Swampy's looking really good - love the mods. :thumbup:

I think the original FX 3rd row seats and yours will be different, though you never know, the headrests may be compatible.
 
Doing great with the build. Steve:thumbup:

BIG shame about the damage plus the wheel :thumbdown: suppose it happens with what we use them for. The touch up did great though :thumbup:

Keep up the good work. I'm sure Chris (Humber4x4) could knock you a front bumper up :icon-wink:
 
YYY
Back
Top