Don't like the adverts?  Click here to remove them

Who is doing what maintenance today?

image.jpeg
image.jpeg
image.jpeg
image.jpeg
Today has been a productive day! Replaced both front wings, and the drivers side inner wing too. Also repacked and set up the passenger front wheel bearing which had developed a little play. Haven't got round to refitting the fibreglass arches yet, as some need replacing, but I quite like the look without...
 
I was looking forward to an HD video of you cussing and swearing, skinning the backs of your hands ... :lol:
I'm just charging the batteries at the mo, its on 93% trouble is until the memory card comes the largest i have is 4gb which is ten minutes at 1080p. Standbye will go for a little drive soon!
Also turning to the darkside... samsung s8 arriving thursday hopefully. You best have found me some good spots for holiday, i want my Mr November back!!!
 
Didn't you rebuild the handbrake internals with new parts Nick ?

When i did mine and had a new disk to compare with the old disk to see how worn the handbrake drum was so i didn't bother ordering new dog bones or anything , new shoes on the new disk have it working well .
 
Didn't you rebuild the handbrake internals with new parts Nick ?

When i did mine and had a new disk to compare with the old disk to see how worn the handbrake drum was so i didn't bother ordering new dog bones or anything , new shoes on the new disk have it working well .
The new dogbones from aus only had the springs and clips with it so no, its got original bits inside. probably just needs some lube on it as i didn't have any at the time...
 
Not quite maintenance but had a sort out while the 80 is away for some tlc, think I've got a few tyres!!!
Needed to sort the garage and make space for when the big snap on tool box comes home. Already have a tool box in there, plus a bench, shelving units, bikes etc etc.

received_10155456197097345.jpeg


Set of 5 80 wheels with 255/85, 2 loose tyres, a set of 4 16" winter wheels/tyres I had for the 1 series, they'll go on the current 3 series, a set of 18" winter tyres that had for the 335d.
Only ones I bought were for the 80 :whistle:

Think it's time to sell some tyres!! I've piled the 80 wheels in the shed as take up the most space.
 
View attachment 124504 View attachment 124505 View attachment 124506 View attachment 124507 Today has been a productive day! Replaced both front wings, and the drivers side inner wing too. Also repacked and set up the passenger front wheel bearing which had developed a little play. Haven't got round to refitting the fibreglass arches yet, as some need replacing, but I quite like the look without...
grrrrr! landcruiser in buiding site backdrop picture. grrr!

good pic..
 
Don't like the adverts?  Click here to remove them
So over the last few days, I replaced my front ARB drop links as the passenger side one had snapped off at the top, and the drivers side drop link was rather loose. I also replaced the bushings as they were rather knackered. Inbetween waiting for the new parts to arrive, I took the opportunity to clean up and respray the ARB and brackets too.....and gave the mounting points a bit of a clean up too while I was at it.....

Passenger side drop link, flapping about all over the place. It was a bugger to get this one off and I had to get the grinder to it in the end....
upload_2017-4-18_10-58-20.png


Drivers side was easier to remove......all the wet stuff is penetrant spray, I love this stuff.....
upload_2017-4-18_10-59-42.png


Overall condition of the ARB before I removed it........
upload_2017-4-18_11-2-34.png


The bracket bushings were well beyond their do not use date!
upload_2017-4-18_11-4-42.png


Front ARB, brackets and bushings off.......
upload_2017-4-18_11-5-52.png


New goodies have arrived :)
upload_2017-4-18_11-6-46.png


Meanwhile, ARB & brackets get a new coat...
upload_2017-4-18_11-7-51.png


Condition of the mounting points....
upload_2017-4-18_11-9-29.png

upload_2017-4-18_11-10-38.png

upload_2017-4-18_11-11-28.png

upload_2017-4-18_11-13-27.png


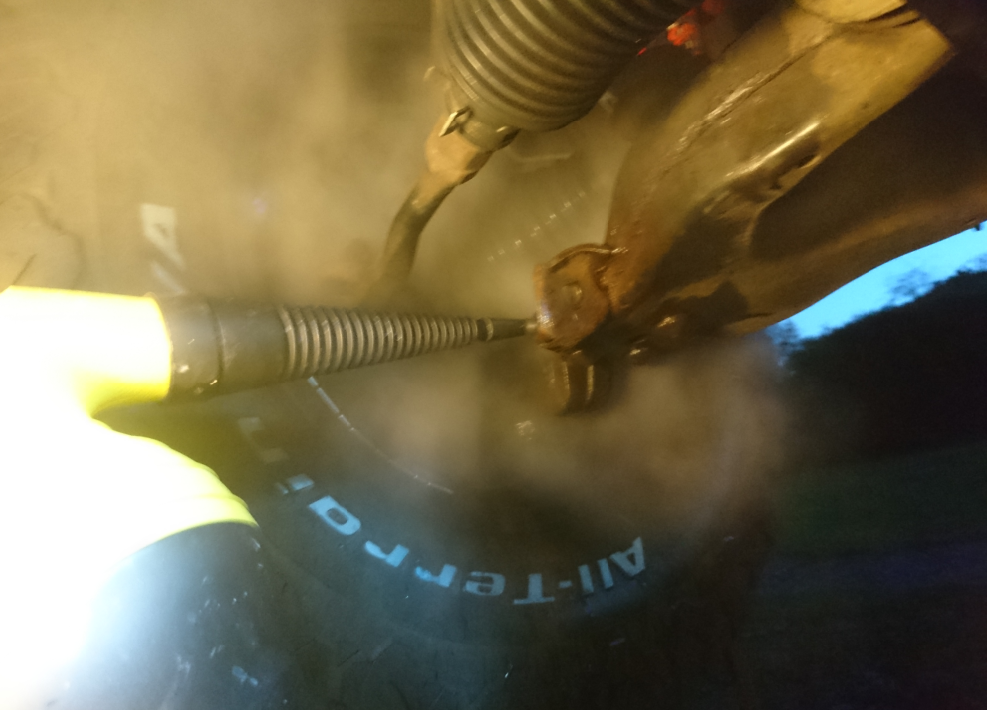
So anyway, I apologise for all the boring photos, but hey ho. After I got the wire brush on all the mounting points, I thought I'd use the little steamer that we have to see if I could use it on the parts to facilitate oil removal etc prior to giving all the points a new coat of paint, for what it is worth.......
upload_2017-4-18_11-17-7.png


A little bit of primer....
upload_2017-4-18_11-18-5.png


upload_2017-4-18_11-20-2.png


And then, yep you guessed it, a little bit of black....
upload_2017-4-18_11-21-10.png


upload_2017-4-18_11-21-50.png


Comparing new drop links to the old ones....the new ones look a little sturdier to me.....
upload_2017-4-18_11-23-13.png


The shiny looking bits and bobs ready to go back on.........
upload_2017-4-18_11-27-53.png


I'm pleased with how it has gone and how it now looks underneath.....
upload_2017-4-18_11-30-18.png

upload_2017-4-18_11-33-13.png


I took her for a quick spin to see how she went, and my lord, what a transformation. I do have all the parts to do the rear ARB too, but I figured I'd leave that for another day. However, seeing as I was on a roll, I thought I'd sort out the last plug on the tow bar........
upload_2017-4-18_11-37-36.png


upload_2017-4-18_11-38-32.png


While I don't tow anything, the original plugs were completely smashed so I thought while the electrics were there, I'd just as well sort it out. And then, because I was having so much fun I put up my cargo net for odds and sods.....
upload_2017-4-18_11-47-42.png


upload_2017-4-18_11-51-59.png


The cargo net is temporarily fixed for now, I do have some 10mm bungee to run around the perimeter, but for now it is just hooked into place while it is 'trialed'. And now after all this, it was time for a evening camping in the woods with some mates.....
upload_2017-4-18_11-56-10.png


If only I could get my truck in there........
upload_2017-4-18_11-57-58.png


upload_2017-4-18_11-59-43.png


That, that, that's all folks.
BTW, if anybody has bored themselves senseless with this, does anybody know where I can get a new back door seal from?
Cheers, Simon upload_2017-4-18_11-15-58.png
 
Last edited:
I'm trying to do similar Bert and its been job stop because after much reading i had decided on Eastwoods rust encapsulator for the mrs truck as there is plenty of paint to remove otherwise .

We will have new stock early April said Frost's UK who seem to be Eastwood's only UK supplier - and today they tell me they might have it by the end of May ! :angry-screaming:
Hi Shayne. I did use a little dinitrol in my rusted areas in the hope it would help slow down the red devil.....
 
No i'm trying to fix the brakes on my other truck but work won't leave me alone , it's trying to rain to :icon-rolleyes: not to worry though the plan is to seal the bare metal with this

Once dried, the Zinga film requires exposure to fresh air, carbon dioxide and moisture to become fully cured. The natural porosity of the coating is dramatically reduced as curing takes place, and Zinga continues to harden for several weeks after application.

It is very important to note that before exposure to a saline environment (i.e. submerged in salt water or placed in a salt spray zone) all zinganised surfaces will require saturation with fresh water for a minimum of two hours to properly seal them. If the coating is unlikely to be immediately exposed to a salt atmosphere then exposure to rainwater or heavy overnight condensation for a couple of days will have the same sealing effect. Zinga can also be forced dried using Infrared drying systems.

Approximate Drying Times (45µm DFT) @ 20C:

  • Touch dry in 10 minutes
  • Dry to handle in 30 minutes (using heavy lifting equipment)
  • Dry to overcoat with more Zinga in 60 minutes
  • Dried to overcoat with water-based paints in 4 hours
  • Dried to overcoat with Alufer N sealer in 4 hours
  • Dried to overcoat with 2K PU or acrylic paints in 4 hours
  • Cured to overcoat with epoxy in 24 hours
And then sort of give the original chassis paint a boost with a light cover of the Omnicote stuff , both products actually like British weather which has to bode well i hope .
 
It was time to do a bit more Industrial Archaeology on my 2001 '100'. It has spent its 16 years in Yorkshire and Scotland and the rust is everywhere :doh:.

This time it was front wheel bearing check, replace the dust shields, new brake flexi pipes and renew some of the solid brake pipes. Then new front pads.

DSCN7424_zpsov3d4vly.jpg


There wasn't much of the original dust shields left !


DSCN7427_zpslqml31ie.jpg


The pads run right to the edge of the disks, which are fine.


DSCN7430_zpsblpkqy3j.jpg


Its amazing how many tools accumulate when having to remove the rusted remains of bolts. That MAP Gas Torch is a godsend, its much hotter than my Propane torch and the pencil flame is very controllable.

(The big hammer is for getting the powder-coated wheels off the hubs - a good tap on the back of the tyre does the job :icon-wink:).

The remains of the dust shield bolts came out with heat. I tried to remove the ABS Sensor but there was no chance of it moving. I didn't need to remove it so left it alone before I broke it.

DSCN7431_zpsx91uvzjd.jpg


A bit of black spray paint makes it look a bit better, even if it will only last a week or so.


DSCN7436_zpsr58wf4cy.jpg


I realised once I'd started that there is another protector plate that is supposed to bolt in front of the dust shield. I'll need to buy a couple and whip the hubs off again.


DSCN7438_zpsizwyknhb.jpg


Today I replaced the N/S brake pipes and put new pads in. Tomorrow I'll do the O/S (and will hopefully remember to take pictures - It didn't go well and I was in a bad mood :oops:).

I drained the engine oil this evening and I've left it dripping overnight. Tomorrow I'll de-grease the sump and try that magic repair putty on the rust hole :thumbup:.

Life is a constant rush these days. I've still got my elder daughter's RAV4 in the garage - but its starting to come together now :thumbup:.

DSCN7334_zpsnjfoo1xs.jpg


DSCN7340_zpsyj7dc4pt.jpg


DSCN7341_zpsyogmcti2.jpg


I'm sick of the sight of this damn thing and want it gone (and my Focus Estate back!). Hopefully it will actually work when I get it assembled :lol:.

Bob.
 
Made a start on the frame to mount the front runner table to the swing out carrier. (No pics yet) nice simple frame that the table bolts to, will need to drill a couple of holes in the Kaymar to secure it.
The table can be mounted and left on as just enough space if slide the wood section out and store in the boot.
 
Back on the '100' as planned, I de-greased the sump and cleaned-off rust and paint around the drain plug with a Black and Decker Power File (13mm-wide belt sander). The rust patch was very evident so I guess there has been some water in the sump oil at some point in its life.

I then cut a length of magic putty and kneaded the two constituents together (grey outer, brown inner) to give a consistent mix, then carefully applied it to the sump. I put an old drain plug in while I was doing this.

When all done I put the new drain plug in ant took pictures:


DSCN7440_zpscmhbmmje.jpg


This was yesterday morning; at around 20:00 hrs I checked it, it was very firm so I gave it a coat of black gloss spray and filled the sump with oil.

Time will tell if it has worked but I'll buy a new sump from Amayama in the next month or so and fit it in the Summer. This is not the only rust patch (but the only one that was leaking).

Then I concentrated on replacing brake pipes and disk pads. I use Cupro/Nickel pipe and cover the exposed length in neoprene tube. I removed the small thin steel brackets, cleaned them up and gave them two coats of silver Smoothrite. hopefully they will last another couple of years.

DSCN7444_zpsrsfwscts.jpg


DSCN7445_zpszahbcvsu.jpg


When replacing the O/S disk pads I found that the lower outer piston was seized. The other three were free so I put the new pad on the inner side, stuck a full-width piece of wood between the outer upper and the disk and a half-width piece of wood between the stuck lower outer and the disk.

With the ignition on the brake pedal easily pushed the piston out. Then it was a matter of removing the rubber boot and cleaning the piston wall with a small toothbrush and brake fluid.

Repeatedly pushing it back, pumping it out, giving it a scrub and pushing it back had it free - but it took a couple of hours of messing about.

All well now and the brakes are bled and feel tight.

MOT on Tuesday :angry-screaming: .

Bob.
 
Some of this stuff would likely be a godsend to you Bob http://mooneyboats.ie/shop/marine-chandlery/dychem-cleaning-products/super-limate-rust-remover

Its expensive for what i would call concentrated bleach but if domestos kills all known germs this stuff would kill a horse . It stings your skin and likes to suffocate and damn it hurts if you get it in your eye but if you put a bit on a rusty nut it will start sizzling away very quickly .

I reckon i've saved myself a lot of snapped bolts using a 2 shots at 5 minute intervals and 15 minutes its ready to come out with this stuff .
 
Thought id share with you all something a little different from landcruiser axles. This is what im currently on with at work, changing the axle ratios on a heavy haulage unit. Ive had to change the hub reductions on all 4 hubs. Its a bit different to a conventional drive system as at the end of the halfshaft sits a gear called the sun which then drives 5 planet gears which all sit in a outer ring gear called the annulas. Been an interesting task. Could fit something similar to the cruiser for ultra low gear! Maybe not as theres £7000 worth of parts haha

IMG_20170422_110653[1].jpg IMG_20170422_110727[1].jpg IMG_20170422_110740[1].jpg IMG_20170422_110811[1].jpg
 
My usual pre-MOT inspection revealed the front ARB outer bushes were shot with quite a bit of play at the bar ends. I bought a kit for front and rear around 18 months ago from Milners and only replaced the rears at the time as fronts were OK so the parts were sat in the garage waiting. All the bolts and nuts came off easily with just a small amount of surface rust at bar ends and mounts so greased them up with Corrosion Block. I'm using this stuff instead of the wax based treatments which I've gone right off personally.
 
Another MOT come and gone and no advisories. Hard to believe it's a year since the last one, is it just an age thing? :lol:
 
Back
Top